This is the multi-page printable view of this section. Click here to print.
Development
- 1: Contribute
- 1.1: Getting Started With Contributing
- 1.2: Contributing new content
- 1.2.1: GitHub Workflow
- 1.2.2: Pull Request Process
- 1.2.3: Adding Documentation
- 1.2.4: Suggesting content improvements
- 1.3: United Manufacturing Hub
- 1.3.1: Setup Local Environment
- 1.3.2: Coding Conventions
- 1.3.3: Automation Tools
- 1.3.4: Release Process
- 1.4: Documentation
- 1.4.1: Setup Local Environment
- 1.4.2: Write a new topic
- 1.4.3: Style Overview
- 1.4.3.1: Content Guide
- 1.4.3.2: Style Guide
- 1.4.3.3: Diagram Guide
- 1.4.3.4: Custom Hugo Shortcodes
- 1.4.4: Localizing UMH documentation
- 1.4.5: Versioning Documentation
- 2: Debugging using fgtrace
1 - Contribute
Welcome
Welcome to the United Manufacturing Hub project! We’re excited that you want to contribute to the project. The following documents cover some important aspects of contributing to the United Manufacturing Hub or its documentation.
UMH Systems welcomes improvements from all contributors, new and experienced!
The first place to start is the Getting Started With Contributing page. It provides a high-level overview of the contribution process.
1.1 - Getting Started With Contributing
Welcome
This document is the single source of truth for how to contribute to the code base. Feel free to browse the open issues and file new ones, all feedback is welcome!
Prerequisites
Before you begin contributing, you should first complete the following prerequisites:
Create a GitHub account
Before you get started, you will need to sign up for a GitHub user account.
Sign the Contributor License Agreement
Before you can contribute to United Manufacturing Hub, you will need to sign the Contributor License Agreement.
Code of Conduct
Please make sure to read and observe the Code of Conduct.
Setting up your development environment
The development environment changes depending on the type of contribution you want to make.
If you plan to contribute documentation changes, you can use the GitHub UI to edit the files. Otherwise, you can follow the instructions in the documentation to set up your environment.
If you plan to contribute code changes, review the developer resources page for how to set up your environment.
Find something to work on
The first step to getting starting contributing to United Manufacturing Hub is to find something to work on. Help is always welcome, and no contribution is too small!
Here are some things you can do today to get started contributing:
- Help improve the United Manufacturing Hub documentation
- Clarify code, variables, or functions that can be renamed or commented on
- Write test coverage
- If the above suggestions don’t appeal to you, you can browse the issues labeled as a good first issue to see who is looking for help.
Look at the issue section of any of our repositories to find issues that are currently open. Don’t be afraid to ask questions if you are interested in contributing to a specific issue. When you find something you want to work on, you can assign the issue to yourself.
Make your changes
Once you have found something to work on, you can start making your changes. Follow the contributing guidelines.
Open a pull request
Once you have made your changes, you can submit them for review. You can do this by creating a pull request (PR) against the main branch of the repository.
Code review
Once you have submitted your changes, a maintainer will review your changes and provide feedback.
As a community we believe in the value of code review for all contributions. Code review increases both the quality and readability of our codebase, which in turn produces high quality software.
See the pull request documentation for more information on code review.
Expect reviewers to request that you avoid common go style mistakes in your PRs.
Best practices
- Write clear and meaningful git commit messages.
- If the PR will completely fix a specific issue, include fixes #123 in the PR body (where 123 is the specific issue number the PR will fix). This will automatically close the issue when the PR is merged.
- Make sure you don’t include @mentions or fixes keywords in your git commit messages. These should be included in the PR body instead.
- When you make a PR for small change (such as fixing a typo, style change, or grammar fix), please squash your commits so that we can maintain a cleaner git history.
- Make sure you include a clear and detailed PR description explaining the reasons for the changes, and ensuring there is sufficient information for the reviewer to understand your PR.
- Additional Readings:
Testing
Testing is the responsibility of all contributors. It is important to ensure that all code is tested and that all tests pass. This ensures that the code base is stable and reliable.
There are multiple type of tests. The location of the test code vaires with type, as do the specifics of the environment needed to succesfully run the test:
- Unit: these confirm that a particular function behaves as intended. Golang includes a native ability for unit testing via the testing package. Unit test source code can be found adjacent tot the corresponding source code within a given package. These are easily run by any developer on any OS.
- Integration: these tests cover interactions of package components or interactions between UMH components and some external system. An example would be testing whether a piece of code can correctly store data in tha database. Running these tests can require the developer to set up additional functionality on their development system.
- End-to-end (“e2e”): these are broad test of overall system behavior and coherence. These are more complicated as they require a functional Kubernetes cluster. There are some e2e tests running in pipelines, and if your changes require e2e tests, you will need to add them to the pipeline. You can find more information about the CI pipelines in the CI documentation.
Documentation
Documentation is an important part of any project. It is important to ensure that all code is documented and that all documentation is up to date.
Learn more about how to contribute to the documentation on the documentation contributor guide.
1.2 - Contributing new content
1.2.1 - GitHub Workflow
1. Fork in the cloud
- Go to the repository page.
- Click
Forkbutton (top right) to establish a cloud-based fork.
2. Clone fork to local storage
Per Go’s workspace instructions,
place United Manufacturing Hub’s code on your GOPATH using the following cloning procedure.
In your shell, define a local working directory as working_dir. If your GOPATH
has multiple paths, pick just one and use it instead of $GOPATH. You must follow
exactly this pattern, neither $GOPATH/src/github.com/${your github profile name}/
nor any other pattern will work.
export working_dir="$(go env GOPATH)/src/github.com/"
Set user to match your github profile name:
export user=<your github profile name>
Both $working_dir and $user are mentioned in the figure above.
Create your clone:
mkdir -p $working_dir
cd $working_dir
git clone https://github.com/$user/united-manufacturing-hub.git
# or: git clone [email protected]:$user/united-manufacturing-hub.git

cd $working_dir/united-manufacturing-hub
git remote add origin https://github.com/united-manufacturing-hub/united-manufacturing-hub.git
# or: git remote add upstream [email protected]:united-manufacturing-hub/united-manufacturing-hub.git

# Never push to upstream master
git remote set-url --push origin no_push

# Confirm that your remotes make sense:
git remote -v
3. Create a Working Branch
Get your local master up to date.
cd $working_dir/united-manufacturing-hub
git fetch origin
git checkout main
git rebase origin/main
Create your new branch.
git checkout -b myfeature
You may now edit files on the myfeature branch.
4. Keep your branch in sync
You will need to periodically fetch changes from the origin
repository to keep your working branch in sync.
Make sure your local repository is on your working branch and run the following commands to keep it in sync:
git fetch origin
git rebase origin/main
Please don’t use git pull instead of the above fetch and
rebase. Since git pull executes a merge, it creates merge commits. These make
the commit history messy and violate the principle that commits ought to be
individually understandable and useful (see below).
You might also consider changing your .git/config file via
git config branch.autoSetupRebase always to change the behavior of git pull,
or another non-merge option such as git pull --rebase.
5. Commit Your Changes
You will probably want to regularly commit your changes. It is likely that you will go back and edit, build, and test multiple times. After a few cycles of this, you might amend your previous commit.
git commit
6. Push to GitHub
When your changes are ready for review, push your working branch to your fork on GitHub.
git push -f <your_remote_name> myfeature
7. Create a Pull Request
- Visit your fork at
https://github.com/<user>/united-manufacturing-hub - Click the Compare & Pull Request button next to your
myfeaturebranch. - Check out the pull request process for more details and advice.
Get a code review
Once your pull request has been opened it will be assigned to one or more reviewers. Those reviewers will do a thorough code review, looking for correctness, bugs, opportunities for improvement, documentation and comments, and style.
Commit changes made in response to review comments to the same branch on your fork.
Very small PRs are easy to review. Very large PRs are very difficult to review.
Squash commits
After a review, prepare your PR for merging by squashing your commits.
All commits left on your branch after a review should represent meaningful milestones or units of work. Use commits to add clarity to the development and review process.
Before merging a PR, squash the following kinds of commits:
- Fixes/review feedback
- Typos
- Merges and rebases
- Work in progress
Aim to have every commit in a PR compile and pass tests independently if you can,
but it’s not a requirement. In particular, merge commits must be removed, as
they will not pass tests.
To squash your commits, perform an interactive rebase:
Check your git branch:
git statusThe output should be similar to this:
On branch your-contribution
Your branch is up to date with 'origin/your-contribution'.
Start an interactive rebase using a specific commit hash, or count backwards from your last commit using
HEAD~<n>, where<n>represents the number of commits to include in the rebase.git rebase -i HEAD~3The output should be similar to this:
pick 2ebe926 Original commit
pick 31f33e9 Address feedback
pick b0315fe Second unit of work

# Rebase 7c34fc9..b0315ff onto 7c34fc9 (3 commands)
#
# Commands:
# p, pick <commit> = use commit
# r, reword <commit> = use commit, but edit the commit message
# e, edit <commit> = use commit, but stop for amending
# s, squash <commit> = use commit, but meld into previous commit
# f, fixup <commit> = like "squash", but discard this commit's log message

...
Use a command line text editor to change the word
picktosquashfor the commits you want to squash, then save your changes and continue the rebase:pick 2ebe926 Original commit squash 31f33e9 Address feedback pick b0315fe Second unit of work ...The output after saving changes should look similar to this:
[detached HEAD 61fdded] Second unit of work
 Date: Thu Mar 5 19:01:32 2020 +0100
 2 files changed, 15 insertions(+), 1 deletion(-)

 ...

Successfully rebased and updated refs/heads/master.
Force push your changes to your remote branch:
git push --force
For mass automated fixups such as automated doc formatting, use one or more commits for the changes to tooling and a final commit to apply the fixup en masse. This makes reviews easier.
By squashing locally, you control the commit message(s) for your work, and can separate a large PR into logically separate changes. For example: you have a pull request that is code complete and has 24 commits. You rebase this against the same merge base, simplifying the change to two commits. Each of those two commits represents a single logical change and each commit message summarizes what changes. Reviewers see that the set of changes are now understandable, and approve your PR.
Merging a commit
Once you’ve received review and approval, your commits are squashed, your PR is ready for merging.
Merging happens automatically after both a Reviewer and Approver have approved the PR. If you haven’t squashed your commits, they may ask you to do so before approving a PR.
Reverting a commit
In case you wish to revert a commit, use the following instructions.
If you have upstream write access, please refrain from using the
Revert button in the GitHub UI for creating the PR, because GitHub
will create the PR branch inside the main repository rather than inside your fork.
Create a branch and sync it with upstream.
# create a branch
git checkout -b myrevert

# sync the branch with upstream
git fetch origin
git rebase origin/main
If the commit you wish to revert is a merge commit, use this command:
# SHA is the hash of the merge commit you wish to revert
git revert -m 1 <SHA>
If it is a single commit, use this command:
# SHA is the hash of the single commit you wish to revert
git revert <SHA>
This will create a new commit reverting the changes. Push this new commit to your remote.
git push <your_remote_name> myrevertFinally, create a Pull Request using this branch.
1.2.2 - Pull Request Process
This doc explains the process and best practices for submitting a pull request to the United Manufacturing Hub project and its associated sub-repositories. It should serve as a reference for all contributors, and be useful especially to new and infrequent submitters.
Before You Submit a Pull Request
This guide is for contributors who already have a pull request to submit. If you’re looking for information on setting up your developer environment and creating code to contribute to United Manufacturing Hub, or you are a first-time contributor, see the Contributor Guide to get started.
Make sure your pull request adheres to our best practices. These include following project conventions, making small pull requests, and commenting thoroughly. Please read the more detailed section on Best Practices for Faster Reviews at the end of this doc.
The Pull Request Submit Process
Merging a pull request requires the following steps to be completed before the pull request will be merged.
- Sign the CLA (prerequisite)
- Open a pull request
- Pass all e2e tests
- Get all necessary approvals from reviewers and code owners
Marking Unfinished Pull Requests
If you want to solicit reviews before the implementation of your pull request is complete, you should hold your pull request to ensure that a maintainer does not merge it prematurely.
There are three methods to achieve this:
- You may add the
status: in-progressorstatus: on-holdlabels - You may add or remove a
WIPor[WIP]prefix to your pull request title - You may open your pull request in a draft state
While either method is acceptable, we recommend using the status: in-progress
label.
How the e2e Tests Work
United Manufacturing Hub runs a set of end-to-end tests (e2e tests) on pull requests. You can find an overview of the tests in the CI documentation.
Why was my pull request closed?
Closed pull requests are easy to recreate, and little work is lost by closing a pull request that subsequently needs to be reopened. We want to limit the total number of pull requests in flight to:
- Maintain a clean project
- Remove old pull requests that would be difficult to rebase as the underlying code has changed over time
- Encourage code velocity
Best Practices for Faster Reviews
Most of this section is not specific to United Manufacturing Hub, but it’s good to keep these best practices in mind when you’re making a pull request.
You’ve just had a brilliant idea on how to make United Manufacturing Hub better. Let’s call that idea Feature-X. Feature-X is not even that complicated. You have a pretty good idea of how to implement it. You jump in and implement it, fixing a bunch of stuff along the way. You send your pull request - this is awesome! And it sits. And sits. A week goes by and nobody reviews it. Finally, someone offers a few comments, which you fix up and wait for more review. And you wait. Another week or two go by. This is horrible.
Let’s talk about best practices so your pull request gets reviewed quickly.
Familiarize yourself with project conventions
Is the feature wanted? File a United Manufacturing Hub Enhancement Proposal
Are you sure Feature-X is something the UMH team wants or will accept? Is it implemented to fit with other changes in flight? Are you willing to bet a few days or weeks of work on it?
It’s better to get confirmation beforehand.
Even for small changes, it is often a good idea to gather feedback on an issue you filed, or even simply ask in UMH Discord channel to invite discussion and feedback from code owners.
KISS, YAGNI, MVP, etc
Sometimes we need to remind each other of core tenets of software design - Keep It Simple, You Aren’t Gonna Need It, Minimum Viable Product, and so on. Adding a feature “because we might need it later” is antithetical to software that ships. Add the things you need NOW and (ideally) leave room for things you might need later - but don’t implement them now.
Smaller Is Better: Small Commits, Small Pull Requests
Small commits and small pull requests get reviewed faster and are more likely to be correct than big ones.
Attention is a scarce resource. If your pull request takes 60 minutes to review, the reviewer’s eye for detail is not as keen in the last 30 minutes as it was in the first. It might not get reviewed at all if it requires a large continuous block of time from the reviewer.
Breaking up commits
Break up your pull request into multiple commits, at logical break points.
Making a series of discrete commits is a powerful way to express the evolution of an idea or the different ideas that make up a single feature. Strive to group logically distinct ideas into separate commits.
For example, if you found that Feature-X needed some prefactoring to fit in, make a commit that JUST does that prefactoring. Then make a new commit for Feature-X.
Strike a balance with the number of commits. A pull request with 25 commits is still very cumbersome to review, so use your best judgment.
Breaking up Pull Requests
Or, going back to our prerefactoring example, you could also fork a new branch, do the prefactoring there and send a pull request for that. If you can extract whole ideas from your pull request and send those as pull requests of their own, you can avoid the painful problem of continually rebasing.
Multiple small pull requests are often better than multiple commits. Don’t worry about flooding us with pull requests. We’d rather have 100 small, obvious pull requests than 10 unreviewable monoliths.
We want every pull request to be useful on its own, so use your best judgment on what should be a pull request vs. a commit.
As a rule of thumb, if your pull request is directly related to Feature-X and
nothing else, it should probably be part of the Feature-X pull request.
If you can explain why you are doing seemingly no-op work
(“it makes the Feature-X change easier, I promise”) we’ll probably be OK with it.
If you can imagine someone finding value independently of Feature-X, try it as a
pull request.
(Do not link pull requests by # in a commit description, because GitHub creates
lots of spam. Instead, reference other pull requests via the pull request your
commit is in.)
Open a Different Pull Request for Fixes and Generic Features
Put changes that are unrelated to your feature into a different pull request
Often, as you are implementing Feature-X, you will find bad comments, poorly named functions, bad structure, weak type-safety, etc.
You absolutely should fix those things (or at least file issues, please) - but not in the same pull request as your feature. Otherwise, your diff will have way too many changes, and your reviewer won’t see the forest for the trees.
Look for opportunities to pull out generic features
For example, if you find yourself touching a lot of modules, think about the dependencies you are introducing between packages. Can some of what you’re doing be made more generic and moved up and out of the Feature-X package? Do you need to use a function or type from an otherwise unrelated package? If so, promote! We have places for hosting more generic code.
Likewise, if Feature-X is similar in form to Feature-W which was checked in last month, and you’re duplicating some tricky stuff from Feature-W, consider prerefactoring the core logic out and using it in both Feature-W and Feature-X. (Do that in its own commit or pull request, please.)
Comments Matter
In your code, if someone might not understand why you did something (or you won’t remember why later), comment it. Many code-review comments are about this exact issue.
If you think there’s something pretty obvious that we could follow up on, add a TODO.
Read up on GoDoc - follow those general rules for comments.
Test
Nothing is more frustrating than starting a review, only to find that the tests are inadequate or absent. Very few pull requests can touch the code and NOT touch tests.
If you don’t know how to test Feature-X, please ask! We’ll be happy to help you design things for easy testing or to suggest appropriate test cases.
Squashing
Your reviewer has finally sent you feedback on Feature-X.
Make the fixups, and don’t squash yet. Put them in a new commit, and re-push. That way your reviewer can look at the new commit on its own, which is much faster than starting over.
We might still ask you to clean up your commits at the very end for the sake of
a more readable history, but don’t do this until asked: typically at the point
where the pull request would otherwise be tagged LGTM.
Each commit should have a good title line (<70 characters) and include an additional description paragraph describing in more detail the change intended.
For more information, see squash commits.
General squashing guidelines
Sausage => squash
Do squash when there are several commits to fix bugs in the original commit(s), address reviewer feedback, etc. Really we only want to see the end state, and commit message for the whole pull request.
Layers => don’t squash
Don’t squash when there are independent changes layered to achieve a single goal. For instance, writing a code munger could be one commit, applying it could be another, and adding a precommit check could be a third. One could argue they should be separate pull requests, but there’s really no way to test/review the munger without seeing it applied, and there needs to be a precommit check to ensure the munged output doesn’t immediately get out of date.
Commit Message Guidelines
PR comments are not represented in the commit history. Commits and their commit messages are the “permanent record” of the changes being done in your PR and their commit messages should accurately describe both what and why it is being done.
Commit messages are comprised of two parts; the subject and the body.
The subject is the first line of the commit message and is often the only part
that is needed for small or trivial changes.
Those may be done as “one liners” with the git commit -m or the --message
flag, but only if the what and especially why can be fully described in that few
words.
The commit message body is the portion of text below the subject when you run
git commit without the -m flag which will open the commit message for editing
in your preferred editor.
Typing a few further sentences of clarification is a useful investment in time
both for your reviews and overall later project maintenance.
This is the commit message subject

Any text here is the commit message body
Some text
Some more text
...

# Please enter the commit message for your changes. Lines starting
# with '#' will be ignored, and an empty message aborts the commit.
#
# On branch example
# Changes to be committed:
#   ...
#
Use these guidelines below to help craft a well formatted commit message. These can be largely attributed to the previous work of Chris Beams, Tim Pope, Scott Chacon and Ben Straub.
- Follow the conventional commit format
- Try to keep the subject line to 50 characters or less; do not exceed 72 characters
- Do not end the commit message subject with a period
- Use imperative mood in your commit message subject
- Add a single blank line before the commit message body
- Wrap the commit message body at 72 characters
- Do not use GitHub keywords or (@)mentions within your commit message
- Use the commit message body to explain the what and why of the commit
Follow the conventional commit format
The conventional commit format is a lightweight convention on top of commit messages. It provides an easy set of rules for creating an explicit commit history; which makes it easier to write automated tools on top of.
The commit message should be structured as follows:
<type>[optional scope]: <description>

[optional body]

[optional footer(s)]
The type and description fields are mandatory, the scope field is optional.
The body and footer are optional and can be used to provide additional
context.
Find more information on the conventional commits website.
Try to keep the subject line to 50 characters or less; do not exceed 72 characters
The 50 character limit for the commit message subject line acts as a focus to keep the message summary as concise as possible. It should be just enough to describe what is being done.
The hard limit of 72 characters is to align with the max body size.
When viewing the history of a repository with git log, git will pad the body
text with additional blank spaces.
Wrapping the width at 72 characters ensures the body text will be centered and
easily viewable on an 80-column terminal.
Do not end the commit message subject with a period
This is primary intended to serve as a space saving measure, but also aids in driving the subject line to be as short and concise as possible.
Use imperative mood in your commit message subject
Imperative mood can be be thought of as a “giving a command”; it is a present-tense statement that explicitly describes what is being done.
Good Examples:
- fix: x error in y
- feat: add foo to bar
- Revert commit “baz”
- docs: update pull request guidelines
Bad Examples:
- fix: Fixed x error in y
- feat: Added foo to bar
- Reverting bad commit “baz”
- docs: Updating the pull request guidelines
- Fixing more things
Add a single blank line before the commit message body
Git uses the blank line to determine which portion of the commit message is the subject and body. Text preceding the blank line is the subject, and text following is considered the body.
Wrap the commit message body at 72 characters
The default column width for git is 80 characters. Git will pad the text of the message body with an additional 4 spaces when viewing the git log. This would leave you with 76 available spaces for text, however the text would be “lop-sided”. To center the text for better viewing, the other side is artificially padded with the same amount of spaces, resulting in 72 usable characters per line. Think of them as the margins in a word doc.
Do not use GitHub keywords or (@)mentions within your commit message
GitHub Keywords
Using GitHub keywords followed by a #<issue number> reference within your
commit message will automatically apply the do-not-merge/invalid-commit-message
label to your PR preventing it from being merged.
GitHub keywords in a PR to close issues is considered a convenience item, but can have unexpected side-effects when used in a commit message; often closing something they shouldn’t.
Blocked Keywords:
- close
- closes
- closed
- fix
- fixes
- fixed
- resolve
- resolves
- resolved
(@)Mentions
(@)mentions within the commit message will send a notification to that user, and will continually do so each time the PR is updated.
Use the commit message body to explain the what and why of the commit
Commits and their commit messages are the “permanent record” of the changes being done in your PR. Describing why something has changed and what effects it may have. You are providing context to both your reviewer and the next person that has to touch your code.
If something is resolving a bug, or is in response to a specific issue, you can link to it as a reference with the message body itself. These sorts of breadcrumbs become essential when tracking down future bugs or regressions and further help explain the “why” the commit was made.
Additional Resources:
- How to Write a Git Commit Message - Chris Beams
- Distributed Git - Contributing to a Project (Commit Guidelines)
- What’s with the 50/72 rule? - Preslav Rachev
- A Note About Git Commit Messages - Tim Pope
It’s OK to Push Back
Sometimes reviewers make mistakes. It’s OK to push back on changes your reviewer requested. If you have a good reason for doing something a certain way, you are absolutely allowed to debate the merits of a requested change. Both the reviewer and reviewee should strive to discuss these issues in a polite and respectful manner.
You might be overruled, but you might also prevail. We’re pretty reasonable people.
Another phenomenon of open-source projects (where anyone can comment on any issue) is the dog-pile - your pull request gets so many comments from so many people it becomes hard to follow. In this situation, you can ask the primary reviewer (assignee) whether they want you to fork a new pull request to clear out all the comments. You don’t HAVE to fix every issue raised by every person who feels like commenting, but you should answer reasonable comments with an explanation.
Common Sense and Courtesy
No document can take the place of common sense and good taste. Use your best judgment, while you put a bit of thought into how your work can be made easier to review. If you do these things your pull requests will get merged with less friction.
Trivial Edits
Each incoming Pull Request needs to be reviewed, checked, and then merged.
While automation helps with this, each contribution also has an engineering cost. Therefore it is appreciated if you do NOT make trivial edits and fixes, but instead focus on giving the entire file a review.
If you find one grammatical or spelling error, it is likely there are more in that file, you can really make your Pull Request count by checking the formatting, checking for broken links, and fixing errors and then submitting all the fixes at once to that file.
Some questions to consider:
- Can the file be improved further?
- Does the trivial edit greatly improve the quality of the content?
1.2.3 - Adding Documentation
To contribute new content pages or improve existing content pages, open a pull request (PR). Make sure you follow all the general contributing guidelines in the Getting started section, as well as the documentation specific guidelines.
If your change is small, or you’re unfamiliar with git, read Changes using GitHub to learn how to edit a page.
If your changes are large, read Work from a local fork to learn how to make changes locally on your computer.
Contributing basics
- Write United Manufacturing Hub documentation in Markdown and build the UMH docs site using Hugo.
- The source is in GitHub.
- Page content types describe the presentation of documentation content in Hugo.
- You can use Docsy shortcodes or custom Hugo shortcodes to contribute to UMH documentation.
- In addition to the standard Hugo shortcodes, we use a number of custom Hugo shortcodes in our documentation to control the presentation of content.
- Documentation source is available in multiple languages in
/content/. Each language has its own folder with a two-letter code determined by the ISO 639-1 standard . For example, English documentation source is stored in/content/en/docs/. - For more information about contributing to documentation in multiple languages or starting a new translation, see localization.
Changes using GitHub
If you’re less experienced with git workflows, here’s an easier method of opening a pull request. Figure 1 outlines the steps and the details follow.
Contributor]) --- id1[(umh/umh.docs.umh.app
GitHub)] subgraph tasks[Changes using GitHub] direction TB 0[ ] -.- 1[1. Edit this page] --> 2[2. Use GitHub markdown
editor to make changes] 2 --> 3[3. fill in Propose file change] end subgraph tasks2[ ] direction TB 4[4. select Propose file change] --> 5[5. select Create pull request] --> 6[6. fill in Open a pull request] 6 --> 7[7. select Create pull request] end id1 --> tasks --> tasks2 classDef grey fill:#dddddd,stroke:#ffffff,stroke-width:px,color:#000000, font-size:15px; classDef white fill:#ffffff,stroke:#000,stroke-width:px,color:#000,font-weight:bold classDef k8s fill:#326ce5,stroke:#fff,stroke-width:1px,color:#fff; classDef spacewhite fill:#ffffff,stroke:#fff,stroke-width:0px,color:#000 class A,1,2,3,4,5,6,7 grey class 0 spacewhite class tasks,tasks2 white class id1 k8s
Figure 1. Steps for opening a PR using GitHub.
On the page where you see the issue, select the Edit this page option in the right-hand side navigation panel.
Make your changes in the GitHub markdown editor.
Below the editor, fill in the Propose file change form. In the first field, give your commit message a title. In the second field, provide a description.
Do not use any GitHub Keywords in your commit message. You can add those to the pull request description later.
Select Propose file change.
Select Create pull request.
The Open a pull request screen appears. Fill in the form:
- The Subject field of the pull request defaults to the commit summary. You can change it if needed.
- The Body contains your extended commit message, if you have one, and some template text. Add the details the template text asks for, then delete the extra template text.
- Leave the Allow edits from maintainers checkbox selected.
PR descriptions are a great way to help reviewers understand your change. For more information, see Opening a PR.
Select Create pull request.
Addressing feedback in GitHub
Before merging a pull request, UMH community members review and approve it. If you have someone specific in mind, leave a comment with their GitHub username in it.
If a reviewer asks you to make changes:
- Go to the Files changed tab.
- Select the pencil (edit) icon on any files changed by the pull request.
- Make the changes requested.
- Commit the changes.
When your review is complete, a reviewer merges your PR and your changes go live a few minutes later.
Work from a local fork
If you’re more experienced with git, or if your changes are larger than a few lines, work from a local fork.
Make sure you setup your local environment before you start.
Figure 2 shows the steps to follow when you work from a local fork. The details for each step follow.
repository] --> 2[Create local clone
and set upstream] subgraph changes[Your changes] direction TB S[ ] -.- 3[Create a branch
example: my_new_branch] --> 3a[Make changes using
text editor] --> 4["Preview your changes
locally using Hugo
(localhost:1313)"] end subgraph changes2[Commit / Push] direction TB T[ ] -.- 5[Commit your changes] --> 6[Push commit to
origin/my_new_branch] end 2 --> changes --> changes2 classDef grey fill:#dddddd,stroke:#ffffff,stroke-width:px,color:#000000, font-size:15px; classDef white fill:#ffffff,stroke:#000,stroke-width:px,color:#000,font-weight:bold classDef k8s fill:#326ce5,stroke:#fff,stroke-width:1px,color:#fff; classDef spacewhite fill:#ffffff,stroke:#fff,stroke-width:0px,color:#000 class 1,2,3,3a,4,5,6 grey class S,T spacewhite class changes,changes2 white
Figure 2. Working from a local fork to make your changes.
Fork the united-manufacturing-hub/umh.docs.umh.app repository
- Navigate to the united-manufacturing-hub/umh.docs.umh.app repository.
- Select Fork.
Fetch commits
Before proceeding, verify that your environment is setup correctly.
Confirm your
originandupstreamrepositories:git remote -vOutput is similar to:
origin  https://github.com/<github_username>/umh.docs.umh.app.git (fetch)
origin  https://github.com/<github_username>/umh.docs.umh.app.git (push)
upstream        https://github.com/united-manufacturing-hub/umh.docs.umh.app.git (fetch)
upstream        no_push (push)
Fetch commits from your fork’s
origin/mainandunited-manufacturing-hub/umh.docs.umh.app’supstream/main:git fetch origin git fetch upstreamThis makes sure your local repository is up to date before you start making changes.
Create a branch
Decide which branch base to your work on:
- For improvements to existing content, use
upstream/main. - For new content about existing features, use
upstream/main. - For localized content, use the localization’s conventions. For more information, see localizing United Manufacturing Hub documentation.
- It is helpful to name branches like [Purpose]/[ID]/[Title] where Purpose is docs, feat, or fix and ID is the issue identifier (or xxx if there is no related issue).
If you need help choosing a branch, reach out on the Discord channel.
- For improvements to existing content, use
Create a new branch based on the branch identified in step 1. This example assumes the base branch is
upstream/main:git checkout -b <my_new_branch> upstream/mainMake your changes using a text editor.
At any time, use the git status command to see what files you’ve changed.
Commit your changes
When you are ready to submit a pull request, commit your changes.
In your local repository, check which files you need to commit:
git statusOutput is similar to:
On branch <my_new_branch>
Your branch is up to date with 'origin/<my_new_branch>'.

Changes not staged for commit:
(use "git add <file>..." to update what will be committed)
(use "git checkout -- <file>..." to discard changes in working directory)

modified:   content/en/docs/development/contribute/new-content/add-documentation.md

no changes added to commit (use "git add" and/or "git commit -a")
Add the files listed under Changes not staged for commit to the commit:
git add <your_file_name>Repeat this for each file.
After adding all the files, create a commit:
git commit -m "Your commit message"Do not use any GitHub Keywords in your commit message. You can add those to the pull request description later.
Push your local branch and its new commit to your remote fork:
git push origin <my_new_branch>
Preview your changes locally
It’s a good idea to preview your changes locally before pushing them or opening a pull request. A preview lets you catch build errors or markdown formatting problems.
Install and use the hugo command on your computer:
Install Hugo.
If you have not updated your website repository, the
website/themes/docsydirectory is empty. The site cannot build without a local copy of the theme. To update the website theme, run:git submodule update --init --recursive --depth 1In a terminal, go to your United Manufacturing Hub website repository and start the Hugo server:
cd <path_to_your_repo>/umh.docs.umh.app
hugo server --buildFuture
Alternatively, if you have installed GNU make and GNU awk:
cd <path_to_your_repo>
make serve
In a web browser, navigate to
https://localhost:1313. Hugo watches the changes and rebuilds the site as needed.To stop the local Hugo instance, go back to the terminal and type
Ctrl+C, or close the terminal window.
Open a pull request from your fork to united-manufacturing-hub/umh.docs.umh.app
Figure 3 shows the steps to open a PR from your fork to the umh/umh.docs.umh.app. The details follow.
head repository drop-down menu] end subgraph second [ ] direction TB 5[5. Select your branch from
the compare drop-down menu] --> 6[6. Select Create Pull Request] 6 --> 7[7. Add a description
to your PR] 7 --> 8[8. Select Create pull request] end first --> second classDef grey fill:#dddddd,stroke:#ffffff,stroke-width:px,color:#000000, font-size:15px; classDef white fill:#ffffff,stroke:#000,stroke-width:px,color:#000,font-weight:bold class 1,2,3,4,5,6,7,8 grey class first,second white
Figure 3. Steps to open a PR from your fork to the umh/umh.docs.umh.app.
In a web browser, go to the united-manufacturing-hub/umh.docs.umh.app repository.
Select New Pull Request.
Select compare across forks.
From the head repository drop-down menu, select your fork.
From the compare drop-down menu, select your branch.
Select Create Pull Request.
Add a description for your pull request:
Title (50 characters or less): Summarize the intent of the change.
Description: Describe the change in more detail.
- If there is a related GitHub issue, include
Fixes #12345orCloses #12345in the description. GitHub’s automation closes the mentioned issue after merging the PR if used. If there are other related PRs, link those as well. - If you want advice on something specific, include any questions you’d like reviewers to think about in your description.
- If there is a related GitHub issue, include
Select the Create pull request button.
Congratulations! Your pull request is available in Pull requests.
After opening a PR, GitHub runs automated tests and tries to deploy a preview using Cloudflare Pages.
- If the Cloudflare Page build fails, select Details for more information.
- If the Cloudflare Page build succeeds, select Details opens a staged version of the United Manufacturing Hub website with your changes applied. This is how reviewers check your changes.
You should also add labels to your PR.
Addressing feedback locally
After making your changes, amend your previous commit:
git commit -a --amend-a: commits all changes--amend: amends the previous commit, rather than creating a new one
Update your commit message if needed.
Use
git push origin <my_new_branch>to push your changes and re-run the Cloudflare tests.If you use
git commit -minstead of amending, you must squash your commits before merging.
Changes from reviewers
Sometimes reviewers commit to your pull request. Before making any other changes, fetch those commits.
Fetch commits from your remote fork and rebase your working branch:
git fetch origin
git rebase origin/<your-branch-name>
After rebasing, force-push new changes to your fork:
git push --force-with-lease origin <your-branch-name>
Merge conflicts and rebasing
For more information, see Git Branching - Basic Branching and Merging, Advanced Merging, or ask in the Discord channel for help.
If another contributor commits changes to the same file in another PR, it can create a merge conflict. You must resolve all merge conflicts in your PR.
Update your fork and rebase your local branch:
git fetch origin
git rebase origin/<your-branch-name>
Then force-push the changes to your fork:
git push --force-with-lease origin <your-branch-name>Fetch changes from
united-manufacturing-hub/umh.docs.umh.app’supstream/mainand rebase your branch:git fetch upstream git rebase upstream/mainInspect the results of the rebase:
git statusThis results in a number of files marked as conflicted.
Open each conflicted file and look for the conflict markers:
>>>,<<<, and===. Resolve the conflict and delete the conflict marker.For more information, see How conflicts are presented.
Add the files to the changeset:
git add <filename>Continue the rebase:
git rebase --continueRepeat steps 2 to 5 as needed.
After applying all commits, the
git statuscommand shows that the rebase is complete.Force-push the branch to your fork:
git push --force-with-lease origin <your-branch-name>The pull request no longer shows any conflicts.
Squashing commits
For more information, see Git Tools - Rewriting History, or ask in the Discord channel for help.
If your PR has multiple commits, you must squash them into a single commit before merging your PR.
You can check the number of commits on your PR’s Commits tab or by running the git log
command locally.
This topic assumes vim as the command line text editor.
Start an interactive rebase:
git rebase -i HEAD~<number_of_commits_in_branch>Squashing commits is a form of rebasing. The
-iswitch tells git you want to rebase interactively.HEAD~<number_of_commits_in_branchindicates how many commits to look at for the rebase.Output is similar to:
pick d875112ca Original commit
pick 4fa167b80 Address feedback 1
pick 7d54e15ee Address feedback 2

# Rebase 3d18sf680..7d54e15ee onto 3d183f680 (3 commands)

...

# These lines can be re-ordered; they are executed from top to bottom.
The first section of the output lists the commits in the rebase. The second section lists the options for each commit. Changing the word
pickchanges the status of the commit once the rebase is complete.For the purposes of rebasing, focus on
squashandpick.For more information, see Interactive Mode.
Start editing the file.
Change the original text:
pick d875112ca Original commit
pick 4fa167b80 Address feedback 1
pick 7d54e15ee Address feedback 2
To:
pick d875112ca Original commit
squash 4fa167b80 Address feedback 1
squash 7d54e15ee Address feedback 2
This squashes commits
4fa167b80 Address feedback 1and7d54e15ee Address feedback 2intod875112ca Original commit, leaving onlyd875112ca Original commitas a part of the timeline.Save and exit your file.
Push your squashed commit:
git push --force-with-lease origin <branch_name>
1.2.4 - Suggesting content improvements
If you notice an issue with the United Manufacturing Hub or one of its components, like the documentation, or have an idea for new content, then open an issue. All you need is a GitHub account and a web browser.
In most cases, new work on the United Manufacturing Hub begins with an issue in GitHub. UMH maintainers then review, categorize and tag issues as needed. Next, you or another member of the United Manufacturing Hub community open a pull request with changes to resolve the issue.
Opening an issue
If you want to suggest improvements to existing content or notice an error, then open an issue.
- Go to the GitHub repository for the content you want to improve, like the main repository or the documentation repository.
- Click Issues, then click New issue.
- There are multiple issue templates to choose from. Choose the one that best describes your issue.
- Fill out the issue template with as many details as you can. If you have a specific suggestion for how to resolve the issue, include it in the issue description.
- Click Submit new issue.
After submitting, check in on your issue occasionally or turn on GitHub notifications. Reviewers and other community members might ask questions before they can take action on your issue.
How to file great issues
Keep the following in mind when filing an issue:
- Provide a clear issue description. Describe what specifically is missing, out of date, wrong, or needs improvement.
- Explain the specific impact the issue has on users.
- Limit the scope of a given issue to a reasonable unit of work. For problems with a large scope, break them down into smaller issues. For example, “Fix the security docs” is too broad, but “Add details to the ‘Restricting network access’ topic” is specific enough to be actionable.
- Search the existing issues to see if there’s anything related or similar to the new issue.
- If the new issue relates to another issue or pull request, refer to it
either by its full URL or by the issue or pull request number prefixed
with a
#character. For example,Introduced by #987654. - Follow the Code of Conduct. Respect your fellow contributors. For example, “The docs are terrible” is not helpful or polite feedback.
1.3 - United Manufacturing Hub
1.3.1 - Setup Local Environment
The following instructions describe how to set up your local environment for contributing to the United Manufacturing Hub.
You can use any text editor or IDE. However, we recommend using JetBrains GoLand.
Requirements
The following tools are required to contribute to the United Manufacturing Hub. Use the links to install the correct version for your operating system. We recommend using a package manager where possible (for Windows, we recommend using Chocolatey).
- Git
- Go version 1.19 or later
- Docker version 20.10 or later
- kubectl version 1.26 or later
- Helm version 3.11 or later
- k3d version 5.0 or later
- GNU C Compiler version 12 or later. The
gccbinaries must be in yourPATHenvironment variable, and the go variableCGO_ENABLEDmust be set to1. You can check this by runninggo env CGO_ENABLEDin your terminal.
Other tools that are not required, but are recommended:
- GNU make to easily run scripts
- GNU awk is used by some
makescripts - Python 3 is used by some
makescripts
Fork the documentation repository
If you are not a member of the United Manufacturing Hub organization, you will need to fork the repository to your own GitHub account. This is done by clicking the Fork button in the top-right corner of the united-manufacturing-hub/united-manufacturing-hub repository page.
Clone the repository
Clone the repository to your local machine:
git clone https://github.com/<user>/united-manufacturing-hub.git
# or: git clone [email protected]:<user>/united-manufacturing-hub.git
Where <user> is your GitHub username, or united-manufacturing-hub if
you are a member of the United Manufacturing Hub organization.
If you are not a member of the United Manufacturing Hub organization, you will need to add the upstream repository as a remote:
git remote add origin https://github.com/united-manufacturing-hub/united-manufacturing-hub.git
# or: git remote add upstream [email protected]:united-manufacturing-hub/united-manufacturing-hub.git

# Never push to upstream master
git remote set-url --push origin no_push
Install dependencies
Download the go dependencies:
make go-deps
Build the container images
These are the make targets to manage containers:
# Build the container images
make docker-build

# Push the container images
make docker-push

# Build and push the container images
make docker
You can pass the following variables to change the behavior of the make
targets:
CTR_REPO: The container repository to push the images to. Defaults toghcr.io/united-manufacturing-hub.CTR_TAG: The tag to use for the container images. Defaults tolatest.CTR_IMG: Space-separated list of container images. Defaults to all the images in thedeploymentdirectory.
Run a cluster locally
To run a local cluster, run:
# Create a cluster that runs the latest version of the United Manufacturing Hub
make cluster-install

# Create a cluster that runs the local version of the United Manufacturing Hub
make cluster-install CHART=./deployment/helm/united-manufacturing-hub
You can pass the following variables to change the behavior of the make
targets:
CLUSTER_NAME: The name of the cluster. Defaults toumh.CHART: The Helm chart to use. Defaults tounited-manufacturing-hub/united-manufacturing-hub.VERSION: The version of the Helm chart to use. Default is empty, which means the latest version.VALUES_FILE: The Helm values file to use. Default is empty, which means the default values.
Test
To run the unit tests, run:
make go-test-unit
To run e2e tests, run:
make helm-test-upgrade

# To run the upgrade test with data
make helm-test-upgrade-with-data
Other useful commands
# Display the help for the Makefile
make help

# Pass the PRINT_HELP=y flag to make to print the help for each target
make cluster-install PRINT_HELP=y
What’s next
- Read about our coding conventions.
1.3.2 - Coding Conventions
Code conventions
Bash
- https://google.github.io/styleguide/shell.xml
- Ensure that build, release, test, and cluster-management scripts run on macOS
Go
- Go Code Review Comments
- Effective Go
- Know and avoid Go landmines
- Comment your code.
- Go’s commenting conventions
- If reviewers ask questions about why the code is the way it is, that’s a sign that comments might be helpful.
- Command-line flags should use dashes, not underscores
- Naming
- Please consider package name when selecting an interface name, and avoid redundancy. For example,
storage.Interfaceis better thanstorage.StorageInterface. - Do not use uppercase characters, underscores, or dashes in package names.
- Please consider parent directory name when choosing a package name. For example,
pkg/controllers/autoscaler/foo.goshould saypackage autoscalernotpackage autoscalercontroller.- Unless there’s a good reason, the
package fooline should match the name of the directory in which the.gofile exists. - Importers can use a different name if they need to disambiguate.
- Unless there’s a good reason, the
- Locks should be called
lockand should never be embedded (alwayslock sync.Mutex). When multiple locks are present, give each lock a distinct name following Go conventions:stateLock,mapLocketc.
- Please consider package name when selecting an interface name, and avoid redundancy. For example,
Testing conventions
- All new packages and most new significant functionality must come with unit tests.
- Significant features should come with integration and/or end-to-end.
- Do not expect an asynchronous thing to happen immediately—do not wait for one second and expect a pod to be running. Wait and retry instead.
Directory and file conventions
- Avoid package sprawl. Find an appropriate subdirectory for new packages.
- Libraries with no appropriate home belong in new package subdirectories of
pkg/util.
- Libraries with no appropriate home belong in new package subdirectories of
- Avoid general utility packages. Packages called “util” are suspect. Instead, derive a name that describes your desired function. For example, the utility functions dealing with waiting for operations are in the
waitpackage and include functionality likePoll. The full name iswait.Poll. - All filenames should be lowercase.
- Go source files and directories use underscores, not dashes.
- Package directories should generally avoid using separators as much as possible. When package names are multiple words, they usually should be in nested subdirectories.
- Document directories and filenames should use dashes rather than underscores.
- Go code for normal third-party dependencies is managed using go modules.
1.3.3 - Automation Tools
Automation tools are an essential part of the United Manufacturing Hub project. They automate the building and testing of the project’s code, ensuring that it remains of high quality and stays reliable.
We rely on GitHub Actions for running the pipelines, which are defined in the
.github/workflows directory of the project’s repository.
Here’s a brief overview of each workflow:
Build Docker Images
This pipeline builds and pushes all the Docker images for the project, tagging them using the branch name or the git tag. This way there is always a tagged version for the latest release of the UMH, as well as specific version for each branch to use for testing.
It runs on push events only when relevant files have been changed, such as the Dockerfiles or the source code.
GitGuardian Scan
This pipeline scans the code for security vulnerabilities, such as exposed secrets.
It runs on both push and pull request events.
Test Deployment
Small deployment test
(deactivated for now as they were flaky. will be replaced in the future with E2E tests)
This pipeline group verifies that the current changes can be successfully installed and that data flows correctly. There are two pipelines: a “tiny” version with the minimum amount of services needed to run the stack, and a “full” version with as many services as possible.
Each pipeline has two jobs. The first job installs the stacks with the current changes, and the second job tries to upgrade from the latest stable version to the current changes.
A test is run in each workflow to verify that simulated data flows through MQTT, NodeRed, Kafka, and TimescaleDB. In the full version, an additional test for sensorconnect is run, using a mocked sensor to verify the data flow.
It runs on pull request events when the Helm configuration or the source code changes.
Full E2E test
On every push to main and staging, an E2E test is executed. More information about this can be found on Github
1.3.4 - Release Process
Releases are coordinated by the United Manufacturing Hub team. All the features and bug fixes due for a release are tracked in the internal project board.
Once all the features and bug fixes for a release are ready and merged into the
staging branch, the release process can start.
Companion
This section is for internal use at UMH.
Testing
If a new version of the Companion is ready to be released, it must be tested
before it can be published. The testing process is done in the staging
environment.
The developer can push to the staging branch all the changes that needs to be
tested, including the new version definition in the Updater and in the
version.json file. They can then use the make docker_tag GIT_TAG=<semver-tag-to-be-released> command from the Companion directory to
build and push the image. After that, from the staging environment, they can
trigger the update process.
This process will not make the changes available to the user, but keep in mind
that the tagged version could still be accidentally used. Once the testing is
done, all the changes are pushed to main and the new release is published,
the image will be overwritten with the correct one.
Preparing the Documentation
Begin by drafting new documentation within the /docs/whatsnew directory of the United Manufacturing Hub documentation repository. Your draft should comprehensively include:
- The UMH version rolled out with this release.
- The new Companion version.
- Versions of any installed plugins, such as
Benthos-UMH.
Initiate your document with an executive summary that encapsulates updates and changes across all platforms, including UMH and Companion.
Version Update Procedure
Navigate to the ManagementConsole repository and contribute a new .go file within the /updater/cmd/upgrades path. This file’s name must adhere to the semantic versioning convention of the update (e.g., 0.0.5.go).
This file should:
- Implement the
Versioninterface defined inupgrade_interface.go. - Include PreMigration and PostMigration functions. These functions should return another function that, when executed, returns nil unless specific migration tasks are necessary. This nested function structure allows for conditional execution of migration steps, as demonstrated in the PostMigration example below:
func (v *v0x0x5) PostMigration() func(version *semver.Version, clientset kubernetes.Interface) error { return func(version *semver.Version, clientset kubernetes.Interface) error { zap.S().Infof("Post-Migration 0.0.5") return nil } } - Define
GetImageVersionto return the Docker tag associated with the new version. For0.5.0this would look like:func (v *v0x0x5) GetImageVersion() *semver.Version { return semver.New(0, 0, 5, "", "") } - Specify any Kubernetes controllers (e.g., Statefulsets, Deployments) needing restart post-update in the
GetPodControllersfunction. Usually you just need to restart the companion itself, so you can use:func (v *v0x0x5) GetPodControllers() []types.KubernetesController { return []types.KubernetesController{ { Name: constants.StatefulsetName, Type: types.Statefulset, }, } }
Validate that all kubernetes objects referenced here, are designed to restart after terminating their Pod. This is especially important for Jobs.
Inside the versions.go, ensure to add your version inside the buildVersionLinkedList function.
func buildVersionLinkedList() error {
	var err error
	builderOnce.Do(func() {
		zap.S().Infof("Building version list")
		start := v0x0x1{}
		versionLinkedList = &start
		/*
		    Other previous versions
		 */

		// Our new version
		err = addVersion(&v0x0x5{})
		if err != nil {
			zap.S().Warnf("Failed to add 0.0.5 to version list: %s", err)
			return
		}
		zap.S().Infof("Build version list")
	})
	return err
}
Update the version.json in the frontend/static/version directory with the new image tag and incorporate the changelog derived from your initial documentation draft.
{
  "companion": {
    "versions": [
      {
        "semver": "0.0.1",
        "changelog": {
          "full": ["INTERNAL TESTING 0.0.1"],
          "short": "Bugfixes"
        },
        "requiresManualIntervention": false
      },

       // Other previous versions

       // Our new version
      {
        "semver": "0.0.5",
        "changelog": {
          "full": ["See 0.0.4"],
          "short": "This version is the same as 0.0.5 and is used for upgrade testing"
        },
        "requiresManualIntervention": false
      }
    ]
  }
}
Finalizing the Release
To finalize:
- Submit a PR to the documentation repository to transition the release notes from draft to final.
- Initiate a PR from the staging to the main branch within the ManagementConsole repository, ensuring to reference the documentation PR.
- Confirm the success of all test suites.
- Merge the code changes and formalize the release on GitHub, labeling it with the semantic version (e.g.,
0.0.5, excluding any precedingv). - Merge the documentation PR to publicize the new version within the official documentation.
Checklist
- Draft documentation in
/docs/whatsnewwith version details and summary. - Add new
.gofile for version update in/updater/cmd/upgrades. - Implement
Versioninterface and necessary migration functions. - Update
version.jsonwith new image tag and changelog. - Submit PR to finalize documentation.
- Create and merge PR in ManagementConsole repository, referencing documentation PR.
- Validate tests and merge code changes.
- Release new GitHub version without the
vprefix. - Merge documentation PR to publish new version details.
Helm Chart
Prerelease
The prerelease process is used to test the release before it is published. If bugs are found during the prerelease, they can be fixed and the release process can be restarted. Once the prerelease is finished, the release can be published.
Create a prerelease branch from
staging:git checkout staging git pull git checkout -b <next-version>-prerelease1Update the
versionandappVersionfields in theChart.yamlfile to the next version:version: <next-version>-prerelease1 appVersion: <next-version>-prerelease1Validate that all external docker images are correctly overwritten. This is especially important if an external chart is updated. The easiest way to do this is to run
helm templateand check the output.Navigate to the
deployment/helm-repodirectory and run the following commands:helm package ../united-manufacturing-hub helm repo index --url https://staging.united-manufacturing-hub.pages.dev --merge index.yaml .Pay attantion to use
-instead of.as a separator in<next-version>.Commit and push the changes:
git add .
git commit -m "build: <next-version>-prerelease1"
git push origin <next-version>-prerelease1
Merge prerelease branch into
staging
Test
All the new releases must be thoroughly tested before they can be published. This includes specific tests for the new features and bug fixes, as well as general tests for the whole stack.
General tests include, but are not limited to:
- Deploy the stack with flatcar
- Upgrade the stack from the previous version
- Deploy the stack on Karbon 300 and test with real sensors
If any bugs are found during the testing phase, they must be fixed and pushed to the prerelease branch. Multiple prerelease versions can be created if necessary.
Release
Once all the tests have passed, the release can be published. Merge the
prerelease branch into staging and create a new release branch.
Create a release branch from
staging:git checkout main git pull git checkout -b <next-version>Update the
versionandappVersionfields in theChart.yamlfile to the next version:version: <next-version> appVersion: <next-version>Navigate to the
deployment/helm-repodirectory and run the following commands:helm package ../united-manufacturing-hub helm repo index --url https://repo.umh.app --merge index.yaml .Commit and push the changes, tagging the release:
git add .
git commit -m "build: <next-version>"
git tag <next-version>
git push origin <next-version> --tags
Merge the release branch into
stagingMerge
stagingintomainand create a new release from the tag on GitHub.
1.4 - Documentation
Welcome
Welcome to the United Manufacturing Hub documentation! We’re excited that you want to contribute to the project.
The first place to start is the Getting Started With Contributing page. It provides a high-level overview of the contribution process.
Once you’re familiar with the contribution process, you can prepare for your first contribution by reading the documents in this section.
United Manufacturing Hub documentation contributors:
- Improve existing content
- Create new content
- Translate the documentation
- Manage and publish the documentation parts of the United Manufacturing Hub release cycle
Your first contribution
You can prepare for your first contribution by reviewing several steps beforehand. The next figure outlines the steps nad the details to follow.
UMH members] --> A[Check umh.docs.umh.app
issues list for good
first PRs] --> B[Open a PR!!] end subgraph first[Suggested Prep] direction TB T[ ] -.- D[Read contribution overview] -->E[Read UMH content
and style guides] E --> F[Learn about Hugo page
content types
and shortcodes] end first ----> second classDef grey fill:#dddddd,stroke:#ffffff,stroke-width:px,color:#000000, font-size:15px; classDef white fill:#ffffff,stroke:#000,stroke-width:px,color:#000,font-weight:bold classDef spacewhite fill:#ffffff,stroke:#fff,stroke-width:0px,color:#000 class A,B,D,E,F,G grey class S,T spacewhite class first,second white
- Read the Contribution overview to learn about the different ways you can contribute.
- Check united-manufacturing-hub/umh.docs.umh.app issues list for issues that make good entry points.
- Open a pull request using GitHub to existing documentation and learn more about filing issues in GitHub.
- Get an insight on how to setup your local environment.
- Read how to write a new topic and the UMH style overview to learn about writing documentation.
- Discover how to localize the documentation.
1.4.1 - Setup Local Environment
The following instructions describe how to set up your local environment for contributing to United Manufacturing Hub documentation website.
You can use any text editor to contribute to the documentation. However, we recommend using Visual Studio Code with the Markdown All in One extension. Additional extensions that can be useful are:
Requirements
The following tools are required to contribute to the documentation website. Use your preferred package manager to install them (for Windows users, we recommend using Chocolatey).
- Git
- Git LFS
- Hugo (Extended version) v0.111.3
- Node.js LTS v18.16.0
Other tools that are not required, but are recommended:
- GNU make to easily run scripts
Fork the documentation repository
If you are not a member of the United Manufacturing Hub organization, you will need to fork the repository to your own GitHub account. This is done by clicking the Fork button in the top-right corner of the united-manufacturing-hub/umh.docs.umh.app repository page.
Clone the repository
Clone the repository to your local machine:
git clone https://github.com/<user>/umh.docs.umh.app.git
# or: git clone [email protected]:<user>/umh.docs.umh.app.git
Where <user> is your GitHub username, or united-manufacturing-hub if
you are a member of the United Manufacturing Hub organization.
If you are not a member of the United Manufacturing Hub organization, you will need to add the upstream repository as a remote:
git remote add upstream https://github.com/united-manufacturing-hub/umh.docs.umh.app.git

# Never push to upstream master
git remote set-url --push upstream no_push
Setup the environment
If you are running on a Windows system, manually install the above required tools.
If you are running on a Linux system, or can run a bash shell, you can use the following commands to install the required tools:
cd <path_to_your_repo>
make install
Run the development server
Now it’s time to run the server locally.
Navigate to the umh.docs.umh.app directory inside the repository you cloned
earlier.
cd <path_to_your_repo>/umh.docs.umh.app
If you have not installed GNU make, run the following command:
hugo server --buildDrafts
Otherwise, run the following command:
make serve
Either method will start the local Hugo server on port 1313. Open up your browser to
http://localhost:1313 to view the website. As you make changes to the source
files, Hugo updates the website and forces a browser refresh.
You can stop the server by pressing Ctrl+C in the terminal.
What’s next
- Learn how to write a new topic.
- Get an overview of the documentation style.
1.4.2 - Write a new topic
Choosing a page type
As you prepare to write a new topic, think about the page type that would fit your content the best. We have many archetypes to choose from, and you can create a new one if none of the existing ones fit your needs.
Generally, each archetype is specific to a particular type of content. For
example, the upgrading archetype is used for pages that describe how to
upgrade to a new version of United Manufacturing Hub, and most of the content
in the Production Guide section of the docs uses the tasks archetype.
In the content guide you can find a description of the most used archetypes. If you need to create a new archetype, you can find more information in the Hugo documentation.
Choosing a directory
The directory in which you put your file is mostly determined by the page type you choose.
If you think that your topic doesn’t belong to any of the existing sections, you should first discuss with the United Manufacturing Hub team where your topic should go. They will coordinate the creation of a new section if needed.
Choosing a title and filename
Choose a title that has the keywords you want search engines to find.
Create a filename that uses the words in your title separated by hyphens.
For example, the topic with title
Access Factoryinsight Outside the Cluster
has filename access-factoryinsight-outside-cluster.md. You don’t need to put
“united manufacturing hub” in the filename, because “umh” is already in the
URL for the topic, for example:
https://umh.docs.umh.app/docs/production-guide/administration/access-factoryinsight-outside-cluster/
Adding the topic title to the front matter
In your topic, put a title field in the
front matter.
The front matter is the YAML block that is between the
triple-dashed lines at the top of the page. Here’s an example:
---
title: Access Factoryinsight Outside the Cluster
---
Most of the archetypes automatically create the page title using the filename, but always check that the title makes sense.
Creating a new page
Once you have chosen the archetype, the location, and the file name, you can
create a new page using the hugo new command. For example, to create a new page
using the tasks archetype, run the following command:
hugo new docs/production-guide/my-first-task.md -k tasks
Placing your topic in the table of contents
The table of contents is built dynamically using the directory structure of the
documentation source. The top-level directories under /content/en/docs/ create
top-level navigation, and subdirectories each have entries in the table of
contents.
Each subdirectory has a file _index.md, which represents the “home” page for
a given subdirectory’s content. The _index.md does not need a template. It
can contain overview content about the topics in the subdirectory.
Other files in a directory are sorted alphabetically by default. This is almost
never the best order. To control the relative sorting of topics in a
subdirectory, set the weight: front-matter key to an integer. Typically, we
use multiples of 10, to account for adding topics later. For instance, a topic
with weight 10 will come before one with weight 20.
You can hide a topic from the table of contents by setting toc_hide: true, and
you can hide the list of child pages at the botton of an _index.md file by
setting no_list: true.
Embedding code in your topic
If you want to include some code in your topic, you can embed the code in your file directly using the markdown code block syntax. This is recommended for the following cases (not an exhaustive list):
- The code shows the output from a command such as
kubectl get deploy mydeployment -o json | jq '.status'. - The code is not generic enough for users to try out.
- The code is an incomplete example because its purpose is to highlight a portion of a larger file.
- The code is not meant for users to try out due to other reasons.
Including code from another file
Another way to include code in your topic is to create a new, complete sample file (or group of sample files) and then reference the sample from your topic. Use this method to include sample YAML files when the sample is generic and reusable, and you want the reader to try it out themselves.
When adding a new standalone sample file, such as a YAML file, place the code in
one of the <LANG>/examples/ subdirectories where <LANG> is the language for
the topic. In your topic file, use the codenew shortcode:
{{< codenew file="<RELPATH>/my-example-yaml>" >}}
where <RELPATH> is the path to the file to include, relative to the
examples directory. The following Hugo shortcode references a YAML
file located at /content/en/examples/pods/storage/gce-volume.yaml.
{{< codenew file="pods/storage/gce-volume.yaml" >}}
Adding images to a topic
Put image files in the /static/images directory. The preferred image format is
SVG. Organize images in subdirectories under /static/images as needed.
Add images to the page using markdown image syntax:

What’s next
- Read the content guidelines.
- Learn about content styling.
1.4.3 - Style Overview
The topics in this section provide guidance on writing style, content formatting and organization, and using Hugo customizations specific to UMH documentation.
1.4.3.1 - Content Guide
In this guide, you’ll find guidelines regarding the content for the United Manufacturing Hub documentation, that is what content is allowed and how to organize it.
For information about the styling, follow the style guide, and for a quick guide to writing a new page, follow the quick start guide.
What’s allowed
United Manufacturing Hub docs allow content for third-party projects only when:
- Content documents software in the United Manufacturing Hub project
- Content documents software that’s out of project but necessary for United Manufacturing Hub to function
Sections
The United Manufacturing Hub documentation is organized into sections. Each section contains a specific set of pages that are relevant to a user goal.
Get started
The Get started section contains information to help new users get started with the United Manufacturing Hub. It’s the first section a reader sees when visiting the website, and it guides users through the installation process.
Features
The Features section contains information about the capabilities of the United Manufacturing Hub. It’s a high-level overview of the project’s features, and it’s intended for users who want to learn more about them without diving into the technical details.
Data Model
The Data Model section contains information about the data model of the United Manufacturing Hub. It’s intended for users who want to learn more about the data model of the United Manufacturing Hub and how it’s used by the different components of the project.
Architecture
The Architecture section contains technical information about the United Manufacturing Hub. It’s intended for users who want to learn more about the project’s architecture and design decisions. Here there are information about the different components of the United Manufacturing Hub and how they interact with each other.
Production Guide
The Production Guide section contains a series of guides that help users to set up and operate the United Manufacturing Hub.
What’s New
The What’s New section contains high-level overview of all the releases of the United Manufacturing Hub. Usually, only the last 3 to 4 releases are displayed in the sidebar, but all the releases are available in the section page.
Reference
The Reference section contains technical information about the different components of the United Manufacturing Hub. It’s intended for users who want to learn more about the different components of the project and how they work.
Development
The Development section contains information about contributing to the United Manufacturing Hub project. It’s intended for users who want to contribute to the project, either by writing code or documentation.
Page Organization
This site uses Hugo. In Hugo, content organization is a core concept.
Page Lists
Page Order
The documentation side menu, the documentation page browser etc. are listed using Hugo’s default sort order, which sorts by weight (from 1), date (newest first), and finally by the link title.
Given that, if you want to move a page or a section up, set a weight in the page’s front matter:
title: My Page
weight: 10
For page weights, it can be smart not to use 1, 2, 3 …, but some other interval, say 10, 20, 30… This allows you to insert pages where you want later. Additionally, each weight within the same directory (section) should not be overlapped with the other weights. This makes sure that content is always organized correctly, especially in localized content.
In some sections, like the What’s New section, it’s easier to manage the order using a negative weight. This is because the What’s New section is organized by release version, and the release version is a string, so it’s easier to use a negative weight to sort the releases in the correct order.
Side Menu
The documentation side-bar menu is built from the current section tree starting
below docs/.
It will show all sections and their pages.
If you don’t want to list a section or page, set the toc_hide flag to true
in front matter:
toc_hide: true
When you navigate to a section that has content, the specific section or page
(e.g. _index.md) is shown. Else, the first page inside that section is shown.
Page Bundles
In addition to standalone content pages (Markdown files), Hugo supports Page Bundles.
One example is Custom Hugo Shortcodes.
It is considered a leaf bundle. Everything below the directory, including the
index.md, will be part of the bundle. This also includes page-relative links,
images that can be processed etc.:
en/docs/home/contribute/includes
├── example1.md
├── example2.md
├── index.md
└── podtemplate.json
Another widely used example is the includes bundle. It sets headless: true
in front matter, which means that it does not get its own URL. It is only used
in other pages.
en/includes
├── default-storage-class-prereqs.md
├── index.md
├── partner-script.js
├── partner-style.css
├── task-tutorial-prereqs.md
├── user-guide-content-moved.md
└── user-guide-migration-notice.md
Some important notes to the files in the bundles:
- For translated bundles, any missing non-content files will be inherited from languages above. This avoids duplication.
- All the files in a bundle are what Hugo calls
Resourcesand you can provide metadata per language, such as parameters and title, even if it does not supports front matter (YAML files etc.). See Page Resources Metadata. - The value you get from
.RelPermalinkof aResourceis page-relative. See Permalinks.
Page Content Types
Hugo uses archetypes to
define page types. The archetypes are located in the archetypes directory.
Each archetype informally defines its expected page structure. There are two main archetypes, described below, but it’s possible to create new archetypes for specific page types that are frequently used.
To create a new page using an archetype, run the following command:
hugo new -k <archetype> docs/<section>/<page-name>.md
Content Types
Concept
A concept page explains some aspect of United Manufacturing Hub. For example, a concept page might describe a specific component of the United Manufacturing Hub and explain the role it plays as an application while it is deployed, scaled, and updated. Typically, concept pages don’t include sequences of steps, but instead provide links to tasks or tutorials.
To write a new concept page, create a Markdown file with the following characteristics:
Concept pages are divided into three sections:
| Page section |
|---|
| overview |
| body |
| whatsnext |
The overview and body sections appear as comments in the concept page.
You can add the whatsnext section to your page with the heading shortcode.
Fill each section with content. Follow these guidelines:
- Organize content with H2 and H3 headings.
- For
overview, set the topic’s context with a single paragraph. - For
body, explain the concept. - For
whatsnext, provide a bulleted list of topics (5 maximum) to learn more about the concept.
Task
A task page shows how to do a single thing. The idea is to give readers a sequence of steps that they can actually do as they read the page. A task page can be short or long, provided it stays focused on one area. In a task page, it is OK to blend brief explanations with the steps to be performed, but if you need to provide a lengthy explanation, you should do that in a concept topic. Related task and concept topics should link to each other.
To write a new task page, create a Markdown file with the following characteristics:
| Page section |
|---|
| overview |
| prerequisites |
| steps |
| discussion |
| whatsnext |
The overview, steps, and discussion sections appear as comments in the task page.
You can add the prerequisites and whatsnext sections to your page
with the heading shortcode.
Within each section, write your content. Use the following guidelines:
- Use a minimum of H2 headings (with two leading
#characters). The sections themselves are titled automatically by the template. - For
overview, use a paragraph to set context for the entire topic. - For
prerequisites, use bullet lists when possible. Start adding additional prerequisites below theinclude. The default prerequisites include a running Kubernetes cluster. - For
steps, use numbered lists. - For discussion, use normal content to expand upon the information covered
in
steps. - For
whatsnext, give a bullet list of up to 5 topics the reader might be interested in reading next.
For an example of a short task page, see Expose Grafana to the internet. For an example of a longer task page, see Access the database
Content Sections
Each page content type contains a number of sections defined by
Markdown comments and HTML headings. You can add content headings to
your page with the heading shortcode. The comments and headings help
maintain the structure of the page content types.
Examples of Markdown comments defining page content sections:
<!-- overview -->

<!-- body -->
To create common headings in your content pages, use the heading shortcode with
a heading string.
Examples of heading strings:
- whatsnext
- prerequisites
- objectives
- cleanup
- synopsis
- seealso
- options
For example, to create a whatsnext heading, add the heading shortcode with the “whatsnext” string:
## {{% heading "whatsnext" %}}
You can declare a prerequisites heading as follows:
## {{% heading "prerequisites" %}}
The heading shortcode expects one string parameter.
The heading string parameter matches the prefix of a variable in the i18n/<lang>.toml files.
For example:
i18n/en.toml:
[heading_whatsnext]
other = "What's next"
What’s next
- Read the Style guide.
1.4.3.2 - Style Guide
This page gives writing style guidelines for the United Manufacturing Hub documentation. These are guidelines, not rules. Use your best judgment, and feel free to propose changes to this document in a pull request.
For additional information on creating new content for the United Manufacturing Hub documentation, read the Documentation Content Guide.
Language
The United Manufacturing Hub documentation has not been translated yet. But if you want to help with that, you can check out the localization page.
Documentation formatting standards
Use upper camel case for Kubernetes objects
When you refer specifically to interacting with a Kubernetes object, use UpperCamelCase, also known as Pascal case.
When you are generally discussing a Kubernetes object, use sentence-style capitalization.
The following examples focus on capitalization. For more information about formatting Kubernetes object names, review the related guidance on Code Style.
| Do | Don’t |
|---|---|
| The ConfigMap of … | The Config map of … |
The Volume object contains a hostPath field. | The volume object contains a hostPath field. |
| Every ConfigMap object is part of a namespace. | Every configMap object is part of a namespace. |
| For managing confidential data, consider using a Secret. | For managing confidential data, consider using the a secret. |
Use angle brackets for placeholders
Use angle brackets for placeholders. Tell the reader what a placeholder represents, for example:
Display information about a pod:
kubectl describe pod <pod-name> -n <namespace>
Use bold for user interface elements
| Do | Don’t |
|---|---|
| Click Fork. | Click “Fork”. |
| Select Other. | Select “Other”. |
Use italics to define or introduce new terms
| Do | Don’t |
|---|---|
| A cluster is a set of nodes … | A “cluster” is a set of nodes … |
| These components form the control plane. | These components form the control plane. |
Use code style for filenames, directories, and paths
| Do | Don’t |
|---|---|
Open the envars.yaml file. | Open the envars.yaml file. |
Go to the /docs/tutorials directory. | Go to the /docs/tutorials directory. |
Open the /_data/concepts.yaml file. | Open the /_data/concepts.yaml file. |
Use the international standard for punctuation inside quotes
| Do | Don’t |
|---|---|
| events are recorded with an associated “stage”. | events are recorded with an associated “stage.” |
| The copy is called a “fork”. | The copy is called a “fork.” |
Inline code formatting
Use code style for inline code, commands, and API objects
For inline code in an HTML document, use the <code> tag. In a Markdown
document, use the backtick (`).
| Do | Don’t |
|---|---|
The kubectl run command creates a Pod. | The “kubectl run” command creates a pod. |
The kubelet on each node acquires a Lease… | The kubelet on each node acquires a lease… |
A PersistentVolume represents durable storage… | A Persistent Volume represents durable storage… |
For declarative management, use kubectl apply. | For declarative management, use “kubectl apply”. |
| Enclose code samples with triple backticks. (```) | Enclose code samples with any other syntax. |
Use single backticks to enclose inline code. For example, var example = true. | Use two asterisks (**) or an underscore (_) to enclose inline code. For example, var example = true. |
| Use triple backticks before and after a multi-line block of code for fenced code blocks. | Use multi-line blocks of code to create diagrams, flowcharts, or other illustrations. |
| Use meaningful variable names that have a context. | Use variable names such as ‘foo’,‘bar’, and ‘baz’ that are not meaningful and lack context. |
| Remove trailing spaces in the code. | Add trailing spaces in the code, where these are important, because the screen reader will read out the spaces as well. |
The website supports syntax highlighting for code samples, but specifying a language is optional. Syntax highlighting in the code block should conform to the contrast guidelines.
Use code style for object field names and namespaces
| Do | Don’t |
|---|---|
Set the value of the replicas field in the configuration file. | Set the value of the “replicas” field in the configuration file. |
The value of the exec field is an ExecAction object. | The value of the “exec” field is an ExecAction object. |
Run the process as a DaemonSet in the kube-system namespace. | Run the process as a DaemonSet in the kube-system namespace. |
Use code style for command tools and component names
| Do | Don’t |
|---|---|
| The kubelet preserves node stability. | The kubelet preserves node stability. |
The kubectl handles locating and authenticating to the API server. | The kubectl handles locating and authenticating to the apiserver. |
Run the process with the certificate, kube-apiserver --client-ca-file=FILENAME. | Run the process with the certificate, kube-apiserver –client-ca-file=FILENAME. |
Starting a sentence with a component tool or component name
| Do | Don’t |
|---|---|
The kubeadm tool bootstraps and provisions machines in a cluster. | kubeadm tool bootstraps and provisions machines in a cluster. |
| The kube-scheduler is the default scheduler for United Manufacturing Hub. | kube-scheduler is the default scheduler for United Manufacturing Hub. |
Use a general descriptor over a component name
| Do | Don’t |
|---|---|
| The United Manufacturing Hub MQTT broker handles… | The HiveMQ handles… |
| To visualize data in the database… | To visualize data in TimescaleDB… |
Use normal style for string and integer field values
For field values of type string or integer, use normal style without quotation marks.
| Do | Don’t |
|---|---|
Set the value of imagePullPolicy to Always. | Set the value of imagePullPolicy to “Always”. |
Set the value of image to nginx:1.16. | Set the value of image to nginx:1.16. |
Set the value of the replicas field to 2. | Set the value of the replicas field to 2. |
Code snippet formatting
Don’t include the command prompt
| Do | Don’t |
|---|---|
| kubectl get pods | $ kubectl get pods |
Separate commands from output
Verify that the pod is running on your chosen node:
kubectl get pods --output=wide
The output is similar to this:
NAME     READY     STATUS    RESTARTS   AGE    IP           NODE
nginx    1/1       Running   0          13s    10.200.0.4   worker0
Versioning United Manufacturing Hub examples
Code examples and configuration examples that include version information should be consistent with the accompanying text.
If the information is version specific, the United Manufacturing Hub version needs to be defined in the prerequisites section of the Task template or the Tutorial template. Once the page is saved, the prerequisites section is shown as Before you begin.
To specify the United Manufacturing Hub version for a task or tutorial page, include minimum-version in the front matter of the page.
If the example YAML is in a standalone file, find and review the topics that include it as a reference. Verify that any topics using the standalone YAML have the appropriate version information defined. If a stand-alone YAML file is not referenced from any topics, consider deleting it instead of updating it.
For example, if you are writing a tutorial that is relevant to United Manufacturing Hub version 0.9.11, the front-matter of your markdown file should look something like:
---
title: <your tutorial title here>
minimum-version: 0.9.11
---
In code and configuration examples, do not include comments about alternative versions. Be careful to not include incorrect statements in your examples as comments, such as:
apiVersion: v1 # earlier versions use...
kind: Pod
...
United Manufacturing Hub word list
A list of UMH-specific terms and words to be used consistently across the site.
| Term | Usage |
|---|---|
| United Manufacturing Hub | United Manufacturing Hub should always be capitalized. |
| Management Console | Management Console should always be capitalized. |
Shortcodes
Hugo Shortcodes help create different rhetorical appeal levels.
There are multiple custom shortcodes that can be used in the United Manufacturing Hub documentation. Refer to the shortcode guide for more information.
Markdown elements
Line breaks
Use a single newline to separate block-level content like headings, lists, images, code blocks, and others. The exception is second-level headings, where it should be two newlines. Second-level headings follow the first-level (or the title) without any preceding paragraphs or texts. A two line spacing helps visualize the overall structure of content in a code editor better.
Headings and titles
People accessing this documentation may use a screen reader or other assistive technology (AT). Screen readers are linear output devices, they output items on a page one at a time. If there is a lot of content on a page, you can use headings to give the page an internal structure. A good page structure helps all readers to easily navigate the page or filter topics of interest.
| Do | Don’t |
|---|---|
| Update the title in the front matter of the page or blog post. | Use first level heading, as Hugo automatically converts the title in the front matter of the page into a first-level heading. |
| Use ordered headings to provide a meaningful high-level outline of your content. | Use headings level 4 through 6, unless it is absolutely necessary. If your content is that detailed, it may need to be broken into separate articles. |
Use pound or hash signs (#) for non-blog post content. | Use underlines (--- or ===) to designate first-level headings. |
| Use sentence case for headings in the page body. For example, Change the security context | Use title case for headings in the page body. For example, Change The Security Context |
Use title case for the page title in the front matter. For example, title: Execute Kafka Shell Scripts | Use sentence case for page titles in the front matter. For example, don’t use title: Execute Kafka shell scripts |
Paragraphs
| Do | Don’t |
|---|---|
| Try to keep paragraphs under 6 sentences. | Indent the first paragraph with space characters. For example, ⋅⋅⋅Three spaces before a paragraph will indent it. |
Use three hyphens (---) to create a horizontal rule. Use horizontal rules for breaks in paragraph content. For example, a change of scene in a story, or a shift of topic within a section. | Use horizontal rules for decoration. |
Links
| Do | Don’t |
|---|---|
| Write hyperlinks that give you context for the content they link to. For example: Certain ports are open on your machines. See Check required ports for more details. | Use ambiguous terms such as “click here”. For example: Certain ports are open on your machines. See here for more details. |
Write Markdown-style links: [link text](/URL). For example: [Hugo shortcodes](/docs/development/contribute/documentation/style/hugo-shortcodes/#table-captions) and the output is Hugo shortcodes. | Write HTML-style links: <a href="/media/examples/link-element-example.css" target="_blank">Visit our tutorial!</a>, or create links that open in new tabs or windows. For example: [example website](https://example.com){target="_blank"} |
Lists
Group items in a list that are related to each other and need to appear in a specific order or to indicate a correlation between multiple items. When a screen reader comes across a list—whether it is an ordered or unordered list—it will be announced to the user that there is a group of list items. The user can then use the arrow keys to move up and down between the various items in the list. Website navigation links can also be marked up as list items; after all they are nothing but a group of related links.
End each item in a list with a period if one or more items in the list are complete sentences. For the sake of consistency, normally either all items or none should be complete sentences.
Ordered lists that are part of an incomplete introductory sentence can be in lowercase and punctuated as if each item was a part of the introductory sentence.Use the number one (
1.) for ordered lists.Use (
+), (*), or (-) for unordered lists.Leave a blank line after each list.
Indent nested lists with four spaces (for example, ⋅⋅⋅⋅).
List items may consist of multiple paragraphs. Each subsequent paragraph in a list item must be indented by either four spaces or one tab.
Tables
The semantic purpose of a data table is to present tabular data. Sighted users can quickly scan the table but a screen reader goes through line by line. A table caption is used to create a descriptive title for a data table. Assistive technologies (AT) use the HTML table caption element to identify the table contents to the user within the page structure.
- Add table captions using Hugo shortcodes for tables.
Content best practices
This section contains suggested best practices for clear, concise, and consistent content.
Use present tense
| Do | Don’t |
|---|---|
| This command starts a proxy. | This command will start a proxy. |
Exception: Use future or past tense if it is required to convey the correct meaning.
Use active voice
| Do | Don’t |
|---|---|
| You can explore the API using a browser. | The API can be explored using a browser. |
| The YAML file specifies the replica count. | The replica count is specified in the YAML file. |
Exception: Use passive voice if active voice leads to an awkward construction.
Use simple and direct language
Use simple and direct language. Avoid using unnecessary phrases, such as saying “please.”
| Do | Don’t |
|---|---|
| To create a ReplicaSet, … | In order to create a ReplicaSet, … |
| See the configuration file. | Please see the configuration file. |
| View the pods. | With this next command, we’ll view the pods. |
Address the reader as “you”
| Do | Don’t |
|---|---|
| You can create a Deployment by … | We’ll create a Deployment by … |
| In the preceding output, you can see… | In the preceding output, we can see … |
Avoid Latin phrases
Prefer English terms over Latin abbreviations.
| Do | Don’t |
|---|---|
| For example, … | e.g., … |
| That is, … | i.e., … |
Exception: Use “etc.” for et cetera.
Patterns to avoid
Avoid using “we”
Using “we” in a sentence can be confusing, because the reader might not know whether they’re part of the “we” you’re describing.
| Do | Don’t |
|---|---|
| Version 1.4 includes … | In version 1.4, we have added … |
| United Manufacturing Hub provides a new feature for … | We provide a new feature … |
| This page teaches you how to use pods. | In this page, we are going to learn about pods. |
Avoid jargon and idioms
Some readers speak English as a second language. Avoid jargon and idioms to help them understand better.
| Do | Don’t |
|---|---|
| Internally, … | Under the hood, … |
| Create a new cluster. | Turn up a new cluster. |
Avoid statements about the future
Avoid making promises or giving hints about the future. If you need to talk about an alpha feature, put the text under a heading that identifies it as alpha information.
An exception to this rule is documentation about announced deprecations targeting removal in future versions.
Avoid statements that will soon be out of date
Avoid words like “currently” and “new.” A feature that is new today might not be considered new in a few months.
| Do | Don’t |
|---|---|
| In version 1.4, … | In the current version, … |
| The Federation feature provides … | The new Federation feature provides … |
Avoid words that assume a specific level of understanding
Avoid words such as “just”, “simply”, “easy”, “easily”, or “simple”. These words do not add value.
| Do | Don’t |
|---|---|
| Include one command in … | Include just one command in … |
| Run the container … | Simply run the container … |
| You can remove … | You can easily remove … |
| These steps … | These simple steps … |
What’s next
- Learn how to write a new topic.
- Read the Content guide.
1.4.3.3 - Diagram Guide
This guide shows you how to create, edit and share diagrams using the Mermaid
JavaScript library. Mermaid.js allows you to generate diagrams using a simple
markdown-like syntax inside Markdown files. You can also use Mermaid to
generate .svg or .png image files that you can add to your documentation.
The target audience for this guide is anybody wishing to learn about Mermaid and/or how to create and add diagrams to United Manufacturing Hub documentation.
Figure 1 outlines the topics covered in this section.
diagrams
with markdown] --> D[on-line
live editor] end A[Why are diagrams
useful?] --> m m --> N[3 x methods
for creating
diagrams] N --> T[Examples] T --> X[Styling
and
captions] X --> V[Tips] classDef box fill:#fff,stroke:#000,stroke-width:1px,color:#000; classDef spacewhite fill:#ffffff,stroke:#fff,stroke-width:0px,color:#000 class A,C,D,N,X,m,T,V box class S spacewhite %% you can hyperlink Mermaid diagram nodes to a URL using click statements click A "https://mermaid-js.github.io/mermaid-live-editor/edit/#eyJjb2RlIjoiZmxvd2NoYXJ0IExSXG4gICAgc3ViZ3JhcGggbVtNZXJtYWlkLmpzXVxuICAgIGRpcmVjdGlvbiBUQlxuICAgICAgICBTWyBdLS4tXG4gICAgICAgIENbYnVpbGQ8YnI-ZGlhZ3JhbXM8YnI-d2l0aCBtYXJrZG93bl0gLS0-XG4gICAgICAgIERbb24tbGluZTxicj5saXZlIGVkaXRvcl1cbiAgICBlbmRcbiAgICBBW1doeSBhcmUgZGlhZ3JhbXM8YnI-dXNlZnVsP10gLS0-IG1cbiAgICBtIC0tPiBOWzMgeCBtZXRob2RzPGJyPmZvciBjcmVhdGluZzxicj5kaWFncmFtc11cbiAgICBOIC0tPiBUW0V4YW1wbGVzXVxuICAgIFQgLS0-IFhbU3R5bGluZzxicj5hbmQ8YnI-Y2FwdGlvbnNdXG4gICAgWCAtLT4gVltUaXBzXVxuICAgIFxuIFxuICAgIGNsYXNzRGVmIGJveCBmaWxsOiNmZmYsc3Ryb2tlOiMwMDAsc3Ryb2tlLXdpZHRoOjFweCxjb2xvcjojMDAwO1xuICAgIGNsYXNzRGVmIHNwYWNld2hpdGUgZmlsbDojZmZmZmZmLHN0cm9rZTojZmZmLHN0cm9rZS13aWR0aDowcHgsY29sb3I6IzAwMFxuICAgIGNsYXNzIEEsQyxELE4sWCxtLFQsViBib3hcbiAgICBjbGFzcyBTIHNwYWNld2hpdGUiLCJtZXJtYWlkIjoie1xuICBcInRoZW1lXCI6IFwiZGVmYXVsdFwiXG59IiwidXBkYXRlRWRpdG9yIjpmYWxzZSwiYXV0b1N5bmMiOnRydWUsInVwZGF0ZURpYWdyYW0iOnRydWV9" _blank click C "https://mermaid-js.github.io/mermaid-live-editor/edit/#eyJjb2RlIjoiZmxvd2NoYXJ0IExSXG4gICAgc3ViZ3JhcGggbVtNZXJtYWlkLmpzXVxuICAgIGRpcmVjdGlvbiBUQlxuICAgICAgICBTWyBdLS4tXG4gICAgICAgIENbYnVpbGQ8YnI-ZGlhZ3JhbXM8YnI-d2l0aCBtYXJrZG93bl0gLS0-XG4gICAgICAgIERbb24tbGluZTxicj5saXZlIGVkaXRvcl1cbiAgICBlbmRcbiAgICBBW1doeSBhcmUgZGlhZ3JhbXM8YnI-dXNlZnVsP10gLS0-IG1cbiAgICBtIC0tPiBOWzMgeCBtZXRob2RzPGJyPmZvciBjcmVhdGluZzxicj5kaWFncmFtc11cbiAgICBOIC0tPiBUW0V4YW1wbGVzXVxuICAgIFQgLS0-IFhbU3R5bGluZzxicj5hbmQ8YnI-Y2FwdGlvbnNdXG4gICAgWCAtLT4gVltUaXBzXVxuICAgIFxuIFxuICAgIGNsYXNzRGVmIGJveCBmaWxsOiNmZmYsc3Ryb2tlOiMwMDAsc3Ryb2tlLXdpZHRoOjFweCxjb2xvcjojMDAwO1xuICAgIGNsYXNzRGVmIHNwYWNld2hpdGUgZmlsbDojZmZmZmZmLHN0cm9rZTojZmZmLHN0cm9rZS13aWR0aDowcHgsY29sb3I6IzAwMFxuICAgIGNsYXNzIEEsQyxELE4sWCxtLFQsViBib3hcbiAgICBjbGFzcyBTIHNwYWNld2hpdGUiLCJtZXJtYWlkIjoie1xuICBcInRoZW1lXCI6IFwiZGVmYXVsdFwiXG59IiwidXBkYXRlRWRpdG9yIjpmYWxzZSwiYXV0b1N5bmMiOnRydWUsInVwZGF0ZURpYWdyYW0iOnRydWV9" _blank click D "https://mermaid-js.github.io/mermaid-live-editor/edit/#eyJjb2RlIjoiZmxvd2NoYXJ0IExSXG4gICAgc3ViZ3JhcGggbVtNZXJtYWlkLmpzXVxuICAgIGRpcmVjdGlvbiBUQlxuICAgICAgICBTWyBdLS4tXG4gICAgICAgIENbYnVpbGQ8YnI-ZGlhZ3JhbXM8YnI-d2l0aCBtYXJrZG93bl0gLS0-XG4gICAgICAgIERbb24tbGluZTxicj5saXZlIGVkaXRvcl1cbiAgICBlbmRcbiAgICBBW1doeSBhcmUgZGlhZ3JhbXM8YnI-dXNlZnVsP10gLS0-IG1cbiAgICBtIC0tPiBOWzMgeCBtZXRob2RzPGJyPmZvciBjcmVhdGluZzxicj5kaWFncmFtc11cbiAgICBOIC0tPiBUW0V4YW1wbGVzXVxuICAgIFQgLS0-IFhbU3R5bGluZzxicj5hbmQ8YnI-Y2FwdGlvbnNdXG4gICAgWCAtLT4gVltUaXBzXVxuICAgIFxuIFxuICAgIGNsYXNzRGVmIGJveCBmaWxsOiNmZmYsc3Ryb2tlOiMwMDAsc3Ryb2tlLXdpZHRoOjFweCxjb2xvcjojMDAwO1xuICAgIGNsYXNzRGVmIHNwYWNld2hpdGUgZmlsbDojZmZmZmZmLHN0cm9rZTojZmZmLHN0cm9rZS13aWR0aDowcHgsY29sb3I6IzAwMFxuICAgIGNsYXNzIEEsQyxELE4sWCxtLFQsViBib3hcbiAgICBjbGFzcyBTIHNwYWNld2hpdGUiLCJtZXJtYWlkIjoie1xuICBcInRoZW1lXCI6IFwiZGVmYXVsdFwiXG59IiwidXBkYXRlRWRpdG9yIjpmYWxzZSwiYXV0b1N5bmMiOnRydWUsInVwZGF0ZURpYWdyYW0iOnRydWV9" _blank click N "https://mermaid-js.github.io/mermaid-live-editor/edit/#eyJjb2RlIjoiZmxvd2NoYXJ0IExSXG4gICAgc3ViZ3JhcGggbVtNZXJtYWlkLmpzXVxuICAgIGRpcmVjdGlvbiBUQlxuICAgICAgICBTWyBdLS4tXG4gICAgICAgIENbYnVpbGQ8YnI-ZGlhZ3JhbXM8YnI-d2l0aCBtYXJrZG93bl0gLS0-XG4gICAgICAgIERbb24tbGluZTxicj5saXZlIGVkaXRvcl1cbiAgICBlbmRcbiAgICBBW1doeSBhcmUgZGlhZ3JhbXM8YnI-dXNlZnVsP10gLS0-IG1cbiAgICBtIC0tPiBOWzMgeCBtZXRob2RzPGJyPmZvciBjcmVhdGluZzxicj5kaWFncmFtc11cbiAgICBOIC0tPiBUW0V4YW1wbGVzXVxuICAgIFQgLS0-IFhbU3R5bGluZzxicj5hbmQ8YnI-Y2FwdGlvbnNdXG4gICAgWCAtLT4gVltUaXBzXVxuICAgIFxuIFxuICAgIGNsYXNzRGVmIGJveCBmaWxsOiNmZmYsc3Ryb2tlOiMwMDAsc3Ryb2tlLXdpZHRoOjFweCxjb2xvcjojMDAwO1xuICAgIGNsYXNzRGVmIHNwYWNld2hpdGUgZmlsbDojZmZmZmZmLHN0cm9rZTojZmZmLHN0cm9rZS13aWR0aDowcHgsY29sb3I6IzAwMFxuICAgIGNsYXNzIEEsQyxELE4sWCxtLFQsViBib3hcbiAgICBjbGFzcyBTIHNwYWNld2hpdGUiLCJtZXJtYWlkIjoie1xuICBcInRoZW1lXCI6IFwiZGVmYXVsdFwiXG59IiwidXBkYXRlRWRpdG9yIjpmYWxzZSwiYXV0b1N5bmMiOnRydWUsInVwZGF0ZURpYWdyYW0iOnRydWV9" _blank click T "https://mermaid-js.github.io/mermaid-live-editor/edit/#eyJjb2RlIjoiZmxvd2NoYXJ0IExSXG4gICAgc3ViZ3JhcGggbVtNZXJtYWlkLmpzXVxuICAgIGRpcmVjdGlvbiBUQlxuICAgICAgICBTWyBdLS4tXG4gICAgICAgIENbYnVpbGQ8YnI-ZGlhZ3JhbXM8YnI-d2l0aCBtYXJrZG93bl0gLS0-XG4gICAgICAgIERbb24tbGluZTxicj5saXZlIGVkaXRvcl1cbiAgICBlbmRcbiAgICBBW1doeSBhcmUgZGlhZ3JhbXM8YnI-dXNlZnVsP10gLS0-IG1cbiAgICBtIC0tPiBOWzMgeCBtZXRob2RzPGJyPmZvciBjcmVhdGluZzxicj5kaWFncmFtc11cbiAgICBOIC0tPiBUW0V4YW1wbGVzXVxuICAgIFQgLS0-IFhbU3R5bGluZzxicj5hbmQ8YnI-Y2FwdGlvbnNdXG4gICAgWCAtLT4gVltUaXBzXVxuICAgIFxuIFxuICAgIGNsYXNzRGVmIGJveCBmaWxsOiNmZmYsc3Ryb2tlOiMwMDAsc3Ryb2tlLXdpZHRoOjFweCxjb2xvcjojMDAwO1xuICAgIGNsYXNzRGVmIHNwYWNld2hpdGUgZmlsbDojZmZmZmZmLHN0cm9rZTojZmZmLHN0cm9rZS13aWR0aDowcHgsY29sb3I6IzAwMFxuICAgIGNsYXNzIEEsQyxELE4sWCxtLFQsViBib3hcbiAgICBjbGFzcyBTIHNwYWNld2hpdGUiLCJtZXJtYWlkIjoie1xuICBcInRoZW1lXCI6IFwiZGVmYXVsdFwiXG59IiwidXBkYXRlRWRpdG9yIjpmYWxzZSwiYXV0b1N5bmMiOnRydWUsInVwZGF0ZURpYWdyYW0iOnRydWV9" _blank click X "https://mermaid-js.github.io/mermaid-live-editor/edit/#eyJjb2RlIjoiZmxvd2NoYXJ0IExSXG4gICAgc3ViZ3JhcGggbVtNZXJtYWlkLmpzXVxuICAgIGRpcmVjdGlvbiBUQlxuICAgICAgICBTWyBdLS4tXG4gICAgICAgIENbYnVpbGQ8YnI-ZGlhZ3JhbXM8YnI-d2l0aCBtYXJrZG93bl0gLS0-XG4gICAgICAgIERbb24tbGluZTxicj5saXZlIGVkaXRvcl1cbiAgICBlbmRcbiAgICBBW1doeSBhcmUgZGlhZ3JhbXM8YnI-dXNlZnVsP10gLS0-IG1cbiAgICBtIC0tPiBOWzMgeCBtZXRob2RzPGJyPmZvciBjcmVhdGluZzxicj5kaWFncmFtc11cbiAgICBOIC0tPiBUW0V4YW1wbGVzXVxuICAgIFQgLS0-IFhbU3R5bGluZzxicj5hbmQ8YnI-Y2FwdGlvbnNdXG4gICAgWCAtLT4gVltUaXBzXVxuICAgIFxuIFxuICAgIGNsYXNzRGVmIGJveCBmaWxsOiNmZmYsc3Ryb2tlOiMwMDAsc3Ryb2tlLXdpZHRoOjFweCxjb2xvcjojMDAwO1xuICAgIGNsYXNzRGVmIHNwYWNld2hpdGUgZmlsbDojZmZmZmZmLHN0cm9rZTojZmZmLHN0cm9rZS13aWR0aDowcHgsY29sb3I6IzAwMFxuICAgIGNsYXNzIEEsQyxELE4sWCxtLFQsViBib3hcbiAgICBjbGFzcyBTIHNwYWNld2hpdGUiLCJtZXJtYWlkIjoie1xuICBcInRoZW1lXCI6IFwiZGVmYXVsdFwiXG59IiwidXBkYXRlRWRpdG9yIjpmYWxzZSwiYXV0b1N5bmMiOnRydWUsInVwZGF0ZURpYWdyYW0iOnRydWV9" _blank click V "https://mermaid-js.github.io/mermaid-live-editor/edit/#eyJjb2RlIjoiZmxvd2NoYXJ0IExSXG4gICAgc3ViZ3JhcGggbVtNZXJtYWlkLmpzXVxuICAgIGRpcmVjdGlvbiBUQlxuICAgICAgICBTWyBdLS4tXG4gICAgICAgIENbYnVpbGQ8YnI-ZGlhZ3JhbXM8YnI-d2l0aCBtYXJrZG93bl0gLS0-XG4gICAgICAgIERbb24tbGluZTxicj5saXZlIGVkaXRvcl1cbiAgICBlbmRcbiAgICBBW1doeSBhcmUgZGlhZ3JhbXM8YnI-dXNlZnVsP10gLS0-IG1cbiAgICBtIC0tPiBOWzMgeCBtZXRob2RzPGJyPmZvciBjcmVhdGluZzxicj5kaWFncmFtc11cbiAgICBOIC0tPiBUW0V4YW1wbGVzXVxuICAgIFQgLS0-IFhbU3R5bGluZzxicj5hbmQ8YnI-Y2FwdGlvbnNdXG4gICAgWCAtLT4gVltUaXBzXVxuICAgIFxuIFxuICAgIGNsYXNzRGVmIGJveCBmaWxsOiNmZmYsc3Ryb2tlOiMwMDAsc3Ryb2tlLXdpZHRoOjFweCxjb2xvcjojMDAwO1xuICAgIGNsYXNzRGVmIHNwYWNld2hpdGUgZmlsbDojZmZmZmZmLHN0cm9rZTojZmZmLHN0cm9rZS13aWR0aDowcHgsY29sb3I6IzAwMFxuICAgIGNsYXNzIEEsQyxELE4sWCxtLFQsViBib3hcbiAgICBjbGFzcyBTIHNwYWNld2hpdGUiLCJtZXJtYWlkIjoie1xuICBcInRoZW1lXCI6IFwiZGVmYXVsdFwiXG59IiwidXBkYXRlRWRpdG9yIjpmYWxzZSwiYXV0b1N5bmMiOnRydWUsInVwZGF0ZURpYWdyYW0iOnRydWV9" _blank
All you need to begin working with Mermaid is the following:
- Basic understanding of markdown.
- Using the Mermaid live editor.
- Using Hugo shortcodes.
- Using the Hugo {{< figure >}} shortcode.
- Performing Hugo local previews.
- Familiar with the Contributing new content process.
Why you should use diagrams in documentation
Diagrams improve documentation clarity and comprehension. There are advantages for both the user and the contributor.
The user benefits include:
- Friendly landing spot. A detailed text-only greeting page could intimidate users, in particular, first-time United Manufacturing Hub users.
- Faster grasp of concepts. A diagram can help users understand the key points of a complex topic. Your diagram can serve as a visual learning guide to dive into the topic details.
- Better retention. For some, it is easier to recall pictures rather than text.
The contributor benefits include:
- Assist in developing the structure and content of your contribution. For example, you can start with a simple diagram covering the high-level points and then dive into details.
- Expand and grow the user community. Easily consumed documentation augmented with diagrams attracts new users who might previously have been reluctant to engage due to perceived complexities.
You should consider your target audience. In addition to experienced UMH users, you will have many who are new to United Manufacturing Hub. Even a simple diagram can assist new users in absorbing United Manufacturing Hub concepts. They become emboldened and more confident to further explore United Manufacturing Hub and the documentation.
Mermaid
Mermaid is an open source JavaScript library that allows you to create, edit and easily share diagrams using a simple, markdown-like syntax configured inline in Markdown files.
The following lists features of Mermaid:
- Simple code syntax.
- Includes a web-based tool allowing you to code and preview your diagrams.
- Supports multiple formats including flowchart, state and sequence.
- Easy collaboration with colleagues by sharing a per-diagram URL.
- Broad selection of shapes, lines, themes and styling.
The following lists advantages of using Mermaid:
- No need for separate, non-Mermaid diagram tools.
- Adheres to existing PR workflow. You can think of Mermaid code as just Markdown text included in your PR.
- Simple tool builds simple diagrams. You don’t want to get bogged down (re)crafting an overly complex and detailed picture. Keep it simple!
Mermaid provides a simple, open and transparent method for the SIG communities to add, edit and collaborate on diagrams for new or existing documentation.
You can still use Mermaid to create/edit diagrams even if it’s not supported in your environment. This method is called Mermaid+SVG and is explained below.
Live editor
The Mermaid live editor is a web-based tool that enables you to create, edit and review diagrams.
The following lists live editor functions:
- Displays Mermaid code and rendered diagram.
- Generates a URL for each saved diagram. The URL is displayed in the URL field of your browser. You can share the URL with colleagues who can access and modify the diagram.
- Option to download
.svgor.pngfiles.
Methods for creating diagrams
Figure 2 outlines the three methods to generate and add diagrams.
Mermaid code
added to .md file] C[Mermaid+SVG
Add mermaid-generated
svg file to .md file] D[External tool
Add external-tool-
generated svg file
to .md file] A --> B A --> C A --> D classDef box fill:#fff,stroke:#000,stroke-width:1px,color:#000; class A,B,C,D box %% you can hyperlink Mermaid diagram nodes to a URL using click statements click A "https://mermaid-js.github.io/mermaid-live-editor/edit/#eyJjb2RlIjoiZ3JhcGggVEJcbiAgICBBW0NvbnRyaWJ1dG9yXVxuICAgIEJbSW5saW5lPGJyPjxicj5NZXJtYWlkIGNvZGU8YnI-YWRkZWQgdG8gLm1kIGZpbGVdXG4gICAgQ1tNZXJtYWlkK1NWRzxicj48YnI-QWRkIG1lcm1haWQtZ2VuZXJhdGVkPGJyPnN2ZyBmaWxlIHRvIC5tZCBmaWxlXVxuICAgIERbRXh0ZXJuYWwgdG9vbDxicj48YnI-QWRkIGV4dGVybmFsLXRvb2wtPGJyPmdlbmVyYXRlZCBzdmcgZmlsZTxicj50byAubWQgZmlsZV1cblxuICAgIEEgLS0-IEJcbiAgICBBIC0tPiBDXG4gICAgQSAtLT4gRFxuXG4gICAgY2xhc3NEZWYgYm94IGZpbGw6I2ZmZixzdHJva2U6IzAwMCxzdHJva2Utd2lkdGg6MXB4LGNvbG9yOiMwMDA7XG4gICAgY2xhc3MgQSxCLEMsRCBib3giLCJtZXJtYWlkIjoie1xuICBcInRoZW1lXCI6IFwiZGVmYXVsdFwiXG59IiwidXBkYXRlRWRpdG9yIjpmYWxzZSwiYXV0b1N5bmMiOnRydWUsInVwZGF0ZURpYWdyYW0iOmZhbHNlfQ" _blank click B "https://mermaid-js.github.io/mermaid-live-editor/edit/#eyJjb2RlIjoiZ3JhcGggVEJcbiAgICBBW0NvbnRyaWJ1dG9yXVxuICAgIEJbSW5saW5lPGJyPjxicj5NZXJtYWlkIGNvZGU8YnI-YWRkZWQgdG8gLm1kIGZpbGVdXG4gICAgQ1tNZXJtYWlkK1NWRzxicj48YnI-QWRkIG1lcm1haWQtZ2VuZXJhdGVkPGJyPnN2ZyBmaWxlIHRvIC5tZCBmaWxlXVxuICAgIERbRXh0ZXJuYWwgdG9vbDxicj48YnI-QWRkIGV4dGVybmFsLXRvb2wtPGJyPmdlbmVyYXRlZCBzdmcgZmlsZTxicj50byAubWQgZmlsZV1cblxuICAgIEEgLS0-IEJcbiAgICBBIC0tPiBDXG4gICAgQSAtLT4gRFxuXG4gICAgY2xhc3NEZWYgYm94IGZpbGw6I2ZmZixzdHJva2U6IzAwMCxzdHJva2Utd2lkdGg6MXB4LGNvbG9yOiMwMDA7XG4gICAgY2xhc3MgQSxCLEMsRCBib3giLCJtZXJtYWlkIjoie1xuICBcInRoZW1lXCI6IFwiZGVmYXVsdFwiXG59IiwidXBkYXRlRWRpdG9yIjpmYWxzZSwiYXV0b1N5bmMiOnRydWUsInVwZGF0ZURpYWdyYW0iOmZhbHNlfQ" _blank click C "https://mermaid-js.github.io/mermaid-live-editor/edit/#eyJjb2RlIjoiZ3JhcGggVEJcbiAgICBBW0NvbnRyaWJ1dG9yXVxuICAgIEJbSW5saW5lPGJyPjxicj5NZXJtYWlkIGNvZGU8YnI-YWRkZWQgdG8gLm1kIGZpbGVdXG4gICAgQ1tNZXJtYWlkK1NWRzxicj48YnI-QWRkIG1lcm1haWQtZ2VuZXJhdGVkPGJyPnN2ZyBmaWxlIHRvIC5tZCBmaWxlXVxuICAgIERbRXh0ZXJuYWwgdG9vbDxicj48YnI-QWRkIGV4dGVybmFsLXRvb2wtPGJyPmdlbmVyYXRlZCBzdmcgZmlsZTxicj50byAubWQgZmlsZV1cblxuICAgIEEgLS0-IEJcbiAgICBBIC0tPiBDXG4gICAgQSAtLT4gRFxuXG4gICAgY2xhc3NEZWYgYm94IGZpbGw6I2ZmZixzdHJva2U6IzAwMCxzdHJva2Utd2lkdGg6MXB4LGNvbG9yOiMwMDA7XG4gICAgY2xhc3MgQSxCLEMsRCBib3giLCJtZXJtYWlkIjoie1xuICBcInRoZW1lXCI6IFwiZGVmYXVsdFwiXG59IiwidXBkYXRlRWRpdG9yIjpmYWxzZSwiYXV0b1N5bmMiOnRydWUsInVwZGF0ZURpYWdyYW0iOmZhbHNlfQ" _blank click D "https://mermaid-js.github.io/mermaid-live-editor/edit/#eyJjb2RlIjoiZ3JhcGggVEJcbiAgICBBW0NvbnRyaWJ1dG9yXVxuICAgIEJbSW5saW5lPGJyPjxicj5NZXJtYWlkIGNvZGU8YnI-YWRkZWQgdG8gLm1kIGZpbGVdXG4gICAgQ1tNZXJtYWlkK1NWRzxicj48YnI-QWRkIG1lcm1haWQtZ2VuZXJhdGVkPGJyPnN2ZyBmaWxlIHRvIC5tZCBmaWxlXVxuICAgIERbRXh0ZXJuYWwgdG9vbDxicj48YnI-QWRkIGV4dGVybmFsLXRvb2wtPGJyPmdlbmVyYXRlZCBzdmcgZmlsZTxicj50byAubWQgZmlsZV1cblxuICAgIEEgLS0-IEJcbiAgICBBIC0tPiBDXG4gICAgQSAtLT4gRFxuXG4gICAgY2xhc3NEZWYgYm94IGZpbGw6I2ZmZixzdHJva2U6IzAwMCxzdHJva2Utd2lkdGg6MXB4LGNvbG9yOiMwMDA7XG4gICAgY2xhc3MgQSxCLEMsRCBib3giLCJtZXJtYWlkIjoie1xuICBcInRoZW1lXCI6IFwiZGVmYXVsdFwiXG59IiwidXBkYXRlRWRpdG9yIjpmYWxzZSwiYXV0b1N5bmMiOnRydWUsInVwZGF0ZURpYWdyYW0iOmZhbHNlfQ" _blank
Figure 2. Methods to create diagrams.
Inline
Figure 3 outlines the steps to follow for adding a diagram using the Inline method.
to create/edit
diagram] --> B[2. Store diagram
URL somewhere] --> C[3. Copy Mermaid code
to page markdown file] --> D[4. Add caption] classDef box fill:#fff,stroke:#000,stroke-width:1px,color:#000; class A,B,C,D box %% you can hyperlink Mermaid diagram nodes to a URL using click statements click A "https://mermaid-js.github.io/mermaid-live-editor/edit/#eyJjb2RlIjoiZ3JhcGggTFJcbiAgICBBWzEuIFVzZSBsaXZlIGVkaXRvcjxicj4gdG8gY3JlYXRlL2VkaXQ8YnI-ZGlhZ3JhbV0gLS0-XG4gICAgQlsyLiBTdG9yZSBkaWFncmFtPGJyPlVSTCBzb21ld2hlcmVdIC0tPlxuICAgIENbMy4gQ29weSBNZXJtYWlkIGNvZGU8YnI-dG8gcGFnZSBtYXJrZG93biBmaWxlXSAtLT5cbiAgICBEWzQuIEFkZCBjYXB0aW9uXVxuIFxuXG4gICAgY2xhc3NEZWYgYm94IGZpbGw6I2ZmZixzdHJva2U6IzAwMCxzdHJva2Utd2lkdGg6MXB4LGNvbG9yOiMwMDA7XG4gICAgY2xhc3MgQSxCLEMsRCBib3hcbiAgICAiLCJtZXJtYWlkIjoie1xuICBcInRoZW1lXCI6IFwiZGVmYXVsdFwiXG59IiwidXBkYXRlRWRpdG9yIjpmYWxzZSwiYXV0b1N5bmMiOnRydWUsInVwZGF0ZURpYWdyYW0iOmZhbHNlfQ" _blank click B "https://mermaid-js.github.io/mermaid-live-editor/edit/#eyJjb2RlIjoiZ3JhcGggTFJcbiAgICBBWzEuIFVzZSBsaXZlIGVkaXRvcjxicj4gdG8gY3JlYXRlL2VkaXQ8YnI-ZGlhZ3JhbV0gLS0-XG4gICAgQlsyLiBTdG9yZSBkaWFncmFtPGJyPlVSTCBzb21ld2hlcmVdIC0tPlxuICAgIENbMy4gQ29weSBNZXJtYWlkIGNvZGU8YnI-dG8gcGFnZSBtYXJrZG93biBmaWxlXSAtLT5cbiAgICBEWzQuIEFkZCBjYXB0aW9uXVxuIFxuXG4gICAgY2xhc3NEZWYgYm94IGZpbGw6I2ZmZixzdHJva2U6IzAwMCxzdHJva2Utd2lkdGg6MXB4LGNvbG9yOiMwMDA7XG4gICAgY2xhc3MgQSxCLEMsRCBib3hcbiAgICAiLCJtZXJtYWlkIjoie1xuICBcInRoZW1lXCI6IFwiZGVmYXVsdFwiXG59IiwidXBkYXRlRWRpdG9yIjpmYWxzZSwiYXV0b1N5bmMiOnRydWUsInVwZGF0ZURpYWdyYW0iOmZhbHNlfQ" _blank click C "https://mermaid-js.github.io/mermaid-live-editor/edit/#eyJjb2RlIjoiZ3JhcGggTFJcbiAgICBBWzEuIFVzZSBsaXZlIGVkaXRvcjxicj4gdG8gY3JlYXRlL2VkaXQ8YnI-ZGlhZ3JhbV0gLS0-XG4gICAgQlsyLiBTdG9yZSBkaWFncmFtPGJyPlVSTCBzb21ld2hlcmVdIC0tPlxuICAgIENbMy4gQ29weSBNZXJtYWlkIGNvZGU8YnI-dG8gcGFnZSBtYXJrZG93biBmaWxlXSAtLT5cbiAgICBEWzQuIEFkZCBjYXB0aW9uXVxuIFxuXG4gICAgY2xhc3NEZWYgYm94IGZpbGw6I2ZmZixzdHJva2U6IzAwMCxzdHJva2Utd2lkdGg6MXB4LGNvbG9yOiMwMDA7XG4gICAgY2xhc3MgQSxCLEMsRCBib3hcbiAgICAiLCJtZXJtYWlkIjoie1xuICBcInRoZW1lXCI6IFwiZGVmYXVsdFwiXG59IiwidXBkYXRlRWRpdG9yIjpmYWxzZSwiYXV0b1N5bmMiOnRydWUsInVwZGF0ZURpYWdyYW0iOmZhbHNlfQ" _blank click D "https://mermaid-js.github.io/mermaid-live-editor/edit/#eyJjb2RlIjoiZ3JhcGggTFJcbiAgICBBWzEuIFVzZSBsaXZlIGVkaXRvcjxicj4gdG8gY3JlYXRlL2VkaXQ8YnI-ZGlhZ3JhbV0gLS0-XG4gICAgQlsyLiBTdG9yZSBkaWFncmFtPGJyPlVSTCBzb21ld2hlcmVdIC0tPlxuICAgIENbMy4gQ29weSBNZXJtYWlkIGNvZGU8YnI-dG8gcGFnZSBtYXJrZG93biBmaWxlXSAtLT5cbiAgICBEWzQuIEFkZCBjYXB0aW9uXVxuIFxuXG4gICAgY2xhc3NEZWYgYm94IGZpbGw6I2ZmZixzdHJva2U6IzAwMCxzdHJva2Utd2lkdGg6MXB4LGNvbG9yOiMwMDA7XG4gICAgY2xhc3MgQSxCLEMsRCBib3hcbiAgICAiLCJtZXJtYWlkIjoie1xuICBcInRoZW1lXCI6IFwiZGVmYXVsdFwiXG59IiwidXBkYXRlRWRpdG9yIjpmYWxzZSwiYXV0b1N5bmMiOnRydWUsInVwZGF0ZURpYWdyYW0iOmZhbHNlfQ" _blank
The following lists the steps you should follow for adding a diagram using the Inline method:
- Create your diagram using the live editor.
- Store the diagram URL somewhere for later access.
- Copy the mermaid code to the location in your
.mdfile where you want the diagram to appear. - Add a caption below the diagram using Markdown text.
A Hugo build runs the Mermaid code and turns it into a diagram.
You may find keeping track of diagram URLs is cumbersome. If so, make a notice note
in the .md file that the Mermaid code is self-documenting. Contributors can
copy the Mermaid code to and from the live editor for diagram edits.
Here is a sample code snippet contained in an .md file:
---
title: My PR
---
Figure 17 shows a simple A to B process.
some markdown text
...
{{< mermaid >}}
    graph TB
    A --> B
{{< /mermaid >}}

Figure 17. A to B
more text
For more details on diagram captions, see How to use captions.
The following lists advantages of the Inline method:
- Live editor tool.
- Easy to copy Mermaid code to and from the live editor and your
.mdfile. - No need for separate
.svgimage file handling. - Content text, diagram code and diagram caption contained in the same
.mdfile.
You should use the local and Cloudflare previews to verify the diagram is properly rendered.
Mermaid+SVG
Figure 4 outlines the steps to follow for adding a diagram using the Mermaid+SVG method.
to create/edit
diagram] B[2. Store diagram
URL somewhere] C[3. Generate .svg file
and download to
images/ folder] subgraph w[ ] direction TB D[4. Use figure shortcode
to reference .svg
file in page
.md file] --> E[5. Add caption] end A --> B B --> C C --> w classDef box fill:#fff,stroke:#000,stroke-width:1px,color:#000; class A,B,C,D,E,w box click A "https://mermaid-js.github.io/mermaid-live-editor/edit/#eyJjb2RlIjoiZmxvd2NoYXJ0IExSXG4gICAgQVsxLiBVc2UgbGl2ZSBlZGl0b3I8YnI-IHRvIGNyZWF0ZS9lZGl0PGJyPmRpYWdyYW1dXG4gICAgQlsyLiBTdG9yZSBkaWFncmFtPGJyPlVSTCBzb21ld2hlcmVdXG4gICAgQ1szLiBHZW5lcmF0ZSAuc3ZnIGZpbGU8YnI-YW5kIGRvd25sb2FkIHRvPGJyPmltYWdlcy8gZm9sZGVyXVxuICAgIHN1YmdyYXBoIHdbIF1cbiAgICBkaXJlY3Rpb24gVEJcbiAgICBEWzQuIFVzZSBmaWd1cmUgc2hvcnRjb2RlPGJyPnRvIHJlZmVyZW5jZSAuc3ZnPGJyPmZpbGUgaW4gcGFnZTxicj4ubWQgZmlsZV0gLS0-XG4gICAgRVs1LiBBZGQgY2FwdGlvbl1cbiAgICBlbmRcbkEgLS0-IEJcbkIgLS0-IENcbkMgLS0-IHdcblxuICAgIGNsYXNzRGVmIGJveCBmaWxsOiNmZmYsc3Ryb2tlOiMwMDAsc3Ryb2tlLXdpZHRoOjFweCxjb2xvcjojMDAwO1xuICAgIGNsYXNzIEEsQixDLEQsRSx3IGJveFxuICAgICIsIm1lcm1haWQiOiJ7XG4gIFwidGhlbWVcIjogXCJkZWZhdWx0XCJcbn0iLCJ1cGRhdGVFZGl0b3IiOmZhbHNlLCJhdXRvU3luYyI6dHJ1ZSwidXBkYXRlRGlhZ3JhbSI6dHJ1ZX0" _blank click B "https://mermaid-js.github.io/mermaid-live-editor/edit/#eyJjb2RlIjoiZmxvd2NoYXJ0IExSXG4gICAgQVsxLiBVc2UgbGl2ZSBlZGl0b3I8YnI-IHRvIGNyZWF0ZS9lZGl0PGJyPmRpYWdyYW1dXG4gICAgQlsyLiBTdG9yZSBkaWFncmFtPGJyPlVSTCBzb21ld2hlcmVdXG4gICAgQ1szLiBHZW5lcmF0ZSAuc3ZnIGZpbGU8YnI-YW5kIGRvd25sb2FkIHRvPGJyPmltYWdlcy8gZm9sZGVyXVxuICAgIHN1YmdyYXBoIHdbIF1cbiAgICBkaXJlY3Rpb24gVEJcbiAgICBEWzQuIFVzZSBmaWd1cmUgc2hvcnRjb2RlPGJyPnRvIHJlZmVyZW5jZSAuc3ZnPGJyPmZpbGUgaW4gcGFnZTxicj4ubWQgZmlsZV0gLS0-XG4gICAgRVs1LiBBZGQgY2FwdGlvbl1cbiAgICBlbmRcbkEgLS0-IEJcbkIgLS0-IENcbkMgLS0-IHdcblxuICAgIGNsYXNzRGVmIGJveCBmaWxsOiNmZmYsc3Ryb2tlOiMwMDAsc3Ryb2tlLXdpZHRoOjFweCxjb2xvcjojMDAwO1xuICAgIGNsYXNzIEEsQixDLEQsRSx3IGJveFxuICAgICIsIm1lcm1haWQiOiJ7XG4gIFwidGhlbWVcIjogXCJkZWZhdWx0XCJcbn0iLCJ1cGRhdGVFZGl0b3IiOmZhbHNlLCJhdXRvU3luYyI6dHJ1ZSwidXBkYXRlRGlhZ3JhbSI6dHJ1ZX0" _blank click C "https://mermaid-js.github.io/mermaid-live-editor/edit/#eyJjb2RlIjoiZmxvd2NoYXJ0IExSXG4gICAgQVsxLiBVc2UgbGl2ZSBlZGl0b3I8YnI-IHRvIGNyZWF0ZS9lZGl0PGJyPmRpYWdyYW1dXG4gICAgQlsyLiBTdG9yZSBkaWFncmFtPGJyPlVSTCBzb21ld2hlcmVdXG4gICAgQ1szLiBHZW5lcmF0ZSAuc3ZnIGZpbGU8YnI-YW5kIGRvd25sb2FkIHRvPGJyPmltYWdlcy8gZm9sZGVyXVxuICAgIHN1YmdyYXBoIHdbIF1cbiAgICBkaXJlY3Rpb24gVEJcbiAgICBEWzQuIFVzZSBmaWd1cmUgc2hvcnRjb2RlPGJyPnRvIHJlZmVyZW5jZSAuc3ZnPGJyPmZpbGUgaW4gcGFnZTxicj4ubWQgZmlsZV0gLS0-XG4gICAgRVs1LiBBZGQgY2FwdGlvbl1cbiAgICBlbmRcbkEgLS0-IEJcbkIgLS0-IENcbkMgLS0-IHdcblxuICAgIGNsYXNzRGVmIGJveCBmaWxsOiNmZmYsc3Ryb2tlOiMwMDAsc3Ryb2tlLXdpZHRoOjFweCxjb2xvcjojMDAwO1xuICAgIGNsYXNzIEEsQixDLEQsRSx3IGJveFxuICAgICIsIm1lcm1haWQiOiJ7XG4gIFwidGhlbWVcIjogXCJkZWZhdWx0XCJcbn0iLCJ1cGRhdGVFZGl0b3IiOmZhbHNlLCJhdXRvU3luYyI6dHJ1ZSwidXBkYXRlRGlhZ3JhbSI6dHJ1ZX0" _blank click D "https://mermaid-js.github.io/mermaid-live-editor/edit/#eyJjb2RlIjoiZmxvd2NoYXJ0IExSXG4gICAgQVsxLiBVc2UgbGl2ZSBlZGl0b3I8YnI-IHRvIGNyZWF0ZS9lZGl0PGJyPmRpYWdyYW1dXG4gICAgQlsyLiBTdG9yZSBkaWFncmFtPGJyPlVSTCBzb21ld2hlcmVdXG4gICAgQ1szLiBHZW5lcmF0ZSAuc3ZnIGZpbGU8YnI-YW5kIGRvd25sb2FkIHRvPGJyPmltYWdlcy8gZm9sZGVyXVxuICAgIHN1YmdyYXBoIHdbIF1cbiAgICBkaXJlY3Rpb24gVEJcbiAgICBEWzQuIFVzZSBmaWd1cmUgc2hvcnRjb2RlPGJyPnRvIHJlZmVyZW5jZSAuc3ZnPGJyPmZpbGUgaW4gcGFnZTxicj4ubWQgZmlsZV0gLS0-XG4gICAgRVs1LiBBZGQgY2FwdGlvbl1cbiAgICBlbmRcbkEgLS0-IEJcbkIgLS0-IENcbkMgLS0-IHdcblxuICAgIGNsYXNzRGVmIGJveCBmaWxsOiNmZmYsc3Ryb2tlOiMwMDAsc3Ryb2tlLXdpZHRoOjFweCxjb2xvcjojMDAwO1xuICAgIGNsYXNzIEEsQixDLEQsRSx3IGJveFxuICAgICIsIm1lcm1haWQiOiJ7XG4gIFwidGhlbWVcIjogXCJkZWZhdWx0XCJcbn0iLCJ1cGRhdGVFZGl0b3IiOmZhbHNlLCJhdXRvU3luYyI6dHJ1ZSwidXBkYXRlRGlhZ3JhbSI6dHJ1ZX0" _blank click E "https://mermaid-js.github.io/mermaid-live-editor/edit/#eyJjb2RlIjoiZmxvd2NoYXJ0IExSXG4gICAgQVsxLiBVc2UgbGl2ZSBlZGl0b3I8YnI-IHRvIGNyZWF0ZS9lZGl0PGJyPmRpYWdyYW1dXG4gICAgQlsyLiBTdG9yZSBkaWFncmFtPGJyPlVSTCBzb21ld2hlcmVdXG4gICAgQ1szLiBHZW5lcmF0ZSAuc3ZnIGZpbGU8YnI-YW5kIGRvd25sb2FkIHRvPGJyPmltYWdlcy8gZm9sZGVyXVxuICAgIHN1YmdyYXBoIHdbIF1cbiAgICBkaXJlY3Rpb24gVEJcbiAgICBEWzQuIFVzZSBmaWd1cmUgc2hvcnRjb2RlPGJyPnRvIHJlZmVyZW5jZSAuc3ZnPGJyPmZpbGUgaW4gcGFnZTxicj4ubWQgZmlsZV0gLS0-XG4gICAgRVs1LiBBZGQgY2FwdGlvbl1cbiAgICBlbmRcbkEgLS0-IEJcbkIgLS0-IENcbkMgLS0-IHdcblxuICAgIGNsYXNzRGVmIGJveCBmaWxsOiNmZmYsc3Ryb2tlOiMwMDAsc3Ryb2tlLXdpZHRoOjFweCxjb2xvcjojMDAwO1xuICAgIGNsYXNzIEEsQixDLEQsRSx3IGJveFxuICAgICIsIm1lcm1haWQiOiJ7XG4gIFwidGhlbWVcIjogXCJkZWZhdWx0XCJcbn0iLCJ1cGRhdGVFZGl0b3IiOmZhbHNlLCJhdXRvU3luYyI6dHJ1ZSwidXBkYXRlRGlhZ3JhbSI6dHJ1ZX0" _blank
Figure 4. Mermaid+SVG method steps.
The following lists the steps you should follow for adding a diagram using the Mermaid+SVG method:
- Create your diagram using the live editor.
- Store the diagram URL somewhere for later access.
- Generate an
.svgimage file for the diagram and download it to the appropriateimages/folder. - Use the
{{< figure >}}shortcode to reference the diagram in the.mdfile. - Add a caption using the
{{< figure >}}shortcode’scaptionparameter.
For example, use the live editor to create a diagram called boxnet.
Store the diagram URL somewhere for later access. Generate and download a
boxnet.svg file to the appropriate ../images/ folder.
Use the {{< figure >}} shortcode in your PR’s .md file to reference
the .svg image file and add a caption.
{{< figure src="/static/images/boxnet.svg" alt="Boxnet figure" class="diagram-large" caption="Figure 14. Boxnet caption" >}}
For more details on diagram captions, see How to use captions.
The {{< figure >}} shortcode is the preferred method for adding .svg image files
to your documentation. You can also use the standard markdown image syntax like so:
.
And you will need to add a caption below the diagram.
You should add the live editor URL as a comment block in the .svg image file using a text editor.
For example, you would include the following at the beginning of the .svg image file:
<!-- To view or edit the mermaid code, use the following URL: -->
<!-- https://mermaid-js.github.io/mermaid-live-editor/edit/#eyJjb ... <remainder of the URL> -->
The following lists advantages of the Mermaid+SVG method:
- Live editor tool.
- Live editor tool supports the most current Mermaid feature set.
- Employ existing umh/website methods for handling
.svgimage files. - Environment doesn’t require Mermaid support.
Be sure to check that your diagram renders properly using the local and Netlify previews.
External tool
Figure 5 outlines the steps to follow for adding a diagram using the External Tool method.
First, use your external tool to create the diagram and save it as an .svg
or .png image file. After that, use the same steps as the Mermaid+SVG
method for adding .svg image files.
tool to create/edit
diagram] B[2. If possible, save
diagram coordinates
for contributor
access] C[3. Generate .svg
or.png file
and download to
appropriate
images/ folder] subgraph w[ ] direction TB D[4. Use figure shortcode
to reference svg or
png file in
page .md file] --> E[5. Add caption] end A --> B B --> C C --> w classDef box fill:#fff,stroke:#000,stroke-width:1px,color:#000; class A,B,C,D,E,w box click A "https://mermaid-js.github.io/mermaid-live-editor/edit/#eyJjb2RlIjoiZmxvd2NoYXJ0IExSXG4gICAgQVsxLiBVc2UgZXh0ZXJuYWw8YnI-dG9vbCB0byBjcmVhdGUvZWRpdDxicj5kaWFncmFtXVxuICAgIEJbMi4gSWYgcG9zc2libGUsIHNhdmU8YnI-ZGlhZ3JhbSBjb29yZGluYXRlczxicj5mb3IgY29udHJpYnV0b3I8YnI-YWNjZXNzXVxuICAgIENbMy4gR2VuZXJhdGUgLnN2ZyA8YnI-b3IucG5nIGZpbGU8YnI-YW5kIGRvd25sb2FkIHRvPGJyPmFwcHJvcHJpYXRlPGJyPmltYWdlcy8gZm9sZGVyXVxuICAgIHN1YmdyYXBoIHdbIF1cbiAgICBkaXJlY3Rpb24gVEJcbiAgICBEWzQuIFVzZSBmaWd1cmUgc2hvcnRjb2RlPGJyPnRvIHJlZmVyZW5jZSBzdmcgb3I8YnI-cG5nIGZpbGUgaW48YnI-cGFnZSAubWQgZmlsZV0gLS0-XG4gICAgRVs1LiBBZGQgY2FwdGlvbl1cbiAgICBlbmRcbiAgICBBIC0tPiBCXG4gICAgQiAtLT4gQ1xuICAgIEMgLS0-IHdcbiAgICBjbGFzc0RlZiBib3ggZmlsbDojZmZmLHN0cm9rZTojMDAwLHN0cm9rZS13aWR0aDoxcHgsY29sb3I6IzAwMDtcbiAgICBjbGFzcyBBLEIsQyxELEUsdyBib3hcbiAgICAiLCJtZXJtYWlkIjoie1xuICBcInRoZW1lXCI6IFwiZGVmYXVsdFwiXG59IiwidXBkYXRlRWRpdG9yIjpmYWxzZSwiYXV0b1N5bmMiOnRydWUsInVwZGF0ZURpYWdyYW0iOmZhbHNlfQ" click B "https://mermaid-js.github.io/mermaid-live-editor/edit/#eyJjb2RlIjoiZmxvd2NoYXJ0IExSXG4gICAgQVsxLiBVc2UgZXh0ZXJuYWw8YnI-dG9vbCB0byBjcmVhdGUvZWRpdDxicj5kaWFncmFtXVxuICAgIEJbMi4gSWYgcG9zc2libGUsIHNhdmU8YnI-ZGlhZ3JhbSBjb29yZGluYXRlczxicj5mb3IgY29udHJpYnV0b3I8YnI-YWNjZXNzXVxuICAgIENbMy4gR2VuZXJhdGUgLnN2ZyA8YnI-b3IucG5nIGZpbGU8YnI-YW5kIGRvd25sb2FkIHRvPGJyPmFwcHJvcHJpYXRlPGJyPmltYWdlcy8gZm9sZGVyXVxuICAgIHN1YmdyYXBoIHdbIF1cbiAgICBkaXJlY3Rpb24gVEJcbiAgICBEWzQuIFVzZSBmaWd1cmUgc2hvcnRjb2RlPGJyPnRvIHJlZmVyZW5jZSBzdmcgb3I8YnI-cG5nIGZpbGUgaW48YnI-cGFnZSAubWQgZmlsZV0gLS0-XG4gICAgRVs1LiBBZGQgY2FwdGlvbl1cbiAgICBlbmRcbiAgICBBIC0tPiBCXG4gICAgQiAtLT4gQ1xuICAgIEMgLS0-IHdcbiAgICBjbGFzc0RlZiBib3ggZmlsbDojZmZmLHN0cm9rZTojMDAwLHN0cm9rZS13aWR0aDoxcHgsY29sb3I6IzAwMDtcbiAgICBjbGFzcyBBLEIsQyxELEUsdyBib3hcbiAgICAiLCJtZXJtYWlkIjoie1xuICBcInRoZW1lXCI6IFwiZGVmYXVsdFwiXG59IiwidXBkYXRlRWRpdG9yIjpmYWxzZSwiYXV0b1N5bmMiOnRydWUsInVwZGF0ZURpYWdyYW0iOmZhbHNlfQ" click C "https://mermaid-js.github.io/mermaid-live-editor/edit/#eyJjb2RlIjoiZmxvd2NoYXJ0IExSXG4gICAgQVsxLiBVc2UgZXh0ZXJuYWw8YnI-dG9vbCB0byBjcmVhdGUvZWRpdDxicj5kaWFncmFtXVxuICAgIEJbMi4gSWYgcG9zc2libGUsIHNhdmU8YnI-ZGlhZ3JhbSBjb29yZGluYXRlczxicj5mb3IgY29udHJpYnV0b3I8YnI-YWNjZXNzXVxuICAgIENbMy4gR2VuZXJhdGUgLnN2ZyA8YnI-b3IucG5nIGZpbGU8YnI-YW5kIGRvd25sb2FkIHRvPGJyPmFwcHJvcHJpYXRlPGJyPmltYWdlcy8gZm9sZGVyXVxuICAgIHN1YmdyYXBoIHdbIF1cbiAgICBkaXJlY3Rpb24gVEJcbiAgICBEWzQuIFVzZSBmaWd1cmUgc2hvcnRjb2RlPGJyPnRvIHJlZmVyZW5jZSBzdmcgb3I8YnI-cG5nIGZpbGUgaW48YnI-cGFnZSAubWQgZmlsZV0gLS0-XG4gICAgRVs1LiBBZGQgY2FwdGlvbl1cbiAgICBlbmRcbiAgICBBIC0tPiBCXG4gICAgQiAtLT4gQ1xuICAgIEMgLS0-IHdcbiAgICBjbGFzc0RlZiBib3ggZmlsbDojZmZmLHN0cm9rZTojMDAwLHN0cm9rZS13aWR0aDoxcHgsY29sb3I6IzAwMDtcbiAgICBjbGFzcyBBLEIsQyxELEUsdyBib3hcbiAgICAiLCJtZXJtYWlkIjoie1xuICBcInRoZW1lXCI6IFwiZGVmYXVsdFwiXG59IiwidXBkYXRlRWRpdG9yIjpmYWxzZSwiYXV0b1N5bmMiOnRydWUsInVwZGF0ZURpYWdyYW0iOmZhbHNlfQ" click D "https://mermaid-js.github.io/mermaid-live-editor/edit/#eyJjb2RlIjoiZmxvd2NoYXJ0IExSXG4gICAgQVsxLiBVc2UgZXh0ZXJuYWw8YnI-dG9vbCB0byBjcmVhdGUvZWRpdDxicj5kaWFncmFtXVxuICAgIEJbMi4gSWYgcG9zc2libGUsIHNhdmU8YnI-ZGlhZ3JhbSBjb29yZGluYXRlczxicj5mb3IgY29udHJpYnV0b3I8YnI-YWNjZXNzXVxuICAgIENbMy4gR2VuZXJhdGUgLnN2ZyA8YnI-b3IucG5nIGZpbGU8YnI-YW5kIGRvd25sb2FkIHRvPGJyPmFwcHJvcHJpYXRlPGJyPmltYWdlcy8gZm9sZGVyXVxuICAgIHN1YmdyYXBoIHdbIF1cbiAgICBkaXJlY3Rpb24gVEJcbiAgICBEWzQuIFVzZSBmaWd1cmUgc2hvcnRjb2RlPGJyPnRvIHJlZmVyZW5jZSBzdmcgb3I8YnI-cG5nIGZpbGUgaW48YnI-cGFnZSAubWQgZmlsZV0gLS0-XG4gICAgRVs1LiBBZGQgY2FwdGlvbl1cbiAgICBlbmRcbiAgICBBIC0tPiBCXG4gICAgQiAtLT4gQ1xuICAgIEMgLS0-IHdcbiAgICBjbGFzc0RlZiBib3ggZmlsbDojZmZmLHN0cm9rZTojMDAwLHN0cm9rZS13aWR0aDoxcHgsY29sb3I6IzAwMDtcbiAgICBjbGFzcyBBLEIsQyxELEUsdyBib3hcbiAgICAiLCJtZXJtYWlkIjoie1xuICBcInRoZW1lXCI6IFwiZGVmYXVsdFwiXG59IiwidXBkYXRlRWRpdG9yIjpmYWxzZSwiYXV0b1N5bmMiOnRydWUsInVwZGF0ZURpYWdyYW0iOmZhbHNlfQ" click E "https://mermaid-js.github.io/mermaid-live-editor/edit/#eyJjb2RlIjoiZmxvd2NoYXJ0IExSXG4gICAgQVsxLiBVc2UgZXh0ZXJuYWw8YnI-dG9vbCB0byBjcmVhdGUvZWRpdDxicj5kaWFncmFtXVxuICAgIEJbMi4gSWYgcG9zc2libGUsIHNhdmU8YnI-ZGlhZ3JhbSBjb29yZGluYXRlczxicj5mb3IgY29udHJpYnV0b3I8YnI-YWNjZXNzXVxuICAgIENbMy4gR2VuZXJhdGUgLnN2ZyA8YnI-b3IucG5nIGZpbGU8YnI-YW5kIGRvd25sb2FkIHRvPGJyPmFwcHJvcHJpYXRlPGJyPmltYWdlcy8gZm9sZGVyXVxuICAgIHN1YmdyYXBoIHdbIF1cbiAgICBkaXJlY3Rpb24gVEJcbiAgICBEWzQuIFVzZSBmaWd1cmUgc2hvcnRjb2RlPGJyPnRvIHJlZmVyZW5jZSBzdmcgb3I8YnI-cG5nIGZpbGUgaW48YnI-cGFnZSAubWQgZmlsZV0gLS0-XG4gICAgRVs1LiBBZGQgY2FwdGlvbl1cbiAgICBlbmRcbiAgICBBIC0tPiBCXG4gICAgQiAtLT4gQ1xuICAgIEMgLS0-IHdcbiAgICBjbGFzc0RlZiBib3ggZmlsbDojZmZmLHN0cm9rZTojMDAwLHN0cm9rZS13aWR0aDoxcHgsY29sb3I6IzAwMDtcbiAgICBjbGFzcyBBLEIsQyxELEUsdyBib3hcbiAgICAiLCJtZXJtYWlkIjoie1xuICBcInRoZW1lXCI6IFwiZGVmYXVsdFwiXG59IiwidXBkYXRlRWRpdG9yIjpmYWxzZSwiYXV0b1N5bmMiOnRydWUsInVwZGF0ZURpYWdyYW0iOmZhbHNlfQ"
The following lists the steps you should follow for adding a diagram using the External Tool method:
- Use your external tool to create a diagram.
- Save the diagram coordinates for contributor access. For example, your tool
may offer a link to the diagram image, or you could place the source code
file, such as an
.xmlfile, in a public repository for later contributor access. - Generate and save the diagram as an
.svgor.pngimage file. Download this file to the appropriate../images/folder. - Use the
{{< figure >}}shortcode to reference the diagram in the.mdfile. - Add a caption using the
{{< figure >}}shortcode’scaptionparameter.
Here is the {{< figure >}} shortcode for the images/apple.svg diagram:
{{< figure src="/static/images/apple.svg" alt="red-apple-figure" class="diagram-large" caption="Figure 9. A Big Red Apple" >}}
If your external drawing tool permits:
- You can incorporate multiple
.svgor.pnglogos, icons and images into your diagram. However, make sure you observe copyright and follow the United Manufacturing Hub documentation guidelines on the use of third party content. - You should save the diagram source coordinates for later contributor access.
For example, your tool may offer a link to the diagram image, or you could
place the source code file, such as an
.xmlfile, somewhere for contributor access.
The following lists advantages of the External Tool method:
- Contributor familiarity with external tool.
- Diagrams require more detail than what Mermaid can offer.
Don’t forget to check that your diagram renders correctly using the local and Netlify previews.
Examples
This section shows several examples of Mermaid diagrams.
Example 1 - Pod topology spread constraints
Figure 6 shows the diagram appearing in the Pod topology spread constraints page.
Figure 6. Pod Topology Spread Constraints.
Code block:
graph TB
   subgraph "zoneB"
       n3(Node3)
       n4(Node4)
   end
   subgraph "zoneA"
       n1(Node1)
       n2(Node2)
   end

   classDef plain fill:#ddd,stroke:#fff,stroke-width:4px,color:#000;
   classDef k8s fill:#326ce5,stroke:#fff,stroke-width:4px,color:#fff;
   classDef cluster fill:#fff,stroke:#bbb,stroke-width:2px,color:#326ce5;
   class n1,n2,n3,n4 k8s;
   class zoneA,zoneB cluster;
Example 2 - Ingress
Figure 7 shows the diagram appearing in the What is Ingress page.
load balancer .->ingress[Ingress]; ingress-->|routing rule|service[Service]; subgraph cluster ingress; service-->pod1[Pod]; service-->pod2[Pod]; end classDef plain fill:#ddd,stroke:#fff,stroke-width:4px,color:#000; classDef k8s fill:#326ce5,stroke:#fff,stroke-width:4px,color:#fff; classDef cluster fill:#fff,stroke:#bbb,stroke-width:2px,color:#326ce5; class ingress,service,pod1,pod2 k8s; class client plain; class cluster cluster; click client "https://mermaid-js.github.io/mermaid-live-editor/edit/#eyJjb2RlIjoiZ3JhcGggIExSXG4gIGNsaWVudChbY2xpZW50XSktLiBJbmdyZXNzLW1hbmFnZWQgPGJyPiBsb2FkIGJhbGFuY2VyIC4tPmluZ3Jlc3NbSW5ncmVzc107XG4gIGluZ3Jlc3MtLT58cm91dGluZyBydWxlfHNlcnZpY2VbU2VydmljZV07XG4gIHN1YmdyYXBoIGNsdXN0ZXJcbiAgaW5ncmVzcztcbiAgc2VydmljZS0tPnBvZDFbUG9kXTtcbiAgc2VydmljZS0tPnBvZDJbUG9kXTtcbiAgZW5kXG4gIGNsYXNzRGVmIHBsYWluIGZpbGw6I2RkZCxzdHJva2U6I2ZmZixzdHJva2Utd2lkdGg6NHB4LGNvbG9yOiMwMDA7XG4gIGNsYXNzRGVmIGs4cyBmaWxsOiMzMjZjZTUsc3Ryb2tlOiNmZmYsc3Ryb2tlLXdpZHRoOjRweCxjb2xvcjojZmZmO1xuICBjbGFzc0RlZiBjbHVzdGVyIGZpbGw6I2ZmZixzdHJva2U6I2JiYixzdHJva2Utd2lkdGg6MnB4LGNvbG9yOiMzMjZjZTU7XG4gIGNsYXNzIGluZ3Jlc3Msc2VydmljZSxwb2QxLHBvZDIgazhzO1xuICBjbGFzcyBjbGllbnQgcGxhaW47XG4gIGNsYXNzIGNsdXN0ZXIgY2x1c3RlcjtcbiIsIm1lcm1haWQiOiJ7XG4gIFwidGhlbWVcIjogXCJkZWZhdWx0XCJcbn0iLCJ1cGRhdGVFZGl0b3IiOmZhbHNlLCJhdXRvU3luYyI6dHJ1ZSwidXBkYXRlRGlhZ3JhbSI6ZmFsc2V9" _blank click ingress "https://mermaid-js.github.io/mermaid-live-editor/edit/#eyJjb2RlIjoiZ3JhcGggIExSXG4gIGNsaWVudChbY2xpZW50XSktLiBJbmdyZXNzLW1hbmFnZWQgPGJyPiBsb2FkIGJhbGFuY2VyIC4tPmluZ3Jlc3NbSW5ncmVzc107XG4gIGluZ3Jlc3MtLT58cm91dGluZyBydWxlfHNlcnZpY2VbU2VydmljZV07XG4gIHN1YmdyYXBoIGNsdXN0ZXJcbiAgaW5ncmVzcztcbiAgc2VydmljZS0tPnBvZDFbUG9kXTtcbiAgc2VydmljZS0tPnBvZDJbUG9kXTtcbiAgZW5kXG4gIGNsYXNzRGVmIHBsYWluIGZpbGw6I2RkZCxzdHJva2U6I2ZmZixzdHJva2Utd2lkdGg6NHB4LGNvbG9yOiMwMDA7XG4gIGNsYXNzRGVmIGs4cyBmaWxsOiMzMjZjZTUsc3Ryb2tlOiNmZmYsc3Ryb2tlLXdpZHRoOjRweCxjb2xvcjojZmZmO1xuICBjbGFzc0RlZiBjbHVzdGVyIGZpbGw6I2ZmZixzdHJva2U6I2JiYixzdHJva2Utd2lkdGg6MnB4LGNvbG9yOiMzMjZjZTU7XG4gIGNsYXNzIGluZ3Jlc3Msc2VydmljZSxwb2QxLHBvZDIgazhzO1xuICBjbGFzcyBjbGllbnQgcGxhaW47XG4gIGNsYXNzIGNsdXN0ZXIgY2x1c3RlcjtcbiIsIm1lcm1haWQiOiJ7XG4gIFwidGhlbWVcIjogXCJkZWZhdWx0XCJcbn0iLCJ1cGRhdGVFZGl0b3IiOmZhbHNlLCJhdXRvU3luYyI6dHJ1ZSwidXBkYXRlRGlhZ3JhbSI6ZmFsc2V9" _blank click service "https://mermaid-js.github.io/mermaid-live-editor/edit/#eyJjb2RlIjoiZ3JhcGggIExSXG4gIGNsaWVudChbY2xpZW50XSktLiBJbmdyZXNzLW1hbmFnZWQgPGJyPiBsb2FkIGJhbGFuY2VyIC4tPmluZ3Jlc3NbSW5ncmVzc107XG4gIGluZ3Jlc3MtLT58cm91dGluZyBydWxlfHNlcnZpY2VbU2VydmljZV07XG4gIHN1YmdyYXBoIGNsdXN0ZXJcbiAgaW5ncmVzcztcbiAgc2VydmljZS0tPnBvZDFbUG9kXTtcbiAgc2VydmljZS0tPnBvZDJbUG9kXTtcbiAgZW5kXG4gIGNsYXNzRGVmIHBsYWluIGZpbGw6I2RkZCxzdHJva2U6I2ZmZixzdHJva2Utd2lkdGg6NHB4LGNvbG9yOiMwMDA7XG4gIGNsYXNzRGVmIGs4cyBmaWxsOiMzMjZjZTUsc3Ryb2tlOiNmZmYsc3Ryb2tlLXdpZHRoOjRweCxjb2xvcjojZmZmO1xuICBjbGFzc0RlZiBjbHVzdGVyIGZpbGw6I2ZmZixzdHJva2U6I2JiYixzdHJva2Utd2lkdGg6MnB4LGNvbG9yOiMzMjZjZTU7XG4gIGNsYXNzIGluZ3Jlc3Msc2VydmljZSxwb2QxLHBvZDIgazhzO1xuICBjbGFzcyBjbGllbnQgcGxhaW47XG4gIGNsYXNzIGNsdXN0ZXIgY2x1c3RlcjtcbiIsIm1lcm1haWQiOiJ7XG4gIFwidGhlbWVcIjogXCJkZWZhdWx0XCJcbn0iLCJ1cGRhdGVFZGl0b3IiOmZhbHNlLCJhdXRvU3luYyI6dHJ1ZSwidXBkYXRlRGlhZ3JhbSI6ZmFsc2V9" _blank click pod1 "https://mermaid-js.github.io/mermaid-live-editor/edit/#eyJjb2RlIjoiZ3JhcGggIExSXG4gIGNsaWVudChbY2xpZW50XSktLiBJbmdyZXNzLW1hbmFnZWQgPGJyPiBsb2FkIGJhbGFuY2VyIC4tPmluZ3Jlc3NbSW5ncmVzc107XG4gIGluZ3Jlc3MtLT58cm91dGluZyBydWxlfHNlcnZpY2VbU2VydmljZV07XG4gIHN1YmdyYXBoIGNsdXN0ZXJcbiAgaW5ncmVzcztcbiAgc2VydmljZS0tPnBvZDFbUG9kXTtcbiAgc2VydmljZS0tPnBvZDJbUG9kXTtcbiAgZW5kXG4gIGNsYXNzRGVmIHBsYWluIGZpbGw6I2RkZCxzdHJva2U6I2ZmZixzdHJva2Utd2lkdGg6NHB4LGNvbG9yOiMwMDA7XG4gIGNsYXNzRGVmIGs4cyBmaWxsOiMzMjZjZTUsc3Ryb2tlOiNmZmYsc3Ryb2tlLXdpZHRoOjRweCxjb2xvcjojZmZmO1xuICBjbGFzc0RlZiBjbHVzdGVyIGZpbGw6I2ZmZixzdHJva2U6I2JiYixzdHJva2Utd2lkdGg6MnB4LGNvbG9yOiMzMjZjZTU7XG4gIGNsYXNzIGluZ3Jlc3Msc2VydmljZSxwb2QxLHBvZDIgazhzO1xuICBjbGFzcyBjbGllbnQgcGxhaW47XG4gIGNsYXNzIGNsdXN0ZXIgY2x1c3RlcjtcbiIsIm1lcm1haWQiOiJ7XG4gIFwidGhlbWVcIjogXCJkZWZhdWx0XCJcbn0iLCJ1cGRhdGVFZGl0b3IiOmZhbHNlLCJhdXRvU3luYyI6dHJ1ZSwidXBkYXRlRGlhZ3JhbSI6ZmFsc2V9" _blank click pod2 "https://mermaid-js.github.io/mermaid-live-editor/edit/#eyJjb2RlIjoiZ3JhcGggIExSXG4gIGNsaWVudChbY2xpZW50XSktLiBJbmdyZXNzLW1hbmFnZWQgPGJyPiBsb2FkIGJhbGFuY2VyIC4tPmluZ3Jlc3NbSW5ncmVzc107XG4gIGluZ3Jlc3MtLT58cm91dGluZyBydWxlfHNlcnZpY2VbU2VydmljZV07XG4gIHN1YmdyYXBoIGNsdXN0ZXJcbiAgaW5ncmVzcztcbiAgc2VydmljZS0tPnBvZDFbUG9kXTtcbiAgc2VydmljZS0tPnBvZDJbUG9kXTtcbiAgZW5kXG4gIGNsYXNzRGVmIHBsYWluIGZpbGw6I2RkZCxzdHJva2U6I2ZmZixzdHJva2Utd2lkdGg6NHB4LGNvbG9yOiMwMDA7XG4gIGNsYXNzRGVmIGs4cyBmaWxsOiMzMjZjZTUsc3Ryb2tlOiNmZmYsc3Ryb2tlLXdpZHRoOjRweCxjb2xvcjojZmZmO1xuICBjbGFzc0RlZiBjbHVzdGVyIGZpbGw6I2ZmZixzdHJva2U6I2JiYixzdHJva2Utd2lkdGg6MnB4LGNvbG9yOiMzMjZjZTU7XG4gIGNsYXNzIGluZ3Jlc3Msc2VydmljZSxwb2QxLHBvZDIgazhzO1xuICBjbGFzcyBjbGllbnQgcGxhaW47XG4gIGNsYXNzIGNsdXN0ZXIgY2x1c3RlcjtcbiIsIm1lcm1haWQiOiJ7XG4gIFwidGhlbWVcIjogXCJkZWZhdWx0XCJcbn0iLCJ1cGRhdGVFZGl0b3IiOmZhbHNlLCJhdXRvU3luYyI6dHJ1ZSwidXBkYXRlRGlhZ3JhbSI6ZmFsc2V9" _blank
load balancer .->ingress[Ingress]; ingress-->|routing rule|service[Service]; subgraph cluster ingress; service-->pod1[Pod]; service-->pod2[Pod]; end classDef plain fill:#ddd,stroke:#fff,stroke-width:4px,color:#000; classDef k8s fill:#326ce5,stroke:#fff,stroke-width:4px,color:#fff; classDef cluster fill:#fff,stroke:#bbb,stroke-width:2px,color:#326ce5; class ingress,service,pod1,pod2 k8s; class client plain; class cluster cluster; click client "https://mermaid-js.github.io/mermaid-live-editor/edit/#eyJjb2RlIjoiZ3JhcGggIExSXG4gIGNsaWVudChbY2xpZW50XSktLiBJbmdyZXNzLW1hbmFnZWQgPGJyPiBsb2FkIGJhbGFuY2VyIC4tPmluZ3Jlc3NbSW5ncmVzc107XG4gIGluZ3Jlc3MtLT58cm91dGluZyBydWxlfHNlcnZpY2VbU2VydmljZV07XG4gIHN1YmdyYXBoIGNsdXN0ZXJcbiAgaW5ncmVzcztcbiAgc2VydmljZS0tPnBvZDFbUG9kXTtcbiAgc2VydmljZS0tPnBvZDJbUG9kXTtcbiAgZW5kXG4gIGNsYXNzRGVmIHBsYWluIGZpbGw6I2RkZCxzdHJva2U6I2ZmZixzdHJva2Utd2lkdGg6NHB4LGNvbG9yOiMwMDA7XG4gIGNsYXNzRGVmIGs4cyBmaWxsOiMzMjZjZTUsc3Ryb2tlOiNmZmYsc3Ryb2tlLXdpZHRoOjRweCxjb2xvcjojZmZmO1xuICBjbGFzc0RlZiBjbHVzdGVyIGZpbGw6I2ZmZixzdHJva2U6I2JiYixzdHJva2Utd2lkdGg6MnB4LGNvbG9yOiMzMjZjZTU7XG4gIGNsYXNzIGluZ3Jlc3Msc2VydmljZSxwb2QxLHBvZDIgazhzO1xuICBjbGFzcyBjbGllbnQgcGxhaW47XG4gIGNsYXNzIGNsdXN0ZXIgY2x1c3RlcjtcbiIsIm1lcm1haWQiOiJ7XG4gIFwidGhlbWVcIjogXCJkZWZhdWx0XCJcbn0iLCJ1cGRhdGVFZGl0b3IiOmZhbHNlLCJhdXRvU3luYyI6dHJ1ZSwidXBkYXRlRGlhZ3JhbSI6ZmFsc2V9" _blank click ingress "https://mermaid-js.github.io/mermaid-live-editor/edit/#eyJjb2RlIjoiZ3JhcGggIExSXG4gIGNsaWVudChbY2xpZW50XSktLiBJbmdyZXNzLW1hbmFnZWQgPGJyPiBsb2FkIGJhbGFuY2VyIC4tPmluZ3Jlc3NbSW5ncmVzc107XG4gIGluZ3Jlc3MtLT58cm91dGluZyBydWxlfHNlcnZpY2VbU2VydmljZV07XG4gIHN1YmdyYXBoIGNsdXN0ZXJcbiAgaW5ncmVzcztcbiAgc2VydmljZS0tPnBvZDFbUG9kXTtcbiAgc2VydmljZS0tPnBvZDJbUG9kXTtcbiAgZW5kXG4gIGNsYXNzRGVmIHBsYWluIGZpbGw6I2RkZCxzdHJva2U6I2ZmZixzdHJva2Utd2lkdGg6NHB4LGNvbG9yOiMwMDA7XG4gIGNsYXNzRGVmIGs4cyBmaWxsOiMzMjZjZTUsc3Ryb2tlOiNmZmYsc3Ryb2tlLXdpZHRoOjRweCxjb2xvcjojZmZmO1xuICBjbGFzc0RlZiBjbHVzdGVyIGZpbGw6I2ZmZixzdHJva2U6I2JiYixzdHJva2Utd2lkdGg6MnB4LGNvbG9yOiMzMjZjZTU7XG4gIGNsYXNzIGluZ3Jlc3Msc2VydmljZSxwb2QxLHBvZDIgazhzO1xuICBjbGFzcyBjbGllbnQgcGxhaW47XG4gIGNsYXNzIGNsdXN0ZXIgY2x1c3RlcjtcbiIsIm1lcm1haWQiOiJ7XG4gIFwidGhlbWVcIjogXCJkZWZhdWx0XCJcbn0iLCJ1cGRhdGVFZGl0b3IiOmZhbHNlLCJhdXRvU3luYyI6dHJ1ZSwidXBkYXRlRGlhZ3JhbSI6ZmFsc2V9" _blank click service "https://mermaid-js.github.io/mermaid-live-editor/edit/#eyJjb2RlIjoiZ3JhcGggIExSXG4gIGNsaWVudChbY2xpZW50XSktLiBJbmdyZXNzLW1hbmFnZWQgPGJyPiBsb2FkIGJhbGFuY2VyIC4tPmluZ3Jlc3NbSW5ncmVzc107XG4gIGluZ3Jlc3MtLT58cm91dGluZyBydWxlfHNlcnZpY2VbU2VydmljZV07XG4gIHN1YmdyYXBoIGNsdXN0ZXJcbiAgaW5ncmVzcztcbiAgc2VydmljZS0tPnBvZDFbUG9kXTtcbiAgc2VydmljZS0tPnBvZDJbUG9kXTtcbiAgZW5kXG4gIGNsYXNzRGVmIHBsYWluIGZpbGw6I2RkZCxzdHJva2U6I2ZmZixzdHJva2Utd2lkdGg6NHB4LGNvbG9yOiMwMDA7XG4gIGNsYXNzRGVmIGs4cyBmaWxsOiMzMjZjZTUsc3Ryb2tlOiNmZmYsc3Ryb2tlLXdpZHRoOjRweCxjb2xvcjojZmZmO1xuICBjbGFzc0RlZiBjbHVzdGVyIGZpbGw6I2ZmZixzdHJva2U6I2JiYixzdHJva2Utd2lkdGg6MnB4LGNvbG9yOiMzMjZjZTU7XG4gIGNsYXNzIGluZ3Jlc3Msc2VydmljZSxwb2QxLHBvZDIgazhzO1xuICBjbGFzcyBjbGllbnQgcGxhaW47XG4gIGNsYXNzIGNsdXN0ZXIgY2x1c3RlcjtcbiIsIm1lcm1haWQiOiJ7XG4gIFwidGhlbWVcIjogXCJkZWZhdWx0XCJcbn0iLCJ1cGRhdGVFZGl0b3IiOmZhbHNlLCJhdXRvU3luYyI6dHJ1ZSwidXBkYXRlRGlhZ3JhbSI6ZmFsc2V9" _blank click pod1 "https://mermaid-js.github.io/mermaid-live-editor/edit/#eyJjb2RlIjoiZ3JhcGggIExSXG4gIGNsaWVudChbY2xpZW50XSktLiBJbmdyZXNzLW1hbmFnZWQgPGJyPiBsb2FkIGJhbGFuY2VyIC4tPmluZ3Jlc3NbSW5ncmVzc107XG4gIGluZ3Jlc3MtLT58cm91dGluZyBydWxlfHNlcnZpY2VbU2VydmljZV07XG4gIHN1YmdyYXBoIGNsdXN0ZXJcbiAgaW5ncmVzcztcbiAgc2VydmljZS0tPnBvZDFbUG9kXTtcbiAgc2VydmljZS0tPnBvZDJbUG9kXTtcbiAgZW5kXG4gIGNsYXNzRGVmIHBsYWluIGZpbGw6I2RkZCxzdHJva2U6I2ZmZixzdHJva2Utd2lkdGg6NHB4LGNvbG9yOiMwMDA7XG4gIGNsYXNzRGVmIGs4cyBmaWxsOiMzMjZjZTUsc3Ryb2tlOiNmZmYsc3Ryb2tlLXdpZHRoOjRweCxjb2xvcjojZmZmO1xuICBjbGFzc0RlZiBjbHVzdGVyIGZpbGw6I2ZmZixzdHJva2U6I2JiYixzdHJva2Utd2lkdGg6MnB4LGNvbG9yOiMzMjZjZTU7XG4gIGNsYXNzIGluZ3Jlc3Msc2VydmljZSxwb2QxLHBvZDIgazhzO1xuICBjbGFzcyBjbGllbnQgcGxhaW47XG4gIGNsYXNzIGNsdXN0ZXIgY2x1c3RlcjtcbiIsIm1lcm1haWQiOiJ7XG4gIFwidGhlbWVcIjogXCJkZWZhdWx0XCJcbn0iLCJ1cGRhdGVFZGl0b3IiOmZhbHNlLCJhdXRvU3luYyI6dHJ1ZSwidXBkYXRlRGlhZ3JhbSI6ZmFsc2V9" _blank click pod2 "https://mermaid-js.github.io/mermaid-live-editor/edit/#eyJjb2RlIjoiZ3JhcGggIExSXG4gIGNsaWVudChbY2xpZW50XSktLiBJbmdyZXNzLW1hbmFnZWQgPGJyPiBsb2FkIGJhbGFuY2VyIC4tPmluZ3Jlc3NbSW5ncmVzc107XG4gIGluZ3Jlc3MtLT58cm91dGluZyBydWxlfHNlcnZpY2VbU2VydmljZV07XG4gIHN1YmdyYXBoIGNsdXN0ZXJcbiAgaW5ncmVzcztcbiAgc2VydmljZS0tPnBvZDFbUG9kXTtcbiAgc2VydmljZS0tPnBvZDJbUG9kXTtcbiAgZW5kXG4gIGNsYXNzRGVmIHBsYWluIGZpbGw6I2RkZCxzdHJva2U6I2ZmZixzdHJva2Utd2lkdGg6NHB4LGNvbG9yOiMwMDA7XG4gIGNsYXNzRGVmIGs4cyBmaWxsOiMzMjZjZTUsc3Ryb2tlOiNmZmYsc3Ryb2tlLXdpZHRoOjRweCxjb2xvcjojZmZmO1xuICBjbGFzc0RlZiBjbHVzdGVyIGZpbGw6I2ZmZixzdHJva2U6I2JiYixzdHJva2Utd2lkdGg6MnB4LGNvbG9yOiMzMjZjZTU7XG4gIGNsYXNzIGluZ3Jlc3Msc2VydmljZSxwb2QxLHBvZDIgazhzO1xuICBjbGFzcyBjbGllbnQgcGxhaW47XG4gIGNsYXNzIGNsdXN0ZXIgY2x1c3RlcjtcbiIsIm1lcm1haWQiOiJ7XG4gIFwidGhlbWVcIjogXCJkZWZhdWx0XCJcbn0iLCJ1cGRhdGVFZGl0b3IiOmZhbHNlLCJhdXRvU3luYyI6dHJ1ZSwidXBkYXRlRGlhZ3JhbSI6ZmFsc2V9" _blank
Code block:
graph LR;
 client([client])-. Ingress-managed <br> load balancer .->ingress[Ingress];
 ingress-->|routing rule|service[Service];
 subgraph cluster
 ingress;
 service-->pod1[Pod];
 service-->pod2[Pod];
 end
 classDef plain fill:#ddd,stroke:#fff,stroke-width:4px,color:#000;
 classDef k8s fill:#326ce5,stroke:#fff,stroke-width:4px,color:#fff;
 classDef cluster fill:#fff,stroke:#bbb,stroke-width:2px,color:#326ce5;
 class ingress,service,pod1,pod2 k8s;
 class client plain;
 class cluster cluster;
Example 3 - umh system flow WIP
Figure 8 depicts a Mermaid sequence diagram showing the system flow between umh components to start a container.
Code block:
%%{init:{"theme":"neutral"}}%%
sequenceDiagram
    actor me
    participant apiSrv as control plane<br><br>api-server
    participant etcd as control plane<br><br>etcd datastore
    participant cntrlMgr as control plane<br><br>controller<br>manager
    participant sched as control plane<br><br>scheduler
    participant kubelet as node<br><br>kubelet
    participant container as node<br><br>container<br>runtime
    me->>apiSrv: 1. kubectl create -f pod.yaml
    apiSrv-->>etcd: 2. save new state
    cntrlMgr->>apiSrv: 3. check for changes
    sched->>apiSrv: 4. watch for unassigned pods(s)
    apiSrv->>sched: 5. notify about pod w nodename=" "
    sched->>apiSrv: 6. assign pod to node
    apiSrv-->>etcd: 7. save new state
    kubelet->>apiSrv: 8. look for newly assigned pod(s)
    apiSrv->>kubelet: 9. bind pod to node
    kubelet->>container: 10. start container
    kubelet->>apiSrv: 11. update pod status
    apiSrv-->>etcd: 12. save new state
How to style diagrams
You can style one or more diagram elements using well-known CSS nomenclature. You accomplish this using two types of statements in the Mermaid code.
classDefdefines a class of style attributes.classdefines one or more elements to apply the class to.
In the code for figure 7, you can see examples of both.
classDef k8s fill:#326ce5,stroke:#fff,stroke-width:4px,color:#fff; // defines style for the k8s class
class ingress,service,pod1,pod2 k8s; // k8s class is applied to elements ingress, service, pod1 and pod2.
You can include one or multiple classDef and class statements in your diagram.
For more information on styling and classes, see Mermaid Styling and classes docs.
How to use captions
A caption is a brief description of a diagram. A title or a short description of the diagram are examples of captions. Captions aren’t meant to replace explanatory text you have in your documentation. Rather, they serve as a “context link” between that text and your diagram.
The combination of some text and a diagram tied together with a caption help provide a concise representation of the information you wish to convey to the user.
Without captions, you are asking the user to scan the text above or below the diagram to figure out a meaning. This can be frustrating for the user.
Figure 9 lays out the three components for proper captioning: diagram, diagram caption and the diagram referral.
Inline Mermaid or
SVG image files]
B[Diagram Caption
Add Figure Number. and
Caption Text]
C[Diagram Referral
Referenence Figure Number
in text]
classDef box fill:#fff,stroke:#000,stroke-width:1px,color:#000;
class A,B,C box
click A "https://mermaid-js.github.io/mermaid-live-editor/edit#eyJjb2RlIjoiZmxvd2NoYXJ0XG4gICAgQVtEaWFncmFtPGJyPjxicj5JbmxpbmUgTWVybWFpZCBvcjxicj5TVkcgaW1hZ2UgZmlsZXNdXG4gICAgQltEaWFncmFtIENhcHRpb248YnI-PGJyPkFkZCBGaWd1cmUgTnVtYmVyLiBhbmQ8YnI-Q2FwdGlvbiBUZXh0XVxuICAgIENbRGlhZ3JhbSBSZWZlcnJhbDxicj48YnI-UmVmZXJlbmVuY2UgRmlndXJlIE51bWJlcjxicj5pbiB0ZXh0XVxuXG4gICAgY2xhc3NEZWYgYm94IGZpbGw6I2ZmZixzdHJva2U6IzAwMCxzdHJva2Utd2lkdGg6MXB4LGNvbG9yOiMwMDA7XG4gICAgY2xhc3MgQSxCLEMgYm94IiwibWVybWFpZCI6IntcbiAgXCJ0aGVtZVwiOiBcImRlZmF1bHRcIlxufSIsInVwZGF0ZUVkaXRvciI6ZmFsc2UsImF1dG9TeW5jIjp0cnVlLCJ1cGRhdGVEaWFncmFtIjpmYWxzZX0" _blank
click B "https://mermaid-js.github.io/mermaid-live-editor/edit#eyJjb2RlIjoiZmxvd2NoYXJ0XG4gICAgQVtEaWFncmFtPGJyPjxicj5JbmxpbmUgTWVybWFpZCBvcjxicj5TVkcgaW1hZ2UgZmlsZXNdXG4gICAgQltEaWFncmFtIENhcHRpb248YnI-PGJyPkFkZCBGaWd1cmUgTnVtYmVyLiBhbmQ8YnI-Q2FwdGlvbiBUZXh0XVxuICAgIENbRGlhZ3JhbSBSZWZlcnJhbDxicj48YnI-UmVmZXJlbmVuY2UgRmlndXJlIE51bWJlcjxicj5pbiB0ZXh0XVxuXG4gICAgY2xhc3NEZWYgYm94IGZpbGw6I2ZmZixzdHJva2U6IzAwMCxzdHJva2Utd2lkdGg6MXB4LGNvbG9yOiMwMDA7XG4gICAgY2xhc3MgQSxCLEMgYm94IiwibWVybWFpZCI6IntcbiAgXCJ0aGVtZVwiOiBcImRlZmF1bHRcIlxufSIsInVwZGF0ZUVkaXRvciI6ZmFsc2UsImF1dG9TeW5jIjp0cnVlLCJ1cGRhdGVEaWFncmFtIjpmYWxzZX0" _blank
click C "https://mermaid-js.github.io/mermaid-live-editor/edit#eyJjb2RlIjoiZmxvd2NoYXJ0XG4gICAgQVtEaWFncmFtPGJyPjxicj5JbmxpbmUgTWVybWFpZCBvcjxicj5TVkcgaW1hZ2UgZmlsZXNdXG4gICAgQltEaWFncmFtIENhcHRpb248YnI-PGJyPkFkZCBGaWd1cmUgTnVtYmVyLiBhbmQ8YnI-Q2FwdGlvbiBUZXh0XVxuICAgIENbRGlhZ3JhbSBSZWZlcnJhbDxicj48YnI-UmVmZXJlbmVuY2UgRmlndXJlIE51bWJlcjxicj5pbiB0ZXh0XVxuXG4gICAgY2xhc3NEZWYgYm94IGZpbGw6I2ZmZixzdHJva2U6IzAwMCxzdHJva2Utd2lkdGg6MXB4LGNvbG9yOiMwMDA7XG4gICAgY2xhc3MgQSxCLEMgYm94IiwibWVybWFpZCI6IntcbiAgXCJ0aGVtZVwiOiBcImRlZmF1bHRcIlxufSIsInVwZGF0ZUVkaXRvciI6ZmFsc2UsImF1dG9TeW5jIjp0cnVlLCJ1cGRhdGVEaWFncmFtIjpmYWxzZX0" _blank
Diagram
The Mermaid+SVG and External Tool methods generate .svg image files.
Here is the {{< figure >}} shortcode for the diagram defined in an
.svg image file saved to /images/development/contribute/documentation/components-of-kubernetes.svg:
{{< figure src="/images/development/contribute/documentation/components-of-kubernetes.svg" alt="United Manufacturing Hub pod running inside a cluster" class="diagram-large" caption="Figure 4. United Manufacturing Hub Architecture Components >}}
You should pass the src, alt, class and caption values into the
{{< figure >}} shortcode. You can adjust the size of the diagram using
diagram-large, diagram-medium and diagram-small classes.
See Methods for creating diagrams for more information on the different methods for creating diagrams.
Diagram Caption
Next, add a diagram caption.
If you define your diagram in an .svg image file, then you should use the
{{< figure >}} shortcode’s caption parameter.
{{< figure src="/images/development/contribute/documentation/components-of-kubernetes.svg" alt="United Manufacturing Hub pod running inside a cluster" class="diagram-large" caption="Figure 4. United Manufacturing Hub Architecture Components" >}}
If you define your diagram using inline Mermaid code, then you should use Markdown text.
Figure 4. United Manufacturing Hub Architecture Components
The following lists several items to consider when adding diagram captions:
- Use the
{{< figure >}}shortcode to add a diagram caption forMermaid+SVGandExternal Tooldiagrams. - Use simple Markdown text to add a diagram caption for the
Inlinemethod. - Prepend your diagram caption with
Figure NUMBER.. You must useFigureand the number must be unique for each diagram in your documentation page. Add a period after the number. - Add your diagram caption text after the
Figure NUMBER.on the same line. You must puncuate the caption with a period. Keep the caption text short. - Position your diagram caption BELOW your diagram.
Diagram Referral
Finally, you can add a diagram referral. This is used inside your text and
should precede the diagram itself. It allows a user to connect your text with
the associated diagram. The Figure NUMBER in your referral and caption must
match.
You should avoid using spatial references such as ..the image below.. or
..the following figure ..
Here is an example of a diagram referral:
Figure 10 depicts the components of the United Manufacturing Hub architecture.
The control plane ...
Diagram referrals are optional and there are cases where they might not be suitable. If you are not sure, add a diagram referral to your text to see if it looks and sounds okay. When in doubt, use a diagram referral.
Complete picture
Figure 10 shows the United Manufacturing Hub Architecture diagram that includes the diagram,
diagram caption and diagram referral. The {{< figure >}} shortcode
renders the diagram, adds the caption and includes the optional link
parameter so you can hyperlink the diagram. The diagram referral is contained
in this paragraph.
Here is the {{< figure >}} shortcode for this diagram:
{{< figure src="/images/development/contribute/documentation/components-of-kubernetes.svg" alt="United Manufacturing Hub pod running inside a cluster" class="diagram-large" caption="Figure 10. United Manufacturing Hub Architecture." link="https://kubernetes.io/docs/concepts/overview/components/" >}}

Figure 10. United Manufacturing Hub Architecture.
Tips
Always use the live editor to create/edit your diagram.
Always use Hugo local and Netlify previews to check out how the diagram appears in the documentation.
Include diagram source pointers such as a URL, source code location, or indicate the code is self-documenting.
Always use diagram captions.
Very helpful to include the diagram
.svgor.pngimage and/or Mermaid source code in issues and PRs.With the
Mermaid+SVGandExternal Toolmethods, use.svgimage files because they stay sharp when you zoom in on the diagram.Best practice for
.svgfiles is to load it into an SVG editing tool and use the “Convert text to paths” function. This ensures that the diagram renders the same on all systems, regardless of font availability and font rendering support.No Mermaid support for additional icons or artwork.
Hugo Mermaid shortcodes don’t work in the live editor.
Any time you modify a diagram in the live editor, you must save it to generate a new URL for the diagram.
Click on the diagrams in this section to view the code and diagram rendering in the live editor.
Look over the source code of this page,
diagram-guide.md, for more examples.Check out the Mermaid docs for explanations and examples.
Most important, Keep Diagrams Simple. This will save time for you and fellow contributors, and allow for easier reading by new and experienced users.
1.4.3.4 - Custom Hugo Shortcodes
One of the powerful features of Hugo is the ability to create custom shortcodes. Shortcodes are simple snippets of code that you can use to add complex content to your documentation.
Read more about shortcodes in the Hugo documentation.
Code example
You can use the codenew shortcode to display code examples in your documentation.
This is especially useful for code snippets that you want to reuse in multiple places.
After you add a new file with a code snippet in the examples directory, you can
reference it in your documentation using the codenew shortcode with the file
parameter set to the path to the file, relative to the examples directory.
A Copy button is automatically added to the code snippet. When the user clicks the button, the code is copied to the clipboard.
Here’s an example:
{{< codenew file="helm/install-umh.sh" >}}
The rendered shortcode looks like this:
helm install united-manufacturing-hub united-manufacturing-hub -n united-manufacturing-hubHeading
You can use the heading shortcode to use localized strings as headings in your
documentation. The available headings are described in the content types
page.
For example, to create a whatsnext heading, add the heading shortcode with the “whatsnext” string:
## {{% heading "whatsnext" %}}
Include
You can use the include shortcode to include a file in your documentation.
This is especially useful for including markdown files that you want to reuse in
multiple places.
After you add a new file in the includes directory, you can reference it in your
documentation using the include shortcode with the first parameter set to the
path to the file, relative to the includes directory.
Here’s an example:
{{< include "pod-logs.md" >}}
Mermaid
You can use the mermaid shortcode to display Mermaid diagrams in your documentation.
You can find more information in the diagram guide.
Here’s an example:
{{< mermaid >}}
graph TD;
    A-->B;
    A-->C;
    B-->D;
    C-->D;
{{< /mermaid >}}
The rendered shortcode looks like this:
Notice
You can use the notice shortcode to display a notice in your documentation.
There are four types of notices: note, warning, info, and tip.
Here’s an example:
{{< notice note >}}
This is a note.
{{< /notice >}}
{{< notice warning >}}
This is a warning.
{{< /notice >}}
{{< notice info >}}
This is an info.
{{< /notice >}}
{{< notice tip >}}
This is a tip.
{{< /notice >}}
The rendered shortcode looks like this:
Resource
You can use the resource shortcode to display a resource in your documentation.
The resource shortcode takes these parameters:
name: The name of the resource.type: The type of the resource.
This is useful for displaying resources which name might change over time, like a pod name.
Here’s an example:
{{< resource type="pod" name="database" >}}
The rendered shortcode looks like this: united-manufacturing-hub-timescaledb-0
The resources are defined in the i18n/en.toml file. You can add a new resource
by adding a new entry like [resource_<type>_<name>]
Table captions
You can make tables more accessible to screen readers by adding a table caption. To add a
caption to a table,
enclose the table with a table shortcode and specify the caption with the caption parameter.
Here’s an example:
{{< table caption="Configuration parameters" >}}
| Parameter  | Description                  | Default |
| :--------- | :--------------------------- | :------ |
| `timeout`  | The timeout for requests     | `30s`   |
| `logLevel` | The log level for log output | `INFO`  |
{{< /table >}}
The rendered table looks like this:
| Parameter | Description | Default |
|---|---|---|
timeout | The timeout for requests | 30s |
logLevel | The log level for log output | INFO |
If you inspect the HTML for the table, you should see this element immediately
after the opening <table> element:
<caption style="display: none;">Configuration parameters</caption>
Tabs
In a markdown page (.md file) on this site, you can add a tab set to display
multiple flavors of a given solution.
The tabs shortcode takes these parameters:
name: The name as shown on the tab.codelang: If you provide inner content to thetabshortcode, you can tell Hugo what code language to use for highlighting.include: The file to include in the tab. If the tab lives in a Hugo leaf bundle, the file – which can be any MIME type supported by Hugo – is looked up in the bundle itself. If not, the content page that needs to be included is looked up relative to the current page. Note that with theinclude, you do not have any shortcode inner content and must use the self-closing syntax. For example,{{< tab name="Content File #1" include="example1" />}}. The language needs to be specified undercodelangor the language is taken based on the file name. Non-content files are code-highlighted by default.- If your inner content is markdown, you must use the
%-delimiter to surround the tab. For example,{{% tab name="Tab 1" %}}This is **markdown**{{% /tab %}} - You can combine the variations mentioned above inside a tab set.
Below is a demo of the tabs shortcode.
Tabs demo: Code highlighting
{{< tabs name="tab_with_code" >}}
{{< tab name="Tab 1" codelang="bash" >}}
echo "This is tab 1."
{{< /tab >}}
{{< tab name="Tab 2" codelang="go" >}}
println "This is tab 2."
{{< /tab >}}
{{< /tabs >}}
Renders to:
echo "This is tab 1."
println "This is tab 2."
Tabs demo: Inline Markdown and HTML
{{< tabs name="tab_with_md" >}}
{{% tab name="Markdown" %}}
This is **some markdown.**
{{< note >}}
It can even contain shortcodes.
{{< /note >}}
{{% /tab %}}
{{< tab name="HTML" >}}
<div>
  <h3>Plain HTML</h3>
  <p>This is some <i>plain</i> HTML.</p>
</div>
{{< /tab >}}
{{< /tabs >}}
Renders to:
This is some markdown.
Plain HTML
This is some plain HTML.
Tabs demo: File include
{{< tabs name="tab_with_file_include" >}}
{{< tab name="Content File #1" include="example1" />}}
{{< tab name="Content File #2" include="example2" />}}
{{< tab name="JSON File" include="podtemplate" />}}
{{< /tabs >}}
Renders to:
This is an example content file inside the includes leaf bundle.
This is another example content file inside the includes leaf bundle.
  {
    "apiVersion": "v1",
    "kind": "PodTemplate",
    "metadata": {
      "name": "nginx"
    },
    "template": {
      "metadata": {
        "labels": {
          "name": "nginx"
        },
        "generateName": "nginx-"
      },
      "spec": {
         "containers": [{
           "name": "nginx",
           "image": "dockerfile/nginx",
           "ports": [{"containerPort": 80}]
         }]
      }
    }
  }
Version strings
To generate a version string for inclusion in the documentation, you can choose from
several version shortcodes. Each version shortcode displays a version string derived from
the value of a version parameter found in the site configuration file, config.toml.
The two most commonly used version parameters are latest and version.
{{< param "version" >}}
The {{< param "version" >}} shortcode generates the value of the current
version of the Kubernetes documentation from the version site parameter. The
param shortcode accepts the name of one site parameter, in this case:
version.
Renders to:
v0.2{{< latest-umh-version >}}
The {{< latest-umh-version >}} shortcode returns the value of the latestUMH site parameter.
The latestUMH site parameter must be updated when a new version of the UMH Helm chart is released.
Renders to:
{{< latest-umh-semver >}}
The {{< latest-umh-semver >}} shortcode generates the value of latestUMH
without the “v” prefix.
Renders to:
{{< version-check >}}
The {{< version-check >}} shortcode checks if the min-kubernetes-server-version
page parameter is present and then uses this value to compare to version.
Renders to:
To check the United Manufacturing Hub version, open UMHLens / OpenLens and go to Helm > Releases. The version is listed in the Version column.What’s next
- Read the Hugo documentation.
- Learn how to write a new topic.
- Read the Content guide.
1.4.4 - Localizing UMH documentation
This page shows you how to localize the docs for a different language.
Contribute to an existing localization
You can help add or improve the content of an existing localization.
Find your two-letter language code
First, consult the ISO 639-1standard to find your
localization’s two-letter language code. For example, the two-letter code for
German is de.
Some languages use a lowercase version of the country code as defined by the
ISO-3166 along with their language codes. For example, the Brazilian Portuguese
language code is pt-br.
Fork and clone the repo
First, create your ownfork of the united-manufacturing-hub/umh.docs.umh.app repository.
Then, clone your fork and cd into it:
git clone https://github.com/<username>/umh.docs.umh.app
cd umh.docs.umh.app
The website content directory includes subdirectories for each language. The
localization you want to help out with is inside content/<two-letter-code>.
Suggest changes
Create or update your chosen localized page based on the English original. See translating content for more details.
If you notice a technical inaccuracy or other problem with the upstream (English) documentation, you should fix the upstream documentation first and then repeat the equivalent fix by updating the localization you’re working on.
Limit changes in a pull requests to a single localization. Reviewing pull requests that change content in multiple localizations is problematic.
Follow Suggesting Content Improvements to propose changes to that localization. The process is similar to proposing changes to the upstream (English) content.
Start a new localization
If you want the United Manufacturing Hub documentation localized into a new language, here’s what you need to do.
All localization teams must be self-sufficient. The United Manufacturing Hub website is happy to host your work, but it’s up to you to translate it and keep existing localized content current.
You’ll need to know the two-letter language code for your language. Consult the
ISO 639-1 standard
to find your localization’s two-letter language code. For example, the
two-letter code for Korean is ko.
If the language you are starting a localization for is spoken in various places
with significant differences between the variants, it might make sense to
combine the lowercased ISO-3166 country code with the language two-letter code.
For example, Brazilian Portuguese is localized as pt-br.
When you start a new localization, you must localize all the minimum required content before the United Manufacturing Hub project can publish your changes to the live website.
Modify the site configuration
The United Manufacturing Hub website uses Hugo as its web framework. The website’s Hugo
configuration resides in the
config.toml
file. You’ll need to modify config.toml to support a new localization.
Add a configuration block for the new language to config.toml under the
existing [languages] block. The German block, for example, looks like:
[languages.de]
title = "United Manufacturing Hub"
description = "Dokumentation des United Manufacturing Hub"
languageName = "Deutsch (German)"
languageNameLatinScript = "Deutsch"
contentDir = "content/de"
weight = 8
The language selection bar lists the value for languageName. Assign “language
name in native script and language (English language name in Latin script)” to
languageName. For example, languageName = "한국어 (Korean)" or languageName = "Deutsch (German)".
languageNameLatinScript can be used to access the language name in Latin
script and use it in the theme. Assign “language name in latin script” to
languageNameLatinScript. For example, languageNameLatinScript ="Korean" or
languageNameLatinScript = "Deutsch".
When assigning a weight parameter for your block, find the language block with
the highest weight and add 1 to that value.
For more information about Hugo’s multilingual support, see “Multilingual Mode”.
Add a new localization directory
Add a language-specific subdirectory to the
content folder in
the repository. For example, the two-letter code for German is de:
mkdir content/de
You also need to create a directory inside i18n/ for
localized strings; look at existing localizations
for an example.
For example, for German the strings live in i18n/de.toml.
Open a pull request
Next, open a pull request
(PR) to add a localization to the united-manufacturing-hub/umh.docs.umh.app repository. The PR must
include all the minimum required content before it
can be approved.
Add a localized README file
To guide other localization contributors, add a new
README-**.md to the top
level of united-manufacturing-hub/umh.docs.umh.app, where
** is the two-letter language code. For example, a German README file would be
README-de.md.
Guide localization contributors in the localized README-**.md file.
Include the same information contained in README.md as well as:
- A point of contact for the localization project
- Any information specific to the localization
After you create the localized README, add a link to the file from the main
English README.md, and include contact information in English. You can provide
a GitHub ID, email address, Discord channel, or another
method of contact.
Launching your new localization
When a localization meets the requirements for workflow and minimum output, the UMH team does the following:
- Enables language selection on the website.
- Publicizes the localization’s availability through the United Manufacturing Hub blog.
Translating content
Localizing all the United Manufacturing Hub documentation is an enormous task. It’s okay to start small and expand over time.
Minimum required content
At a minimum, all localizations must include:
| Description | URLs |
|---|---|
| Administration | All heading and subheading URLs |
| Architecture | All heading and subheading URLs |
| Getting started | All heading and subheading URLs |
| Produciton guide | All heading and subheading URLs |
| Site strings | All site strings in a new localized TOML file |
Translated documents must reside in their own content/**/ subdirectory, but otherwise, follow the
same URL path as the English source. For example, to prepare the
Getting started tutorial for translation into German,
create a subfolder under the content/de/ folder and copy the English source:
mkdir -p content/de/docs/getstarted
cp content/en/docs/getstarted/installation.md content/de/docs/getstarted/installation.md
Translation tools can speed up the translation process. For example, some editors offer plugins to quickly translate text.
To ensure accuracy in grammar and meaning, members of your localization team should carefully review all machine-generated translations before publishing.
Source files
Localizations must be based on the English files from a specific release targeted by the localization team. Each localization team can decide which release to target, referred to as the target version below.
To find source files for your target version:
Navigate to the United Manufacturing Hub website repository at united-manufacturing-hub/umh.docs.umh.app.
Select a branch for your target version from the following table:
| Target version | Branch |
|---|---|
| Latest version | main |
The main branch holds content for the current release .
Site strings in i18n
Localizations must include the contents of
i18n/en.toml
in a new language-specific file. Using German as an example:
i18n/de.toml.
Add a new localization file to i18n/. For example, with German (de):
cp i18n/en.toml i18n/de.toml
Revise the comments at the top of the file to suit your localization, then translate the value of each string. For example, this is the German-language placeholder text for the search form:
[ui_search_placeholder]
other = "Suchen"
Localizing site strings lets you customize site-wide text and features: for example, the legal copyright text in the footer on each page.
1.4.5 - Versioning Documentation
With the Beta release of the Management Console, we are introducing a new versioning system for the documentation website. This system will ensure that the documentation is versioned in sync with the Management Console’s minor versions. Each new minor release of the Management Console will correspond to a new version of the documentation.
Branches
Below is an outline of the branching strategy we will employ for versioning the documentation website:

main branch
The main branch will serve as the living documentation for the latest released
version of the Management Console. Following a new release, only patches and
hotfixes will be committed to this branch.
Version branches
Upon the release of a new minor version of the Management Console, a snapshot of
the main branch will be taken. This serves as an archive for the documentation
corresponding to the previous version. For instance, with the release of
Management Console version 1.1, we will create a branch from main named v1.0.
The v1.0 branch will host the documentation for the Management Console version
1.0 and will no longer receive updates for subsequent versions.
Development branches
Simultaneously with the snapshot creation, we’ll establish a development branch
for the upcoming version. For example, concurrent with the launch of Management
Console version 1.1, we will initiate a dev-v1.2 branch. This branch will
accumulate all the documentation updates for the forthcoming version of the
Management Console. Upon the release of the next version, we will merge the
dev-v1.2 branch into main, updating the documentation website to reflect the
newest version.
Hugo configuration
To maintain the versioning of our documentation website, specific adjustments
need to be made to the Hugo configuration file (hugo.toml). Follow the steps
below to ensure the versioning is correctly reflected.
Version branches
Update the
latestparameter to match the branch version. For instance, for thev1.0branch, setlatestto1.0.The
[[params.versions]]array should include entries for the current version and the upcoming version. For thev1.0branch, the configuration would be:[[params.versions]] version = "1.1" # Upcoming version url = "https://umh.docs.umh.app" branch = "main" [[params.versions]] version = "1.0" # Current version url = "https://v1-0.umh-docs-umh-app.pages.dev/docs/" branch = "v1.0"
Development branches
Set the
latestparameter to the version that the branch is preparing. If the branch isdev-v1.2, thenlatestshould be1.2.The
[[params.versions]]array should list the version being developed using the Cloudflare Pages URL. The entry fordev-v1.2would be:[[params.versions]] version = "1.2" # Version in development url = "https://dev-v1-2--umh-docs-umh-app.pages.dev" branch = "dev-v1.2" [[params.versions]] version = "1.1" # latest version url = "https://umh.docs.umh.app" branch = "main"Prior to merging a development branch into
main, update theurlfor the version being released to point to the main site and adjust the entry for the previous version to its Cloudflare Pages URL. For instance, just before mergingdev-v1.2:[[params.versions]] version = "1.2" # New stable version url = "https://umh.docs.umh.app" branch = "main" [[params.versions]] version = "1.1" # Previous version url = "https://v1-1--umh-docs-umh-app.pages.dev" branch = "v1.1"
Always ensure that the [[params.versions]] array reflects the correct order of
the versions, with the newest version appearing first.
2 - Debugging using fgtrace
Enable fgtrace
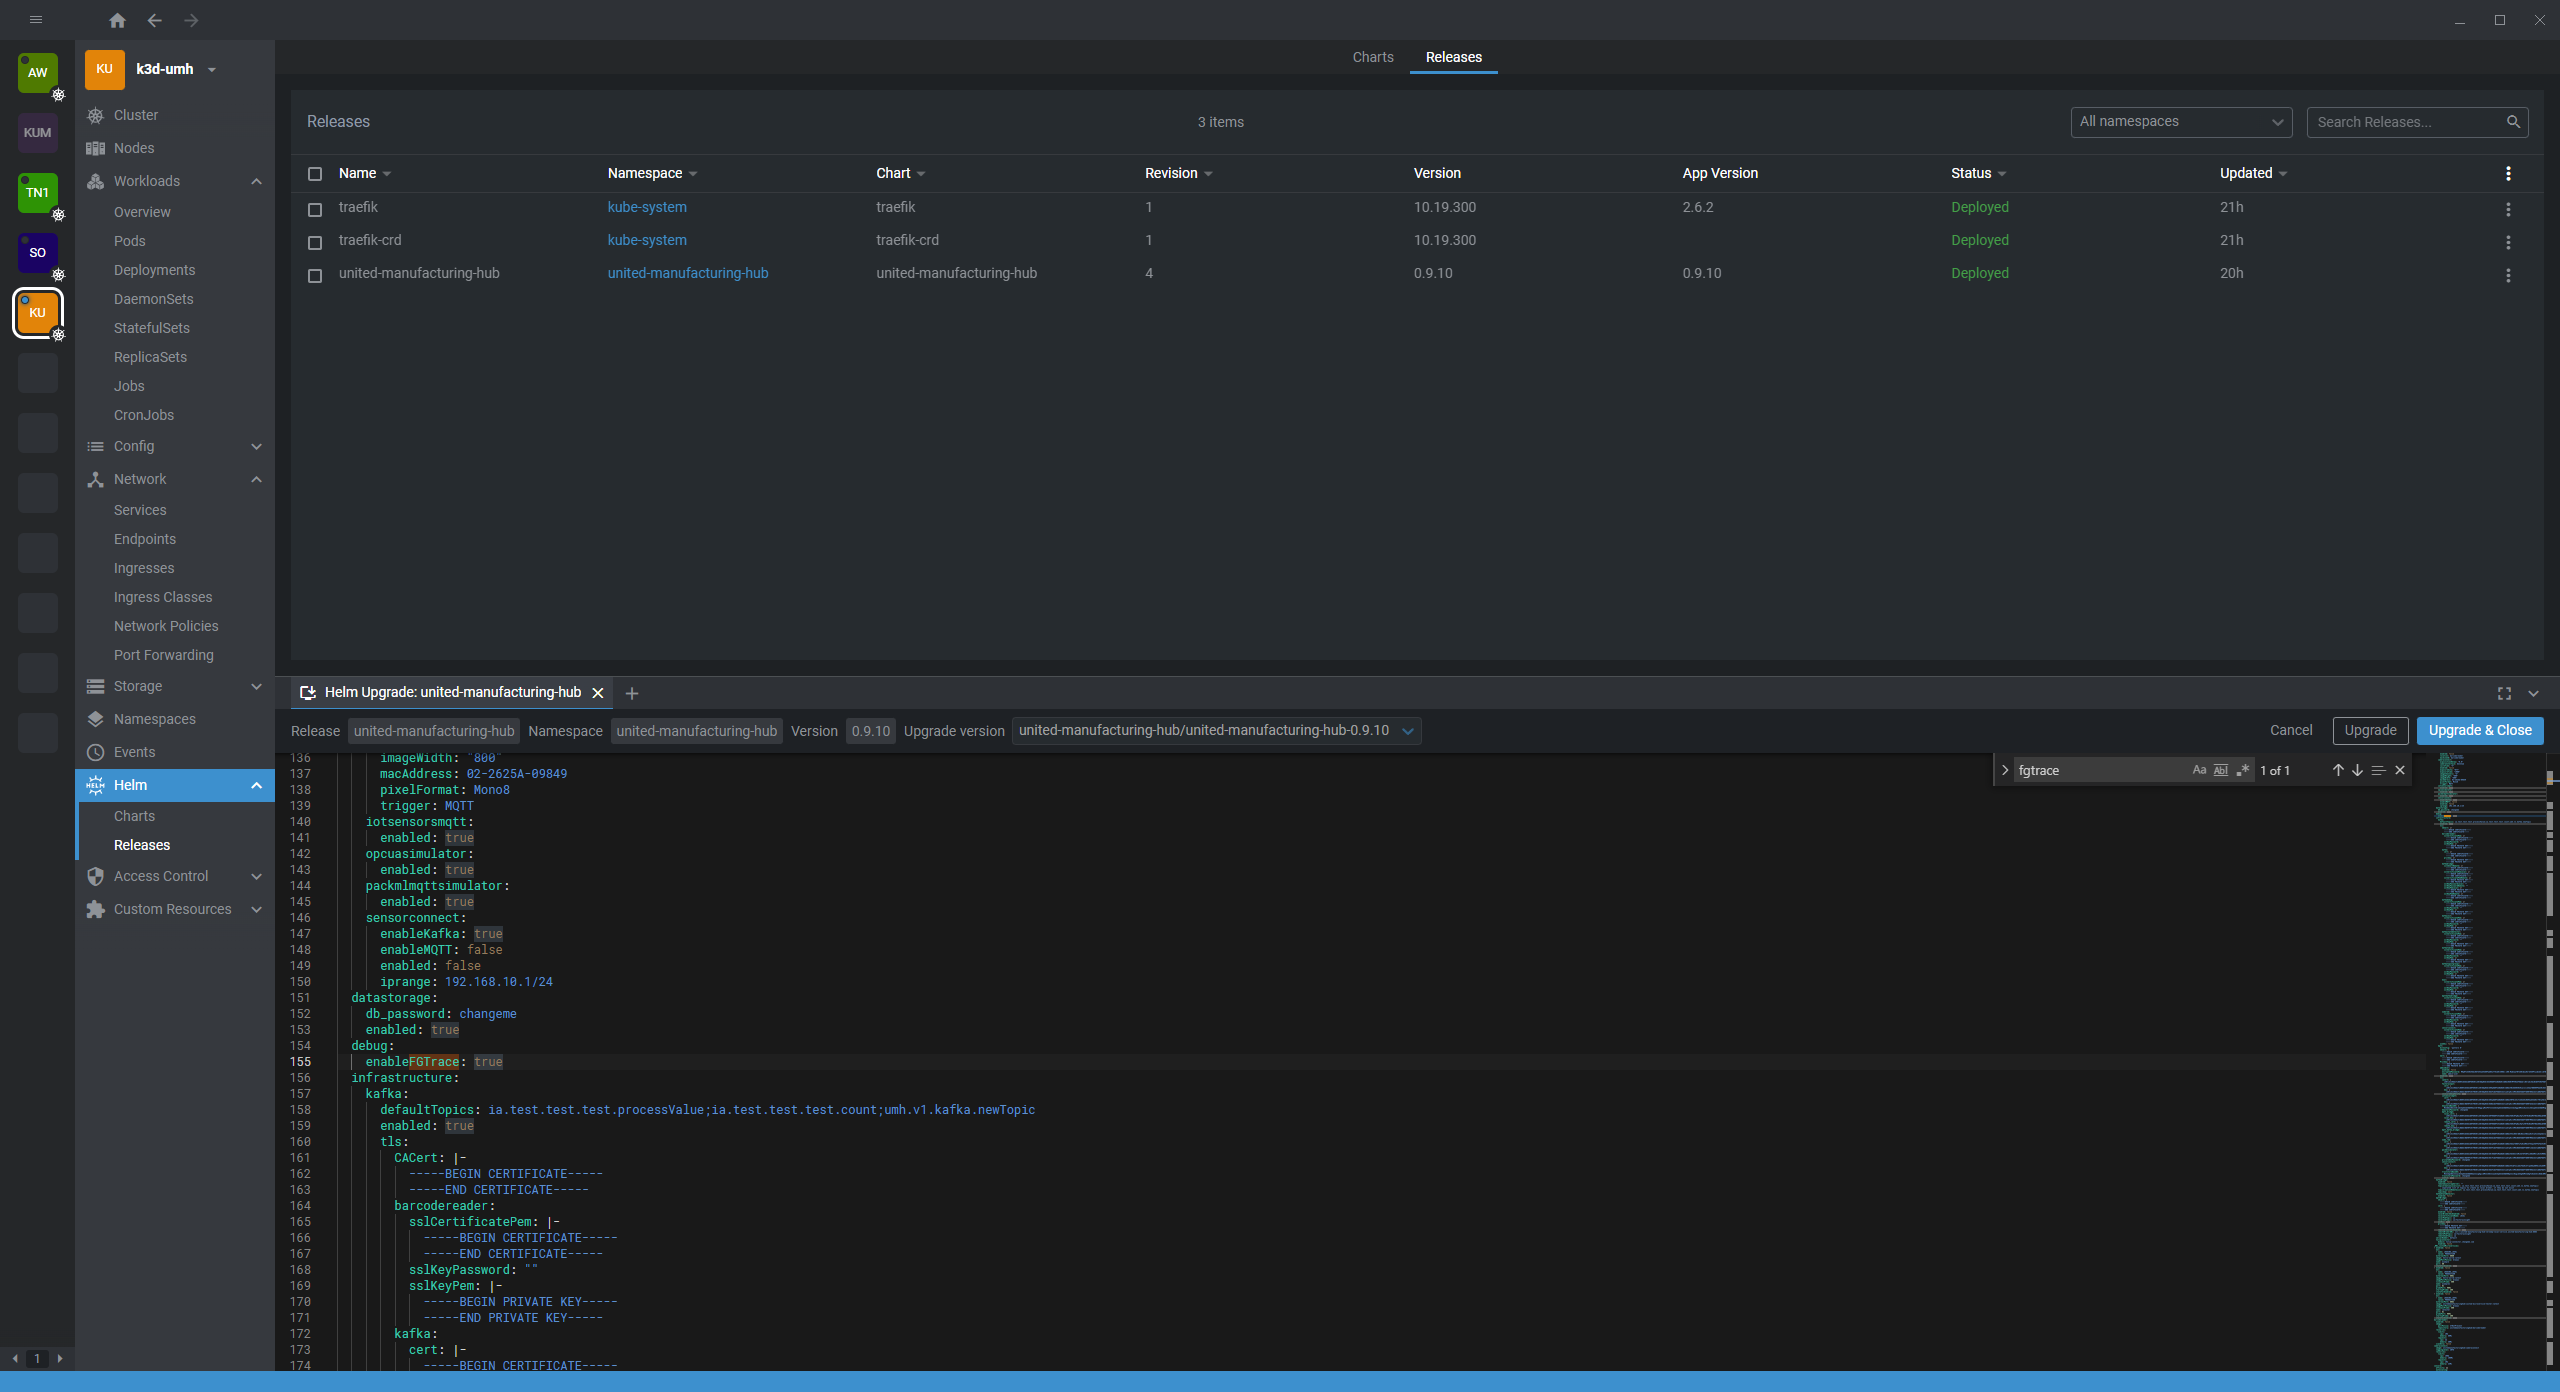
Forward the new fgtrace port
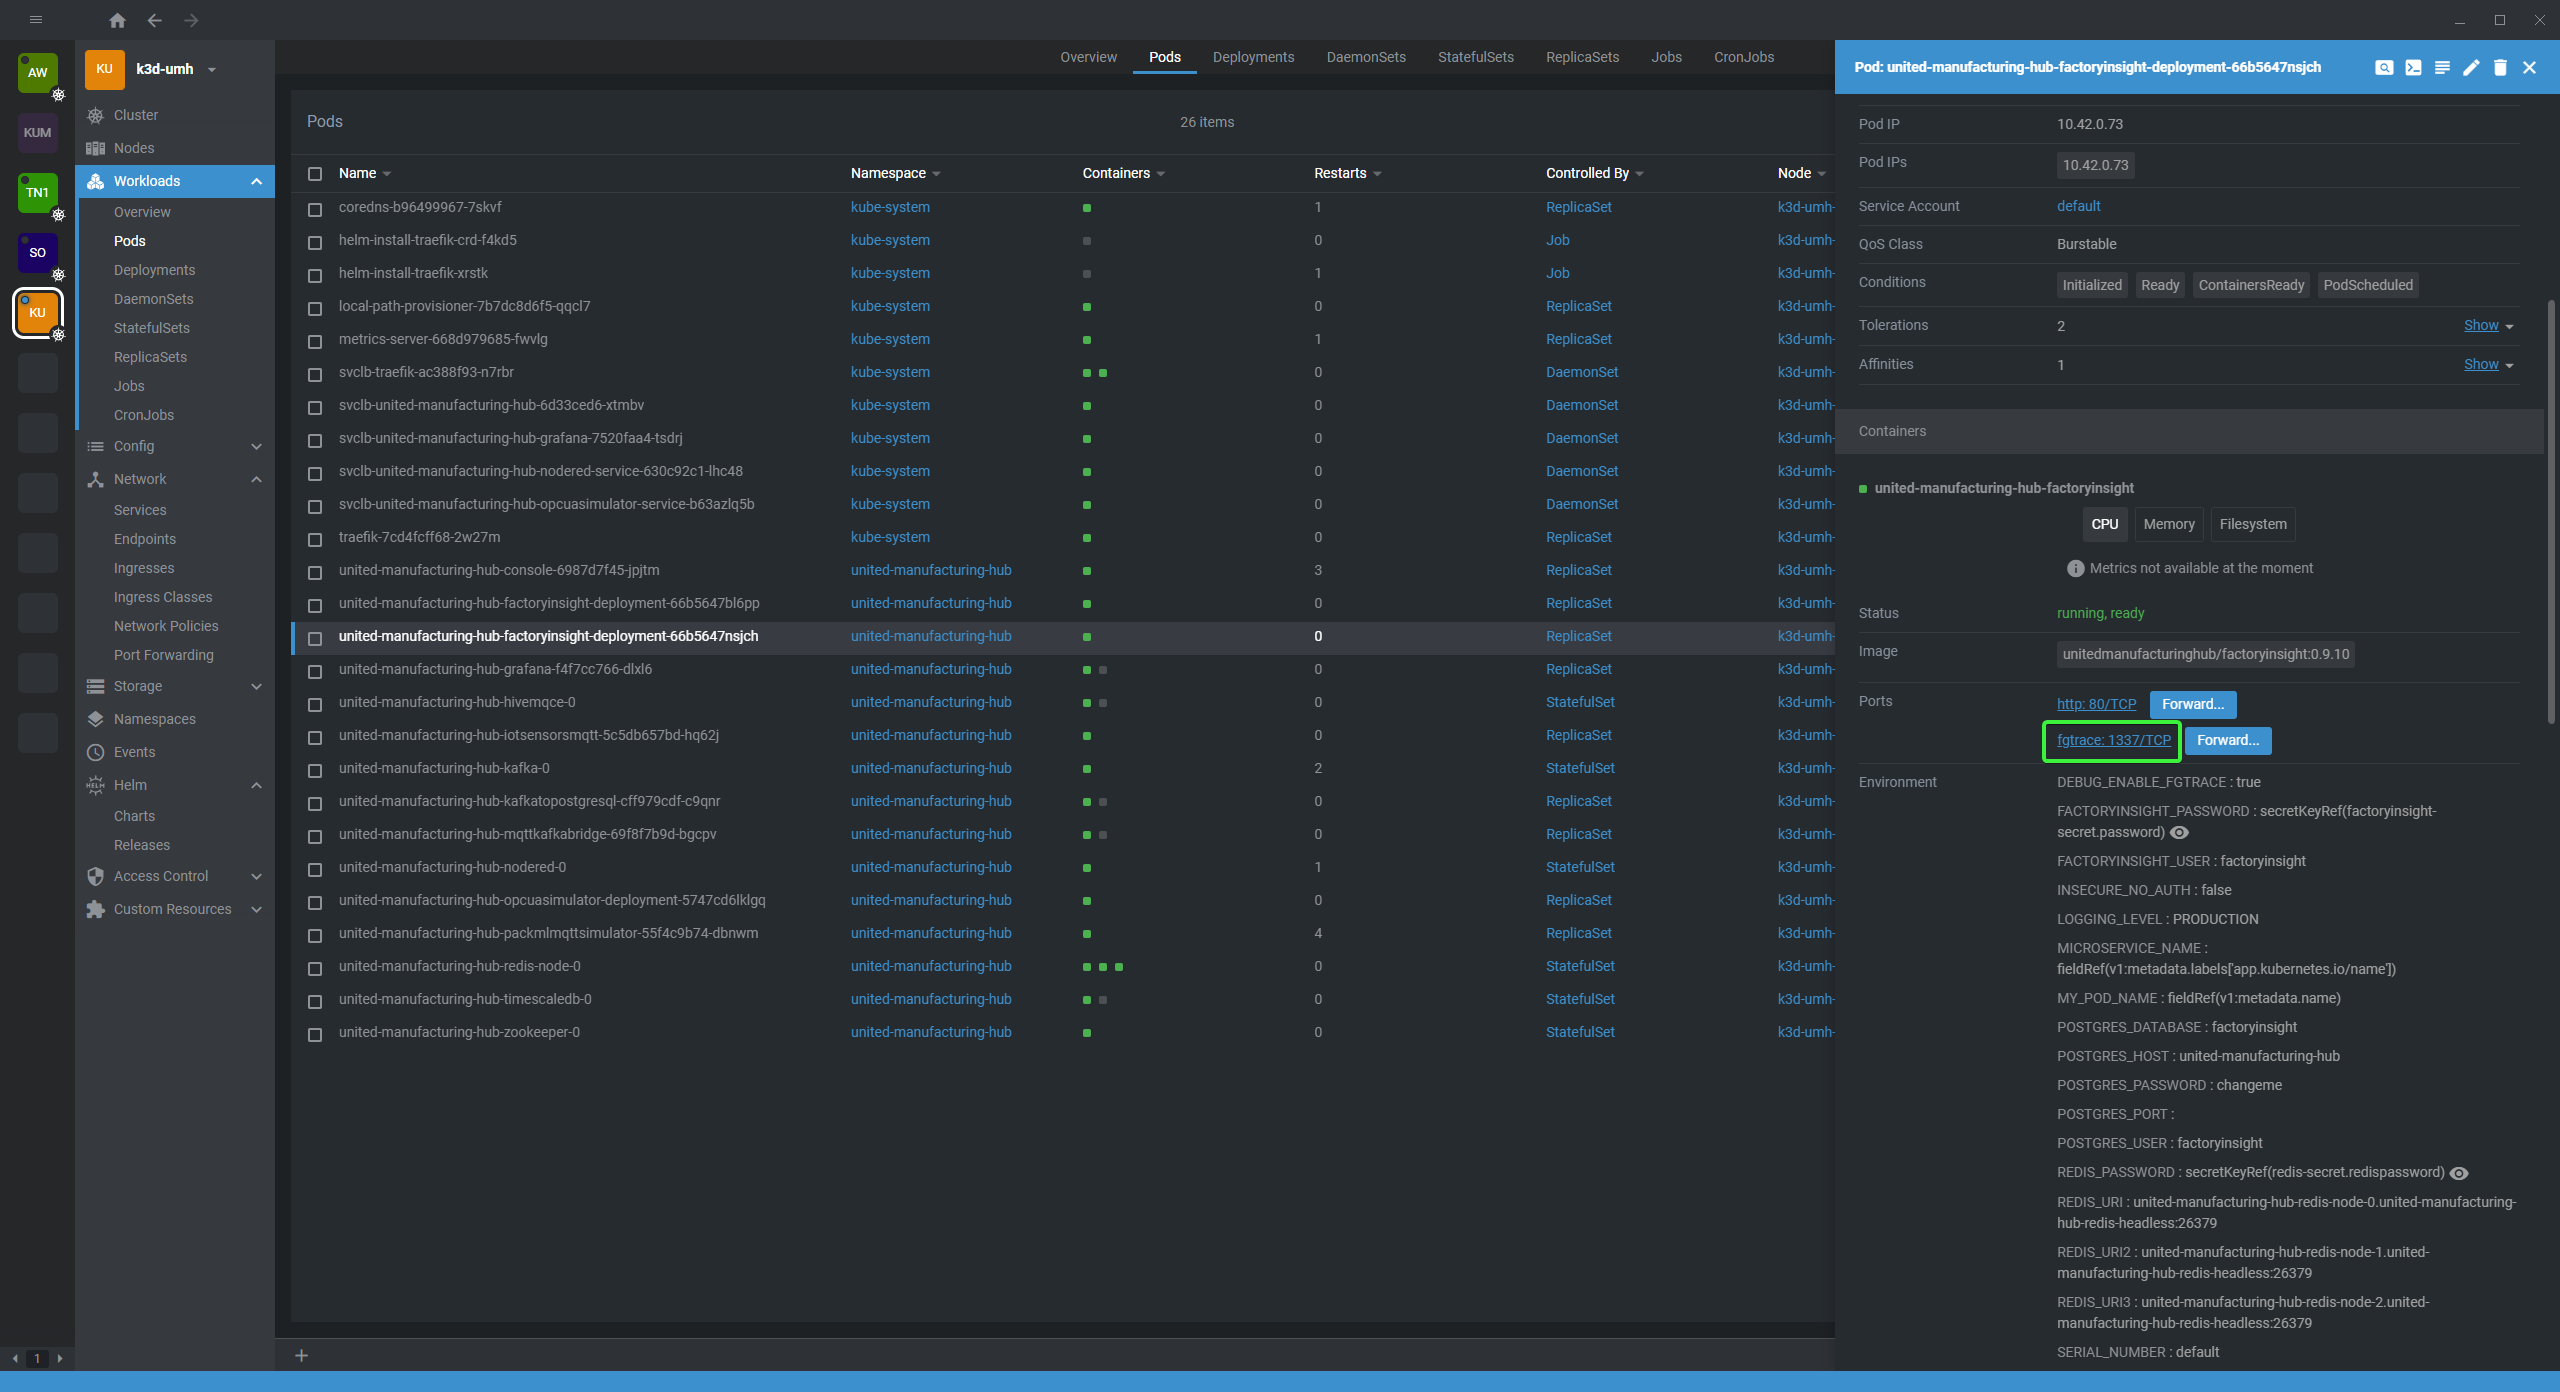
Visit the
/debug/fgtracetrace path using Insomnia or a similar tool. Please note that it will take about half a minute for a trace to complete.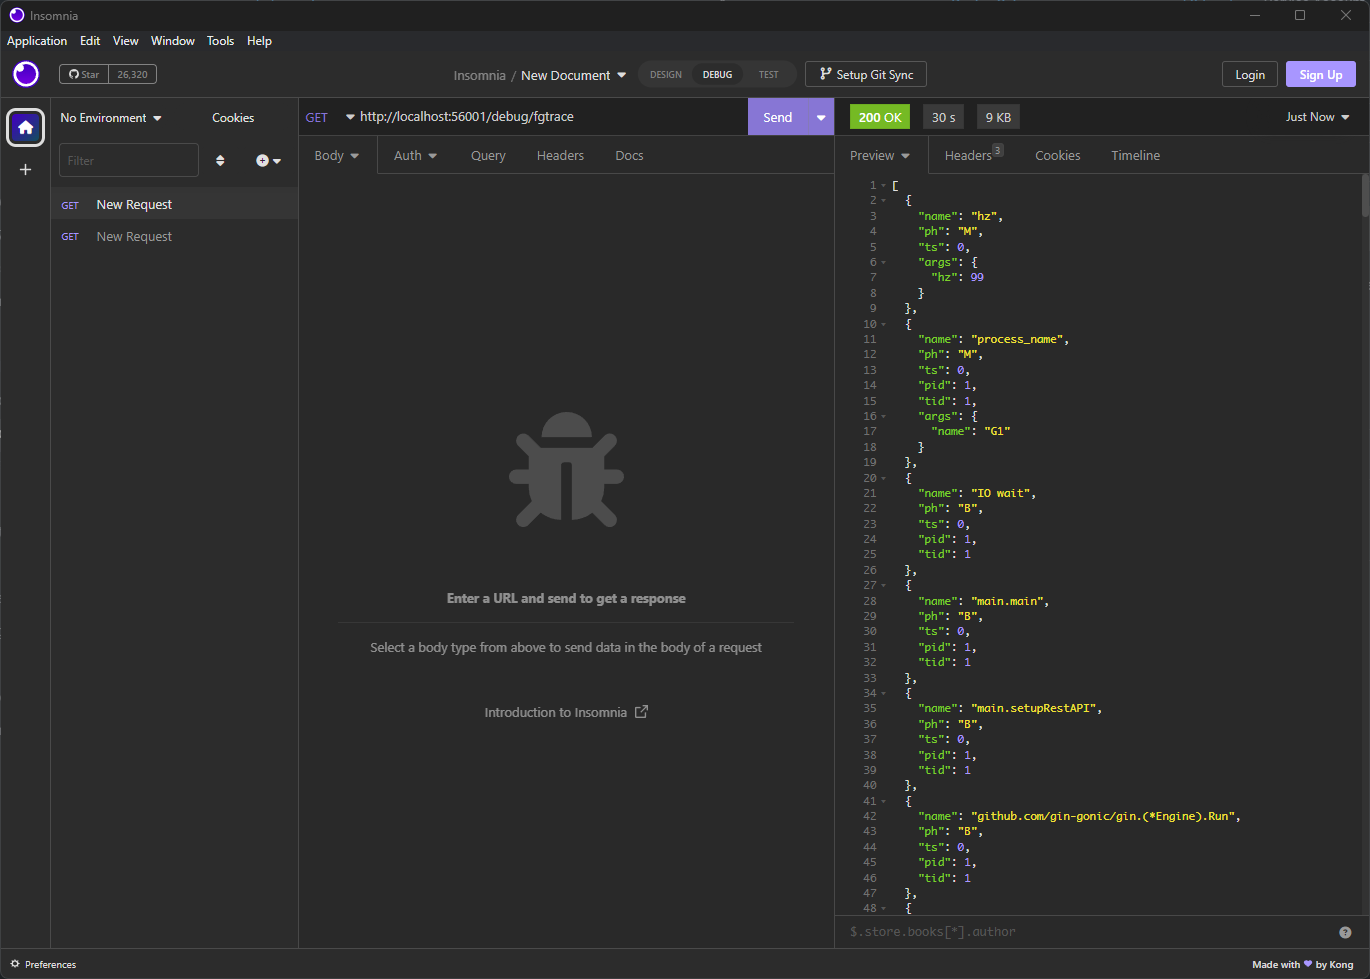
Export the returned JSON
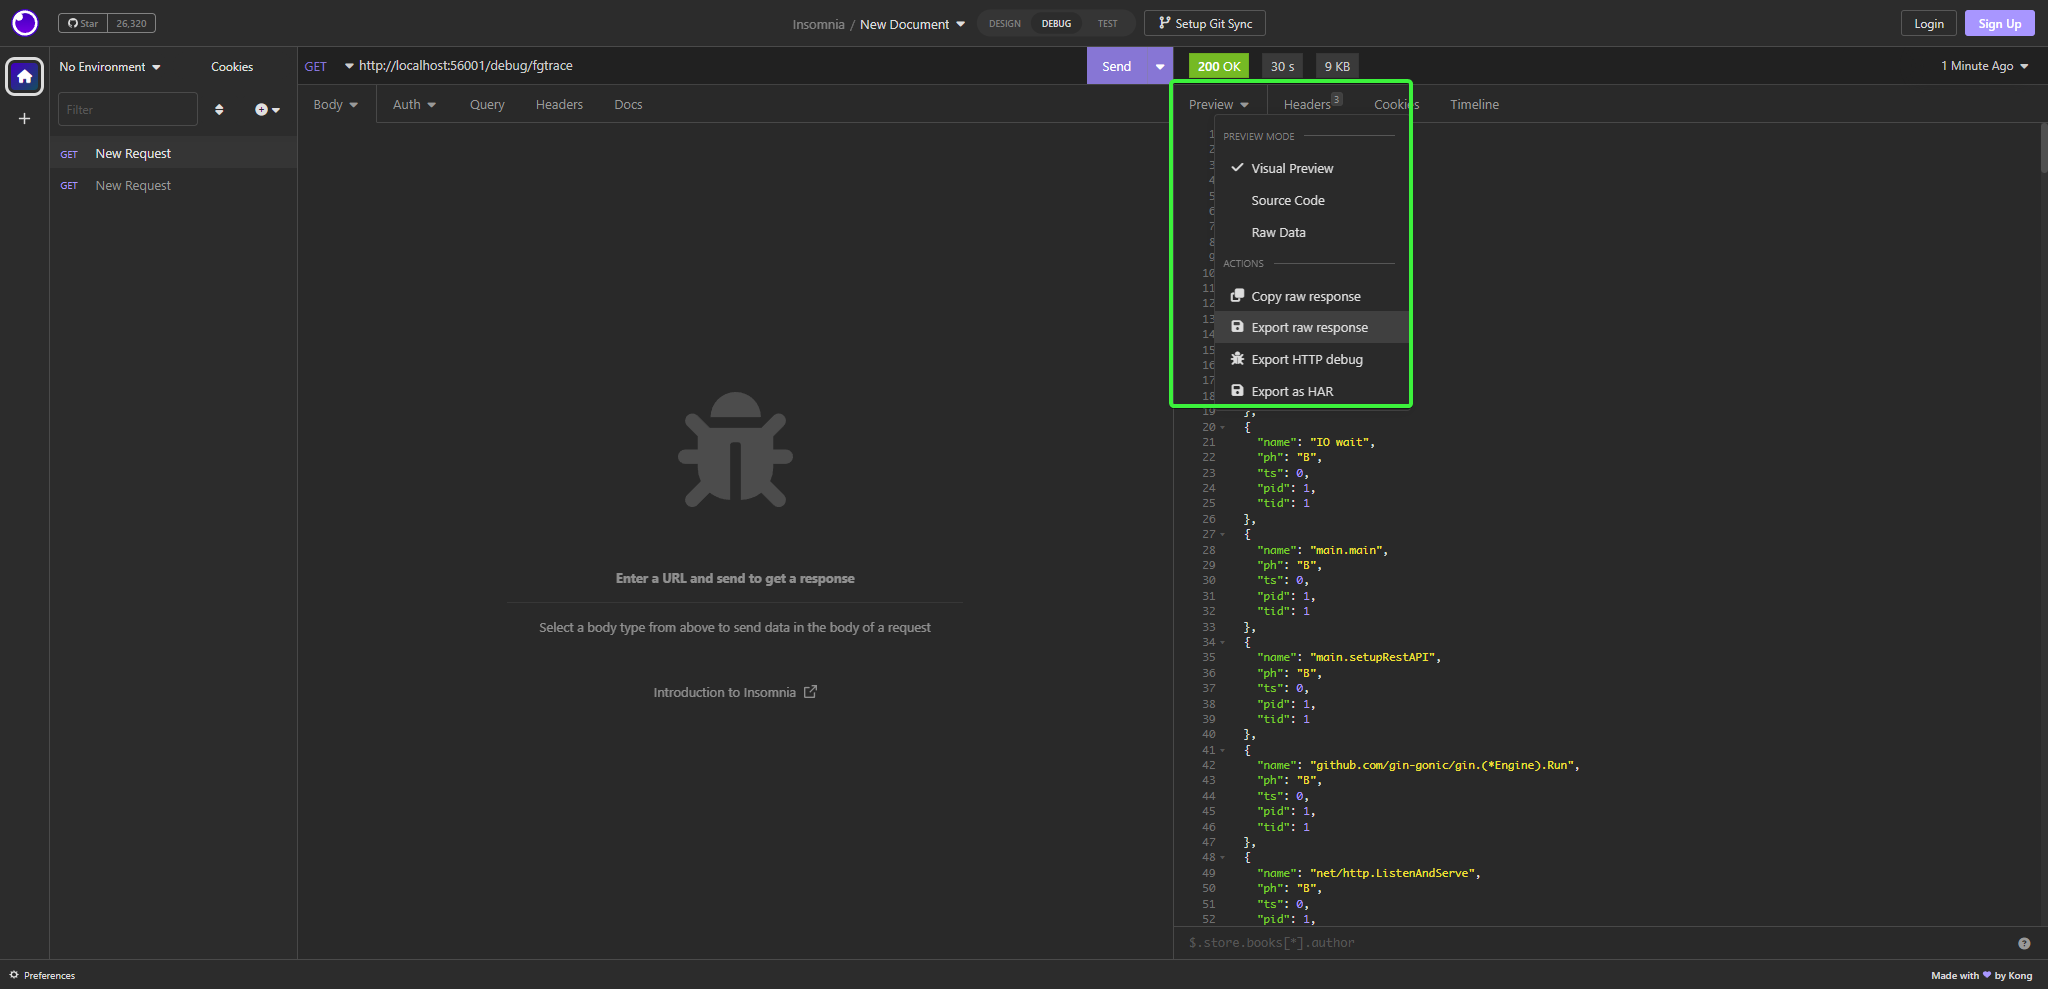
Open the Perfetto UI
Click on “Open trace file” and select the exported JSON

Wait for it to load
You are now viewing a Chrome-like waterfall graph that shows the wallclock time used by each goroutine.
Expanding a goroutine will allow you to view the function calls it made.
Please note that due to our sampling frequency, function calls that take less than 0.01 seconds will not be captured.


Changing the trace length and frequency
To control the trace length and frequency, you can use the query parameters “seconds” and “hz”.
