This is the multi-page printable view of this section. Click here to print.
Production Guide
- 1: Installation
- 2: Upgrading
- 2.1: Upgrade to v0.15.0
- 2.2: Upgrade to v0.14.0
- 2.3: Upgrade to v0.13.7
- 2.4: Upgrade to v0.13.6
- 2.5: Upgrade to v0.10.6
- 2.6: Management Console Upgrades
- 2.7: Migrate to Data Model V1
- 2.8: Archive
- 2.8.1: Upgrade to v0.9.34
- 2.8.2: Upgrade to v0.9.15
- 2.8.3: Upgrade to v0.9.14
- 2.8.4: Upgrade to v0.9.13
- 2.8.5: Upgrade to v0.9.12
- 2.8.6: Upgrade to v0.9.11
- 2.8.7: Upgrade to v0.9.10
- 2.8.8: Upgrade to v0.9.9
- 2.8.9: Upgrade to v0.9.8
- 2.8.10: Upgrade to v0.9.7
- 2.8.11: Upgrade to v0.9.6
- 2.8.12: Upgrade to v0.9.5
- 2.8.13: Upgrade to v0.9.4
- 3: Administration
- 3.1: Access the Database
- 3.2: Access Services From Within the Cluster
- 3.3: Access Services Outside the Cluster
- 3.4: Expose Grafana to the Internet
- 3.5: Install Custom Drivers in NodeRed
- 3.6: Execute Kafka Shell Scripts
- 3.7: Reduce database size
- 3.8: Use Merge Point To Normalize Kafka Topics
- 3.9: Delete Assets from the Database
- 3.10: Change the Language in Factoryinsight
- 3.11: Explore Cached Data
- 4: Backup & Recovery
- 4.1: Backup and Restore the United Manufacturing Hub
- 4.2: Backup and Restore Database
- 4.3: Import and Export Node-RED Flows
- 5: Security
1 - Installation
Learn how to install the United Manufacturing Hub using completely Free and Open Source Software.
1.1 - Advanced Installation
This page describes advanced requirements and considerations when installing the United Manufacturing Hub. It is meant to be an additional guide for the Installation guide page.
You may also find these step-by-step installation guides helpful:
Storage Configuration
When setting up your virtual machine for UMH:
Partition Layout
- The default Rocky Linux installation typically creates a large
/homepartition - During OS installation, you may use custom partitioning to ensure the root partition (
/) has sufficient space ()
Install location
- The kubernetes data directory is stored in
/var/lib/rancher/k3sby default. - This can be overridden by setting the
K3S_DATA_DIRenvironment variable. See Kubernetes Configuration Variables for more information.
Virtual Machine Configuration
There are some specific settings that are recommended for the virtual machine:
Networking
- Use a bridged network adapter
- NAT or host-only adapters will prevent external connections to your instance
- The VM must be able to:
- Access the internet for installation and updates
- Communicate with other devices on your network
- Accept incoming connections from clients
Advanced Requirements
CPU Configuration
- Enable CPU virtualization extensions (VT-x/AMD-V) on the host
- Allocate physical CPU cores rather than virtual cores when possible
- For production environments, reserve the CPU resources
Memory Settings
- Use static memory allocation rather than dynamic/balloon drivers
- Reserve the memory in the hypervisor to prevent memory swapping
Other Settings
- Disable unnecessary virtual hardware (like sound cards, USB controllers)
- Use paravirtualized drivers when available for better performance
General Script Control Variables
For advanced users, the following variables can be used to control the behavior of the script:
| Environment Variable | Script Variable | Default Value | Description |
|---|---|---|---|
AUTO_SELECT_EXTERNAL_IP | auto_select_external_ip | false | If true, automatically pick the first non-loopback network interface and set EXTERNAL_IP/EXTERNAL_IP_INTERFACE/EXTERNAL_IP_GATEWAY based on it. |
GENERAL_IGNORE_ERRORS | ignore_errors | false | If true, the script will ignore errors and continue, mainly used for troubleshooting. |
GENERAL_TIMEOUT | TIMEOUT | 120 | Time in seconds to wait for a process before timing out (default: 2 minutes). |
GENERAL_INTERVAL | INTERVAL | 5 | Interval in seconds to check a process status (default: every 5 seconds). |
GENERAL_RETRIES | RETRIES | 10 | Number of retries for certain checks (default: 10). |
UNINSTALL | UNINSTALL | false | If true, the script will uninstall the UMH, Companion, and Kubernetes instead of installing them. |
EXTERNAL_IP | EXTERNAL_IP | (unset) | Manually set the external IP of the machine. |
EXTERNAL_IP_INTERFACE | EXTERNAL_IP_INTERFACE | (unset) | Manually set the network interface associated with EXTERNAL_IP. |
EXTERNAL_IP_GATEWAY | EXTERNAL_IP_GATEWAY | (unset) | Manually set the default gateway associated with EXTERNAL_IP_INTERFACE. |
DNS_SERVER | DNS_SERVER | (unset) | Manually set the DNS server to be used by mgmtcompanion. |
Tooling Installation Variables
| Environment Variable | Script Variable | Default Value | Description |
|---|---|---|---|
TOOL_K3S_VERSION | INSTALL_K3S_VERSION | v1.29.5+k3s1 | Specifies the version of k3s to be installed. |
TOOL_K3S_SELINUX_VERSION | INSTALL_K3S_SELINUX_VERSION | k3s-selinux-1.5-1.el9.noarch.rpm | Specifies the version (or RPM) of k3s SELinux policy to install on RHEL systems. |
TOOL_KUBECTL_VERSION | INSTALL_KUBECTL_VERSION | v1.29.5 | Specifies the version of kubectl to be installed. |
TOOL_HELM_VERSION | INSTALL_HELM_VERSION | v3.13.2 | Specifies the version of helm to be installed. |
TOOL_K3S_CUSTOM_TLS_SAN | CUSTOM_TLS_SAN | (unset) | Custom TLS Subject Alternative Names for k3s. For example, IP addresses or a domain name for TLS certificates. |
TOOL_K3S_KUBECONFIG | KUBECONFIG | /etc/rancher/k3s/k3s.yaml | Path to the kubeconfig file to be used by kubectl, helm, etc. |
Kubernetes Configuration Variables
| Environment Variable | Script Variable | Default Value | Description |
|---|---|---|---|
KUBE_NODE_NAME | NODE_NAME | Uses the system’s hostname | Node name in the Kubernetes cluster. |
AUTO_PATCH_HOSTNAME | auto_patch_hostname | false | If true, automatically sets the system hostname to NODE_NAME without user confirmation. |
| (Set internally) | INSTALL_K3S_EXEC | (constructed dynamically) | Internal variable to pass additional flags (like --tls-san) during k3s installation. This is auto-generated; not usually set directly. |
K3S_DATA_DIR | K3S_DATA_DIR | k3s default (/var/lib/rancher/k3s or ${HOME}/.rancher/k3s if not root) | Specifies the data directory for k3s by setting the --data-dir flag. |
Speedtest Configuration Variables
| Environment Variable | Script Variable | Default Value | Description |
|---|---|---|---|
SPEEDTEST_MIN_DOWNLOAD | MIN_DOWNLOAD | 50000000 | Minimum download speed in bits per second (default: 50 Mbps). |
SPEEDTEST_MIN_UPLOAD | MIN_UPLOAD | 10000000 | Minimum upload speed in bits per second (default: 10 Mbps). |
SPEEDTEST_MIN_PING | MIN_PING | 50 | Maximum ping in milliseconds (default: 50). |
| (Script-internal) | MEASURED_UPLOAD | 0 | Automatically set by script after running speed test; not typically set by the user. |
| (Script-internal) | MEASURED_DOWNLOAD | 0 | Automatically set by script after running speed test; not typically set by the user. |
| (Script-internal) | MEASURED_PING | 0 | Automatically set by script after running speed test; not typically set by the user. |
UMH Installation Variables
| Environment Variable | Script Variable | Default Value | Description |
|---|---|---|---|
UMH_SKIP_INSTALL | skip_umh_install | false | If true, skips the installation of the United Manufacturing Hub (UMH). |
UMH_FORCE_OVERWRITE | force_umh_overwrite | false | If true, forces overwriting an existing UMH installation without prompting the user. |
UMH_VERSION | UMH_VERSION | 0.27.0 | Specifies which version of the UMH chart to install. |
UMH_HELM_CHART_URL | UMH_HELM_CHART_URL | https://management.umh.app/helm/umh | The URL of the UMH Helm chart repository. |
ALLOW_HELM_PRERELEASE | ALLOW_HELM_PRERELEASE | false | If true, allows Helm to install pre-release versions of UMH. |
IS_LITE_INSTALL | IS_LITE_INSTALL | false | If true, installs a “lite” version of UMH; forcibly sets skip_umh_install to true. |
IS_FULL_INSTALL | IS_FULL_INSTALL | true | True if installing the “full” version of UMH. Note that it becomes false if IS_LITE_INSTALL is true. |
Management Companion Installation Variables
| Environment Variable | Script Variable | Default Value | Description |
|---|---|---|---|
MGMT_AUTH_TOKEN | AUTH_TOKEN | (unset) | Required. A 64-character hex string (256-bit) used by the Management Companion for authentication. |
MGMT_INSECURE_TLS_SKIP_CERTIFICATE_CHECK | insecure_tls_skip_certificate_check | false | If true, skip TLS certificate checks. Useful in development or if you have a proxy intercepting traffic. |
MGMT_CUSTOM_URL | CUSTOM_MGMT_URL | https://management.umh.app | A custom management URL for specialized setups. |
MGMT_CUSTOM_IMAGE_VERSION | IMAGE_VERSION | latest | Custom version tag for the Management Companion Docker image (e.g., staging). |
MGMT_SKIP_INSTALL | skip_companion_install | false | If true, skips the installation of the Management Companion. |
MGMT_SKIP_RHEL_SHA1_SIGNATURES | SKIP_RHEL_SHA1_SIGNATURES | false | On RHEL-based systems, if true, does not temporarily enable SHA1 signatures (needed for some older packages). |
MGMT_CONFIG_DEBUG_DISABLE_BACKEND_CONNECTION | MGMT_CONFIG_DEBUG_DISABLE_BACKEND_CONNECTION | false | Disables the backend connection for debugging. |
MGMT_API_URL | API_URL | $CUSTOM_MGMT_URL/api | API endpoint used by the Management Companion to communicate with the UMH backend. |
MGMT_STATIC_URL | STATIC_URL | $CUSTOM_MGMT_URL/static | URL for static resources (Kubernetes YAML files, etc.). |
MGMT_CONFIGMAP_URL | CONFIGMAP_URL | $STATIC_URL/kubernetes/configmap.yaml | Location of the companion’s ConfigMap YAML. |
MGMT_SECRET_URL | SECRET_URL | $STATIC_URL/kubernetes/secret.yaml | Location of the companion’s Secret YAML. |
MGMT_STATEFULSET_URL | STATEFULSET_URL | $STATIC_URL/kubernetes/statefulset.yaml | Location of the companion’s StatefulSet YAML. |
MGMT_ROLE_URL | ROLE_URL | $STATIC_URL/kubernetes/role.yaml | Location of the companion’s Role YAML. |
MGMT_ROLE_BINDING_URL | ROLE_BINDING_URL | $STATIC_URL/kubernetes/rolebinding.yaml | Location of the companion’s RoleBinding YAML. |
MGMT_PVC_URL | PVC_URL | $STATIC_URL/kubernetes/pvc.yaml | Location of the companion’s PVC YAML. |
MGMT_KUBELET_URL | KUBELET_URL | $STATIC_URL/kubernetes/kubelet-config.yaml | Location of the Kubelet configuration YAML. |
MGMT_REGISTRIES_URL | REGISTRIES_URL | $STATIC_URL/kubernetes/registries.yaml | Custom Docker registry configuration for k3s. |
Location Variables
| Environment Variable | Script Variable | Default Value | Description |
|---|---|---|---|
LOCATION_ENTERPRISE | LOCATION_ENTERPRISE | (unset) | Enterprise name/location for site identification. |
LOCATION_SITE | LOCATION_SITE | (unset) | Site name/location for site identification. |
LOCATION_AREA | LOCATION_AREA | (unset) | Area name/location for site identification. |
LOCATION_LINE | LOCATION_LINE | (unset) | Production line name/location for site identification. |
LOCATION_WORKCELL | LOCATION_WORKCELL | (unset) | Workcell name/location for site identification. |
Additional Installation Options
| Environment Variable | Script Variable | Default Value | Description |
|---|---|---|---|
SILENT | SILENT | false | If true, the script proceeds without interactive confirmations (all prompts default to “yes”). |
SKIP_HARDWARE_TEST | SKIP_HARDWARE_TEST | false | If true, skip hardware checks (CPU cores, memory, disk space, SSE4.2). Useful for dev or limited resource machines. |
DISABLE_HARDWARE_STATUS_CHECK | DISABLE_HARDWARE_STATUS_CHECK | false | If true, skip or ignore hardware checks in the status messages. |
Release Channel
| Environment Variable | Script Variable | Default Value | Description |
|---|---|---|---|
RELEASE_CHANNEL | RELEASE_CHANNEL | stable | Channel to use for UMH updates/notifications. Options: enterprise, stable, nightly |
Helm Flags
| Environment Variable | Script Variable | Default Value | Description |
|---|---|---|---|
| (Set internally) | CHART_VERSION | UMH_VERSION | Used by the script to pass --version to Helm when installing the UMH chart. |
SAME_TOPIC_EXPERIENCE | SAME_TOPIC_EXPERIENCE | false | If true, uses the same Kafka topic across certain analytics solutions (internal optional feature). |
Environment Variables for Testing and Troubleshooting
These variables let you run only portions of the script for debugging:
| Environment Variable | Default | Description |
|---|---|---|
INSTALL_HELM | false | If true, only executes the Helm installation portion of the script. |
UNINSTALL_HELM | false | If true, only executes the Helm uninstallation portion of the script. |
INSTALL_KUBECTL | false | If true, only executes the kubectl installation portion of the script. |
UNINSTALL_KUBECTL | false | If true, only executes the kubectl uninstallation portion of the script. |
INSTALL_KUBERNETES | false | If true, only installs k3s (and does pre-checks). |
UNINSTALL_KUBERNETES | false | If true, only uninstalls k3s (and does relevant cleanup). |
Other Internal Variables
Below variables are set or used internally and typically do not need to be overridden:
TMP_FILE_BASE_DIR(Defaults to/tmp, used to specify base directory for temporary files)SENTRY_DSN(Used for error reporting to Sentry)INSTALL_HELM/UNINSTALL_HELM(See testing & troubleshooting table)INSTALL_KUBECTL/UNINSTALL_KUBECTL(See testing & troubleshooting table)INSTALL_KUBERNETES/UNINSTALL_KUBERNETES(See testing & troubleshooting table)
How to Override Variables
To override any variable, simply export it before running the script, or prepend it on the command line. For example:
export UMH_VERSION="0.28.1"
export MGMT_AUTH_TOKEN="0123456789abcdef..."
export SILENT="true"
./install.sh
Or in a single line:
export UMH_VERSION="0.28.1" && export MGMT_AUTH_TOKEN="0123456789abcdef..." && export SILENT="true" && ./install.sh
1.2 - Flatcar Installation
Here is a step-by-step guide on how to deploy the United Manufacturing Hub on Flatcar Linux, a Linux distribution designed for container workloads with high security and low maintenance. This will leverage the UMH Device and Container Infrastructure.
The system can be installed either bare metal or in a virtual machine.
Before you begin
Ensure your system meets these minimum requirements:
- 4-core CPU
- 8 GB system RAM
- 32 GB available disk space
- Internet access
You will also need the latest version of the iPXE boot image, suitable for your system:
- ipxe-x86_64-efi: For modern systems, recommended for virtual machines.
- ipxe-x86_64-bios: For legacy systems.
- ipxe-arm64-efi: For ARM architectures (Note: Raspberry Pi 4 is currently not supported).
For bare metal installations, flash the image to a USB stick with at least 4 GB of storage. Our guide on flashing an operating system to a USB stick can assist you.
For virtual machines, ensure UEFI boot is enabled when creating the VM.
Lastly, ensure you are on the same network as the device for SSH access post-installation.
System Preparation and Booting from iPXE
Identify the drive for Flatcar Linux installation. For virtual machines, this is typically sda. For bare metal, the drive depends on your physical storage. The troubleshooting section can help identify the correct drive.
Boot your device from the iPXE image. Consult your device or hypervisor documentation for booting instructions.
You can find a comprehensive guide on how to configure a virtual machine in Proxmox for installing Flatcar Linux on the Learning Hub.
Installation
At the first prompt, read and accept the license to proceed.

Next, configure your network settings. Select DHCP if uncertain.

The connection will be tested next. If it fails, revisit the network settings.
Ensure your device has internet access and no firewalls are blocking the connection.
Then, select the drive for Flatcar Linux installation.

A summary of the installation will appear. Check that everything is correct and confirm to start the process.

Shortly after, you’ll see a green command line core@flatcar-0-install. Remove
the USB stick or the CD drive from the VM. The system will continue processing.

The installation will complete after a few minutes, and the system will reboot.
When you see the green core@flatcar-1-umh login prompt, the installation is complete, and the device’s IP address will be displayed.
Installation time varies based on network speed and system performance.
Connect to the Device
With the system installed, access it via SSH.
For Windows 11 users, the default Windows Terminal is recommended. For other OS users, try MobaXTerm.
To do so, open you terminal of choice. We recommend the default Windows Terminal, or MobaXTerm if you are not on Windows 11.
Connect to the device using this command, substituting <ip-address> with your
device’s IP address:
ssh core@<ip-address>
When prompted, enter the default password for the core user: umh.
Troubleshooting
The Installation Stops at the First Green Login Prompt
If the installation halts at the first green login prompt, check the installation status with:
systemctl status installer
A typical response for an ongoing installation will look like this:
● installer.service - Flatcar Linux Installer
     Loaded: loaded (/usr/lib/systemd/system/installer.service; static; vendor preset: enabled)
     Active: active (running) since Wed 2021-05-12 14:00:00 UTC; 1min 30s ago
If the status differs, the installation may have failed. Review the logs to identify the issue.
Unsure Which Drive to Select
To determine the correct drive, refer to your device’s manual:
- SATA drives (HDD or SSD): Typically labeled as
sda. - NVMe drives: Usually labeled as
nvm0n1.
For further verification, boot any Linux distribution on your device and execute:
lsblk
The output, resembling the following, will help identify the drive:
NAME   MAJ:MIN RM   SIZE RO TYPE MOUNTPOINT
sda      8:0    0 223.6G  0 disk
├─sda1   8:1    0   512M  0 part /boot
└─sda2   8:2    0 223.1G  0 part /
sdb      8:0    0  31.8G  0 disk
└─sdb1   8:1    0  31.8G  0 part /mnt/usb
In most cases, the correct drive is the first listed or the one not matching the USB stick size.
No Resources in the Cluster
If you can access the cluster but see no resources, SSH into the edge device and check the cluster status:
systemctl status k3s
If the status is not active (running), the cluster isn’t operational. Restart it with:
sudo systemctl restart k3s
If the cluster is active or restarting doesn’t resolve the issue, inspect the installation logs:
systemctl status umh-install
systemctl status helm-install
Persistent errors may necessitate a system reinstallation.
I can’t SSH into the virtual machine
Ensure that your computer is on the same network as the virtual machine, with no firewalls or VPNs blocking the connection.
What’s next
- You can follow the Getting Started guide to get familiar with the UMH stack.
- If you already know your way around the United Manufacturing Hub, you can follow the Administration guides to configure the stack for production.
2 - Upgrading
2.1 - Upgrade to v0.15.0
This page describes how to upgrade the United Manufacturing Hub from version 0.14.0 to 0.15.0. Before upgrading, remember to back up the database, Node-RED flows, and your cluster configuration.
Upgrade Helm Chart
Upgrade the Helm chart to the 0.15.0 version:
bash <(curl -s https://management.umh.app/binaries/umh/migrations/0_15_0.sh)
Troubleshooting
If for some reason the upgrade fails, you can delete the deployment and statefulsets and try again: This will not delete your data.
sudo $(which kubectl) -n united-manufacturing-hub --kubeconfig /etc/rancher/k3s/k3s.yaml delete deployment \
united-manufacturing-hub-factoryinsight-deployment \
united-manufacturing-hub-iotsensorsmqtt \
united-manufacturing-hub-opcuasimulator-deployment \
united-manufacturing-hub-packmlmqttsimulator \
united-manufacturing-hub-mqttkafkabridge \
united-manufacturing-hub-kafkatopostgresqlv2 \
united-manufacturing-hub-kafkatopostgresql \
united-manufacturing-hub-grafana \
united-manufacturing-hub-databridge-0 \
united-manufacturing-hub-console

sudo $(which kubectl) -n united-manufacturing-hub --kubeconfig /etc/rancher/k3s/k3s.yaml delete statefulset \
united-manufacturing-hub-hivemqce \
united-manufacturing-hub-kafka \
united-manufacturing-hub-nodered \
united-manufacturing-hub-sensorconnect \
united-manufacturing-hub-mqttbridge \
united-manufacturing-hub-timescaledb \
united-manufacturing-hub-redis-master

sudo $(which kubectl) -n united-manufacturing-hub --kubeconfig /etc/rancher/k3s/k3s.yaml delete jobs \
united-manufacturing-hub-kafka-configuration
2.2 - Upgrade to v0.14.0
This page describes how to upgrade the United Manufacturing Hub from version 0.13.6 to 0.14.0. Before upgrading, remember to back up the database, Node-RED flows, and your cluster configuration.
Upgrade Helm Chart
Upgrade the Helm chart to the 0.14.0 version:
bash <(curl -s https://management.umh.app/binaries/umh/migrations/0_14_0.sh)
Troubleshooting
If for some reason the upgrade fails, you can delete the deployment and statefulsets and try again: This will not delete your data.
sudo $(which kubectl) -n united-manufacturing-hub --kubeconfig /etc/rancher/k3s/k3s.yaml delete deployment \
united-manufacturing-hub-factoryinsight-deployment \
united-manufacturing-hub-iotsensorsmqtt \
united-manufacturing-hub-opcuasimulator-deployment \
united-manufacturing-hub-packmlmqttsimulator \
united-manufacturing-hub-mqttkafkabridge \
united-manufacturing-hub-kafkatopostgresqlv2 \
united-manufacturing-hub-kafkatopostgresql \
united-manufacturing-hub-grafana \
united-manufacturing-hub-databridge-0 \
united-manufacturing-hub-console

sudo $(which kubectl) -n united-manufacturing-hub --kubeconfig /etc/rancher/k3s/k3s.yaml delete statefulset \
united-manufacturing-hub-hivemqce \
united-manufacturing-hub-kafka \
united-manufacturing-hub-nodered \
united-manufacturing-hub-sensorconnect \
united-manufacturing-hub-mqttbridge \
united-manufacturing-hub-timescaledb \
united-manufacturing-hub-redis-master

sudo $(which kubectl) -n united-manufacturing-hub --kubeconfig /etc/rancher/k3s/k3s.yaml delete jobs \
united-manufacturing-hub-kafka-configuration
2.3 - Upgrade to v0.13.7
This page describes how to upgrade the United Manufacturing Hub from version 0.13.6 to 0.13.7. Before upgrading, remember to back up the database, Node-RED flows, and your cluster configuration.
Upgrade Helm Chart
Upgrade the Helm chart to the 0.13.7 version:
bash <(curl -s https://management.umh.app/binaries/umh/migrations/0_13_7.sh)
Troubleshooting
If for some reason the upgrade fails, you can delete the deployment and statefulsets and try again: This will not delete your data.
sudo $(which kubectl) -n united-manufacturing-hub --kubeconfig /etc/rancher/k3s/k3s.yaml delete deployment \
united-manufacturing-hub-factoryinsight-deployment \
united-manufacturing-hub-iotsensorsmqtt \
united-manufacturing-hub-opcuasimulator-deployment \
united-manufacturing-hub-packmlmqttsimulator \
united-manufacturing-hub-mqttkafkabridge \
united-manufacturing-hub-kafkatopostgresqlv2 \
united-manufacturing-hub-kafkatopostgresql \
united-manufacturing-hub-grafana \
united-manufacturing-hub-databridge-0 \
united-manufacturing-hub-console

sudo $(which kubectl) -n united-manufacturing-hub --kubeconfig /etc/rancher/k3s/k3s.yaml delete statefulset \
united-manufacturing-hub-hivemqce \
united-manufacturing-hub-kafka \
united-manufacturing-hub-nodered \
united-manufacturing-hub-sensorconnect \
united-manufacturing-hub-mqttbridge \
united-manufacturing-hub-timescaledb \
united-manufacturing-hub-redis-master

sudo $(which kubectl) -n united-manufacturing-hub --kubeconfig /etc/rancher/k3s/k3s.yaml delete jobs \
united-manufacturing-hub-kafka-configuration
2.4 - Upgrade to v0.13.6
This page describes how to upgrade the United Manufacturing Hub to version 0.13.6. Before upgrading, remember to back up the database, Node-RED flows, and your cluster configuration.
Upgrade Helm Chart
Upgrade the Helm chart to the 0.13.6 version:
bash <(curl -s https://management.umh.app/binaries/umh/migrations/0_13_6.sh)
Troubleshooting
If for some reason the upgrade fails, you can delete the deployment and statefulsets and try again: This will not delete your data.
sudo $(which kubectl) -n united-manufacturing-hub --kubeconfig /etc/rancher/k3s/k3s.yaml delete deployment \
united-manufacturing-hub-factoryinsight-deployment \
united-manufacturing-hub-iotsensorsmqtt \
united-manufacturing-hub-opcuasimulator-deployment \
united-manufacturing-hub-packmlmqttsimulator \
united-manufacturing-hub-mqttkafkabridge \
united-manufacturing-hub-kafkatopostgresqlv2 \
united-manufacturing-hub-kafkatopostgresql \
united-manufacturing-hub-grafana \
united-manufacturing-hub-databridge-0 \
united-manufacturing-hub-console

sudo $(which kubectl) -n united-manufacturing-hub --kubeconfig /etc/rancher/k3s/k3s.yaml delete statefulset \
united-manufacturing-hub-hivemqce \
united-manufacturing-hub-kafka \
united-manufacturing-hub-nodered \
united-manufacturing-hub-sensorconnect \
united-manufacturing-hub-mqttbridge \
united-manufacturing-hub-timescaledb \
united-manufacturing-hub-redis-master

sudo $(which kubectl) -n united-manufacturing-hub --kubeconfig /etc/rancher/k3s/k3s.yaml delete jobs \
united-manufacturing-hub-kafka-configuration
2.5 - Upgrade to v0.10.6
This page describes how to upgrade the United Manufacturing Hub to version 0.10.6. Before upgrading, remember to back up the database, Node-RED flows, and your cluster configuration.
All the following commands are to be run from the UMH instance’s shell.
Update Helm Repo
Fetch the latest Helm charts from the UMH repository:
sudo $(which helm) repo update --kubeconfig /etc/rancher/k3s/k3s.yaml
Upgrade Helm Chart
Upgrade the Helm chart to the 0.10.6 version:
sudo $(which helm) upgrade united-manufacturing-hub united-manufacturing-hub/united-manufacturing-hub -n united-manufacturing-hub --version 0.10.6 --reuse-values --kubeconfig /etc/rancher/k3s/k3s.yaml \
--set _000_commonConfig.infrastructure.mqtt.tls.factoryinput=null \
--set _000_commonConfig.datainput=null \
--set _000_commonConfig.mqttBridge=null \
--set _000_commonConfig.mqttBridge=null \
--set mqttbridge=null \
--set factoryinput=null \
--set grafanaproxy=null \
--set kafkastatedetector.image.repository=management.umh.app/oci/united-manufacturing-hub/kafkastatedetector \
--set barcodereader.image.repository=management.umh.app/oci/united-manufacturing-hub/barcodereader \
--set sensorconnect.image=management.umh.app/oci/united-manufacturing-hub/sensorconnect \
--set iotsensorsmqtt.image=management.umh.app/oci/amineamaach/sensors-mqtt \
--set opcuasimulator.image=management.umh.app/oci/united-manufacturing-hub/opcuasimulator \
--set kafkabridge.image.repository=management.umh.app/oci/united-manufacturing-hub/kafka-bridge \
--set kafkabridge.initContainer.repository=management.umh.app/oci/united-manufacturing-hub/kafka-init \
--set factoryinsight.image.repository=management.umh.app/oci/united-manufacturing-hub/factoryinsight \
--set kafkatopostgresql.image.repository=management.umh.app/oci/united-manufacturing-hub/kafka-to-postgresql \
--set kafkatopostgresql.initContainer.repository=management.umh.app/oci/united-manufacturing-hub/kafka-init \
--set timescaledb-single.image.repository=management.umh.app/oci/timescale/timescaledb-ha \
--set timescaledb-single.prometheus.image.repository=management.umh.app/oci/prometheuscommunity/postgres-exporter \
--set grafana.image.repository=management.umh.app/oci/grafana/grafana \
--set grafana.downloadDashboardsImage.repository=management.umh.app/oci/curlimages/curl \
--set grafana.testFramework.image=management.umh.app/oci/bats/bats \
--set grafana.initChownData.image.repository=management.umh.app/oci/library/busybox \
--set grafana.sidecar.image.repository=management.umh.app/oci/kiwigrid/k8s-sidecar \
--set grafana.imageRenderer.image.repository=management.umh.app/oci/grafana/grafana-image-renderer \
--set packmlmqttsimulator.image.repository=management.umh.app/oci/spruiktec/packml-simulator \
--set tulipconnector.image.repository=management.umh.app/oci/united-manufacturing-hub/tulip-connector \
--set mqttkafkabridge.image.repository=management.umh.app/oci/united-manufacturing-hub/mqtt-kafka-bridge \
--set mqttkafkabridge.initContainer.repository=management.umh.app/oci/united-manufacturing-hub/kafka-init \
--set kafkatoblob.image.repository=management.umh.app/oci/united-manufacturing-hub/kafka-to-blob \
--set redpanda.image.repository=management.umh.app/oci/redpandadata/redpanda \
--set redpanda.statefulset.initContainerImage.repository=management.umh.app/oci/library/busybox \
--set redpanda.console.image.registry=management.umh.app/oci \
--set redis.image.registry=management.umh.app/oci \
--set redis.metrics.image.registry=management.umh.app/oci \
--set redis.sentinel.image.registry=management.umh.app/oci \
--set redis.volumePermissions.image.registry=management.umh.app/oci \
--set redis.sysctl.image.registry=management.umh.app/oci \
--set mqtt_broker.image.repository=management.umh.app/oci/hivemq/hivemq-ce \
--set mqtt_broker.initContainer.hivemqextensioninit.image.repository=management.umh.app/oci/united-manufacturing-hub/hivemq-init \
--set metrics.image.repository=management.umh.app/oci/united-manufacturing-hub/metrics \
--set databridge.image.repository=management.umh.app/oci/united-manufacturing-hub/databridge \
--set kafkatopostgresqlv2.image.repository=management.umh.app/oci/united-manufacturing-hub/kafka-to-postgresql-v2
Manual steps (optional)
Due to a limitation of Helm, we cannot automatically set grafana.env.GF_PLUGINS_ALLOW_LOADING_UNSIGNED_PLUGINS=umh-datasource,umh-v2-datasource.
You could either ignore this (if your network is not restricuted to a single domain) or set it manually in the Grafana deployment.
We are also not able to manually overwrite grafana.extraInitContainers[0].image=management.umh.app/oci/united-manufacturing-hub/grafana-umh.
You could either ignore this (if your network is not restricuted to a single domain) or set it manually in the Grafana deployment.
Host system
Open the /var/lib/rancher/k3s/agent/etc/containerd/config.toml.tmpl using vi as root and add the following lines:
version = 2

[plugins."io.containerd.internal.v1.opt"]
path = "/var/lib/rancher/k3s/agent/containerd"
[plugins."io.containerd.grpc.v1.cri"]
stream_server_address = "127.0.0.1"
stream_server_port = "10010"
enable_selinux = false
enable_unprivileged_ports = true
enable_unprivileged_icmp = true
sandbox_image = "management.umh.app/v2/rancher/mirrored-pause:3.6"

[plugins."io.containerd.grpc.v1.cri".containerd]
snapshotter = "overlayfs"
disable_snapshot_annotations = true


[plugins."io.containerd.grpc.v1.cri".cni]
bin_dir = "/var/lib/rancher/k3s/data/ab2055bc72380bad965b219e8688ac02b2e1b665cad6bdde1f8f087637aa81df/bin"
conf_dir = "/var/lib/rancher/k3s/agent/etc/cni/net.d"


[plugins."io.containerd.grpc.v1.cri".containerd.runtimes.runc]
runtime_type = "io.containerd.runc.v2"

[plugins."io.containerd.grpc.v1.cri".containerd.runtimes.runc.options]
SystemdCgroup = true

[plugins."io.containerd.grpc.v1.cri".registry.mirrors]

# Mirror configuration for Docker Hub with fallback
[plugins."io.containerd.grpc.v1.cri".registry.mirrors."docker.io"]
endpoint = ["https://management.umh.app/oci", "https://registry-1.docker.io"]

# Mirror configuration for GitHub Container Registry with fallback
[plugins."io.containerd.grpc.v1.cri".registry.mirrors."ghcr.io"]
endpoint = ["https://management.umh.app/oci", "https://ghcr.io"]

# Mirror configuration for Quay with fallback
[plugins."io.containerd.grpc.v1.cri".registry.mirrors."quay.io"]
endpoint = ["https://management.umh.app/oci", "https://quay.io"]

# Catch-all configuration for any other registries
[plugins."io.containerd.grpc.v1.cri".registry.mirrors."*"]
endpoint = ["https://management.umh.app/oci"]
Open /etc/flatcar/update.conf using vi as root and add the following lines:
GROUP=stable
SERVER=https://management.umh.app/nebraska/
Restart k3s or reboot the host system:
sudo systemctl restart k3s
Troubleshooting
If for some reason the upgrade fails, you can delete the deployment and statefulsets and try again: This will not delete your data.
sudo $(which kubectl) -n united-manufacturing-hub --kubeconfig /etc/rancher/k3s/k3s.yaml delete deployment \
united-manufacturing-hub-factoryinsight-deployment \
united-manufacturing-hub-iotsensorsmqtt \
united-manufacturing-hub-opcuasimulator-deployment \
united-manufacturing-hub-packmlmqttsimulator \
united-manufacturing-hub-mqttkafkabridge \
united-manufacturing-hub-kafkatopostgresqlv2 \
united-manufacturing-hub-kafkatopostgresql \
united-manufacturing-hub-grafana \
united-manufacturing-hub-databridge-0 \
united-manufacturing-hub-console

sudo $(which kubectl) -n united-manufacturing-hub --kubeconfig /etc/rancher/k3s/k3s.yaml delete statefulset \
united-manufacturing-hub-hivemqce \
united-manufacturing-hub-kafka \
united-manufacturing-hub-nodered \
united-manufacturing-hub-sensorconnect \
united-manufacturing-hub-mqttbridge \
united-manufacturing-hub-timescaledb \
united-manufacturing-hub-redis-master

sudo $(which kubectl) -n united-manufacturing-hub --kubeconfig /etc/rancher/k3s/k3s.yaml delete jobs \
united-manufacturing-hub-kafka-configuration
2.6 - Management Console Upgrades
Easily upgrade your UMH instance with the Management Console. This page offers clear, step-by-step instructions for a smooth upgrade process.
Before you begin
Before proceeding with the upgrade of the Companion, ensure that you have the following:
- A functioning UMH instance, verified as “online” and in good health.
- A reliable internet connection.
- Familiarity with the changelog of the new version you are upgrading to, especially to identify any breaking changes or required manual interventions.
Management Companion
Upgrade your UMH instance seamlessly using the Management Console. Follow these steps:
Identify Outdated Instance
From the Overview tab, check for an upgrade icon next to your instance’s name, signaling an outdated Companion version.
Additionally, locate the Upgrade Companion button at the bottom of the tab.
Start the Upgrade
When you’re prepared to upgrade your UMH instance, start by pressing the Upgrade Companion button. This will open a modal, initially displaying a changelog with a quick overview of the latest changes. You can expand the changelog for a detailed view from your current version up to the latest one. Additionally, it may highlight any warnings requiring manual intervention.
Navigate through the changelog, and when comfortable, proceed by clicking the Next button. This step grants you access to crucial information about recommended actions and precautions during the upgrade process.
With the necessary insights, take the next step by clicking the Upgrade button. The system will guide you through the upgrade process, displaying real-time progress updates, including a progress bar and logs.
Upon successful completion, a confirmation message will appear. Simply click the Let’s Go button to return to the dashboard,
where you can seamlessly continue using your UMH instance with the latest enhancements.
United Manufacturing Hub
As of now, the upgrade of the UMH is not yet included in the Management Console, meaning that it has to be performed manually. However, it is planned to be included in the future. Until then, you can follow the instructions in the What’s New page.
Troubleshooting
I encountered an issue during the upgrade process. What should I do?
If you encounter issues during the upgrade process, consider the following steps:
Retry the Process: Sometimes, a transient issue may cause a hiccup. Retry the upgrade process to ensure it’s not a temporary glitch.
Check Logs: Review the logs displayed during the upgrade process for any error messages or indications of what might be causing the problem. This information can offer insights into potential issues.
If the problem persists after retrying and checking the logs, and you’ve confirmed that all prerequisites are met, please reach out to our support team for assistance.
I installed the Management Companion before the 0.1.0 release. How do I upgrade it?
If you installed the Management Companion before the 0.1.0 release, you will need to reinstall it. This is because we made some changes that are not compatible with the previous version.
Before reinstalling the Management Companion, you have to backup your configuration, so that you can restore your connections after the upgrade. To do so, follow these steps:
Access your UMH instance via SSH.
Run the following command to backup your configuration:
sudo $(which kubectl) get configmap/mgmtcompanion-config --kubeconfig /etc/rancher/k3s/k3s.yaml -n mgmtcompanion -o=jsonpath='{.data}' | sed -e 's/^/{"data":/' | sed -e 's/$/}/'> mgmtcompanion-config.bak.jsonThis will create a file called
mgmtcompanion-config.bak.jsonin your current directory.For good measure, copy the file to your local machine:
scp <user>@<ip>:/home/<user>/mgmtcompanion-config.bak.json .Replace
<user>with your username, and<ip>with the IP address of your UMH instance. You will be prompted for your password.Now you can reinstall the Management Companion. Follow the instructions in the Installation guide. Your data will be preserved, and you will be able to restore your connections.
After the installation is complete, you can restore your connections by running the following command:
sudo $(which kubectl) patch configmap/mgmtcompanion-config --kubeconfig /etc/rancher/k3s/k3s.yaml -n mgmtcompanion --patch-file mgmtcompanion-config.bak.json
2.7 - Migrate to Data Model V1
In this guide, you will learn how to migrate your existing instances from the old Data Model to the new Data Model V1.
The old Data Model will continue to work, and all the data will be still available.
Before you begin
You need to have a UMH cluster. If you do not already have a cluster, you can create one by following the Getting Started guide.
You also need to access the system where the cluster is running, either by logging into it or by using a remote shell.
Upgrade Your Companion to the Latest Version
If you haven’t already, upgrade your Companion to the latest version. You can easily do this from the Management Console by selecting your Instance and clicking on the “Upgrade” button.
Upgrade the Helm Chart
The new Data Model was introduced in the 0.10 release of the Helm Chart. To upgrade to the latest 0.10 release, you first need to update the Helm Chart to the latest 0.9 release and then upgrade to the latest 0.10 release.
There is no automatic way (yet!) to upgrade the Helm Chart, so you need to follow the manual steps below.
First, after accessing your instance, find the Helm Chart version you are currently using by running the following command:
sudo $(which helm) get metadata united-manufacturing-hub -n united-manufacturing-hub --kubeconfig /etc/rancher/k3s/k3s.yaml | grep -e ^VERSION
Then, head to the upgrading archive and follow the instructions to upgrade from your current version to the latest version, one version at a time.
2.8 - Archive
The United Manufacturing Hub is a continuously evolving product. This means that new features and bug fixes are added to the product on a regular basis. This section contains the upgrading guides for the different versions the United Manufacturing Hub.
The upgrading process is done by upgrading the Helm chart.
2.8.1 - Upgrade to v0.9.34
This page describes how to upgrade the United Manufacturing Hub to version 0.9.34. Before upgrading, remember to backup the database, Node-RED flows, and your cluster configuration.
All the following commands are to be run from the UMH instance’s shell.
Update Helm Repo
Fetch the latest Helm charts from the UMH repository:
sudo $(which helm) repo update --kubeconfig /etc/rancher/k3s/k3s.yaml
Clear Workloads
Some workloads need to be deleted before upgrading. This process does not delete any data, but it will cause downtime.
sudo $(which kubectl) -n united-manufacturing-hub --kubeconfig /etc/rancher/k3s/k3s.yaml delete deployment united-manufacturing-hub-factoryinsight-deployment united-manufacturing-hub-iotsensorsmqtt united-manufacturing-hub-opcuasimulator-deployment
sudo $(which kubectl) -n united-manufacturing-hub --kubeconfig /etc/rancher/k3s/k3s.yaml delete statefulset united-manufacturing-hub-hivemqce united-manufacturing-hub-kafka united-manufacturing-hub-nodered united-manufacturing-hub-sensorconnect united-manufacturing-hub-mqttbridge
Upgrade Helm Chart
Upgrade the Helm chart to the 0.9.34 version:
sudo helm upgrade united-manufacturing-hub united-manufacturing-hub/united-manufacturing-hub -n united-manufacturing-hub --version 0.9.34 --reuse-values --kubeconfig /etc/rancher/k3s/k3s.yaml \
--set kafkatopostgresqlv2.enabled=false \
--set kafkatopostgresqlv2.image.repository=ghcr.io/united-manufacturing-hub/kafka-to-postgresql-v2 \
--set kafkatopostgresqlv2.image.pullPolicy=IfNotPresent \
--set kafkatopostgresqlv2.replicas=1 \
--set kafkatopostgresqlv2.resources.limits.cpu=1000m \
--set kafkatopostgresqlv2.resources.limits.memory=300Mi \
--set kafkatopostgresqlv2.resources.requests.cpu=100m \
--set kafkatopostgresqlv2.resources.requests.memory=150Mi \
--set kafkatopostgresqlv2.probes.startup.failureThreshold=30 \
--set kafkatopostgresqlv2.probes.startup.initialDelaySeconds=10 \
--set kafkatopostgresqlv2.probes.startup.periodSeconds=10 \
--set kafkatopostgresqlv2.probes.liveness.periodSeconds=5 \
--set kafkatopostgresqlv2.probes.readiness.periodSeconds=5 \
--set kafkatopostgresqlv2.logging.level=PRODUCTION \
--set kafkatopostgresqlv2.asset.cache.lru.size=1000 \
--set kafkatopostgresqlv2.workers.channel.size=10000 \
--set kafkatopostgresqlv2.workers.goroutines.multiplier=16 \
--set kafkatopostgresqlv2.database.user=kafkatopostgresqlv2 \
--set kafkatopostgresqlv2.database.password=changemetoo \
--set _000_commonConfig.datamodel_v2.enabled=true \
--set _000_commonConfig.datamodel_v2.bridges[0].mode=mqtt-kafka \
--set _000_commonConfig.datamodel_v2.bridges[0].brokerA=united-manufacturing-hub-mqtt:1883 \
--set _000_commonConfig.datamodel_v2.bridges[0].brokerB=united-manufacturing-hub-kafka:9092 \
--set _000_commonConfig.datamodel_v2.bridges[0].topic=umh.v1..* \
--set _000_commonConfig.datamodel_v2.bridges[0].topicMergePoint=5 \
--set _000_commonConfig.datamodel_v2.bridges[0].partitions=6 \
--set _000_commonConfig.datamodel_v2.bridges[0].replicationFactor=1 \
--set _000_commonConfig.datamodel_v2.database.name=umh_v2 \
--set _000_commonConfig.datamodel_v2.database.host=united-manufacturing-hub \
--set _000_commonConfig.datamodel_v2.grafana.dbreader=grafanareader \
--set _000_commonConfig.datamodel_v2.grafana.dbpassword=changeme
Update Database
There has been some changes to the database, which need to be applied. This process does not delete any data.
sudo $(which kubectl) -n united-manufacturing-hub --kubeconfig /etc/rancher/k3s/k3s.yaml exec -it united-manufacturing-hub-timescaledb-0 -c timescaledb -- sh -c ". /etc/timescaledb/post_init.d/0_create_dbs.sh; . /etc/timescaledb/post_init.d/1_set_passwords.sh"
Restart kafka-to-postgresql-v2
sudo $(which kubectl) rollout restart deployment united-manufacturing-hub-kafkatopostgresqlv2 -n united-manufacturing-hub --kubeconfig /etc/rancher/k3s/k3s.yaml
2.8.2 - Upgrade to v0.9.15
This page describes how to upgrade the United Manufacturing Hub to version 0.9.15. Before upgrading, remember to backup the database, Node-RED flows, and your cluster configuration.
Add Helm repo in UMHLens / OpenLens
Check if the UMH Helm repository is added in UMHLens / OpenLens.
To do so, from the top-left menu, select FIle > Preferences (or press CTRL + ,).
Click on the Kubernetes tab and check if the Helm Chart section contains
the https://repo.umh.app repository.
If it doesn’t, click the Add Custom Helm Repo button and fill in the following values:
- Helm repo name: united-manufacturing-hub
- URL: https://repo.umh.app
Then click Add.
Clear Workloads
Some workloads need to be deleted before upgrading. This process does not delete any data, but it will cause downtime. If a workload is missing, it means that it was not enabled in your cluster, therefore you can skip it.
To delete a resource, you can select it using the box on the left of the resource name and click the - button on the bottom right corner.
- Open the Workloads tab.
- From the Deployment section, delete the following deployments:
- united-manufacturing-hub-factoryinsight-deployment
- united-manufacturing-hub-opcuasimulator-deployment
- united-manufacturing-hub-iotsensorsmqtt
- united-manufacturing-hub-grafanaproxy
- From the StatefulSet section, delete the following statefulsets:
- united-manufacturing-hub-hivemqce
- united-manufacturing-hub-kafka
- united-manufacturing-hub-nodered
- united-manufacturing-hub-sensorconnect
- united-manufacturing-hub-mqttbridge
- Open the Network tab.
- From the Services section, delete the following services:
- united-manufacturing-hub-kafka
Upgrade Helm Chart
Now everything is ready to upgrade the Helm chart.
Navigate to the Helm > Releases tab.
Select the united-manufacturing-hub release and click Upgrade.
In the Helm Upgrade window, make sure that the
Upgrade versionfield contains the version you want to upgrade to.You can also change the values of the Helm chart, if needed. If you want to activate the new databridge you need to add & edit the following section
_000_commonConfig:
   ...
   datamodel_v2:
   enabled: true
   bridges:
   - mode: mqtt-kafka
     brokerA: united-manufacturing-hub-mqtt:1883 # The flow is always from A->B, for omni-directional flow, setup a 2nd bridge with reversed broker setup
     brokerB: united-manufacturing-hub-kafka:9092
     topic: umh.v1..*              # accept mqtt or kafka topic format. after the topic seprator, you can use # for mqtt wildcard, or .* for kafka wildcard
     topicMergePoint: 5            # This is a new feature of our datamodel_old, which splits topics in topic and key (only in Kafka), preventing having lots of topics
     partitions: 6                 # optional: number of partitions for the new kafka topic. default: 6
     replicationFactor: 1          # optional: replication factor for the new kafka topic. default: 1
   ...
You can also enable the new container registry by changing the values in the
imageorimage.repositoryfields from unitedmanufacturinghub/<image-name> to ghcr.io/united-manufacturing-hub/<image-name>.Click Upgrade.
The upgrade process can take a few minutes. The upgrade is complete when the Status field of the release is Deployed.
2.8.3 - Upgrade to v0.9.14
This page describes how to upgrade the United Manufacturing Hub to version 0.9.14. Before upgrading, remember to backup the database, Node-RED flows, and your cluster configuration.
Add Helm repo in UMHLens / OpenLens
Check if the UMH Helm repository is added in UMHLens / OpenLens.
To do so, from the top-left menu, select FIle > Preferences (or press CTRL + ,).
Click on the Kubernetes tab and check if the Helm Chart section contains
the https://repo.umh.app repository.
If it doesn’t, click the Add Custom Helm Repo button and fill in the following values:
- Helm repo name: united-manufacturing-hub
- URL: https://repo.umh.app
Then click Add.
Clear Workloads
Some workloads need to be deleted before upgrading. This process does not delete any data, but it will cause downtime. If a workload is missing, it means that it was not enabled in your cluster, therefore you can skip it.
To delete a resource, you can select it using the box on the left of the resource name and click the - button on the bottom right corner.
- Open the Workloads tab.
- From the Deployment section, delete the following deployments:
- united-manufacturing-hub-factoryinsight-deployment
- united-manufacturing-hub-opcuasimulator-deployment
- united-manufacturing-hub-iotsensorsmqtt
- united-manufacturing-hub-grafanaproxy
- From the StatefulSet section, delete the following statefulsets:
- united-manufacturing-hub-hivemqce
- united-manufacturing-hub-kafka
- united-manufacturing-hub-nodered
- united-manufacturing-hub-sensorconnect
- united-manufacturing-hub-mqttbridge
- Open the Network tab.
- From the Services section, delete the following services:
- united-manufacturing-hub-kafka
Upgrade Helm Chart
Now everything is ready to upgrade the Helm chart.
Navigate to the Helm > Releases tab.
Select the united-manufacturing-hub release and click Upgrade.
In the Helm Upgrade window, make sure that the
Upgrade versionfield contains the version you want to upgrade to.You can also change the values of the Helm chart, if needed. For example, if you want to apply the new tweaks to the resources in order to avoid the Out Of Memory crash of the MQTT Broker, you can change the following values:
iotsensorsmqtt:
  resources:
    requests:
      cpu: 10m
      memory: 20Mi
    limits:
      cpu: 30m
      memory: 50Mi
grafanaproxy:
 resources:
   requests:
     cpu: 100m
   limits:
     cpu: 300m
kafkatopostgresql:
  resources:
    requests:
      memory: 150Mi
    limits:
      memory: 300Mi
opcuasimulator:
  resources:
    requests:
      cpu: 10m
      memory: 20Mi
    limits:
      cpu: 30m
      memory: 50Mi
packmlmqttsimulator:
  resources:
    requests:
      cpu: 10m
      memory: 20Mi
    limits:
      cpu: 30m
      memory: 50Mi
tulipconnector:
  resources:
    limits:
      cpu: 30m
      memory: 50Mi
    requests:
      cpu: 10m
      memory: 20Mi
redis:
  master:
    resources:
      limits:
        cpu: 100m
        memory: 100Mi
      requests:
        cpu: 50m
        memory: 50Mi
mqtt_broker:
  resources:
    limits:
      cpu: 700m
      memory: 1700Mi
    requests:
      cpu: 300m
      memory: 1000Mi
You can also enable the new container registry by changing the values in the
imageorimage.repositoryfields from unitedmanufacturinghub/<image-name> to ghcr.io/united-manufacturing-hub/<image-name>.Click Upgrade.
The upgrade process can take a few minutes. The upgrade is complete when the Status field of the release is Deployed.
2.8.4 - Upgrade to v0.9.13
This page describes how to upgrade the United Manufacturing Hub to version 0.9.13. Before upgrading, remember to backup the database, Node-RED flows, and your cluster configuration.
Add Helm repo in UMHLens / OpenLens
Check if the UMH Helm repository is added in UMHLens / OpenLens.
To do so, from the top-left menu, select FIle > Preferences (or press CTRL + ,).
Click on the Kubernetes tab and check if the Helm Chart section contains
the https://repo.umh.app repository.
If it doesn’t, click the Add Custom Helm Repo button and fill in the following values:
- Helm repo name: united-manufacturing-hub
- URL: https://repo.umh.app
Then click Add.
Clear Workloads
Some workloads need to be deleted before upgrading. This process does not delete any data, but it will cause downtime. If a workload is missing, it means that it was not enabled in your cluster, therefore you can skip it.
To delete a resource, you can select it using the box on the left of the resource name and click the - button on the bottom right corner.
- Open the Workloads tab.
- From the Deployment section, delete the following deployments:
- united-manufacturing-hub-barcodereader
- united-manufacturing-hub-factoryinsight-deployment
- united-manufacturing-hub-kafkatopostgresql
- united-manufacturing-hub-mqttkafkabridge
- united-manufacturing-hub-iotsensorsmqtt
- united-manufacturing-hub-opcuasimulator-deployment
- From the StatefulSet section, delete the following statefulsets:
- united-manufacturing-hub-mqttbridge
- united-manufacturing-hub-hivemqce
- united-manufacturing-hub-nodered
- united-manufacturing-hub-sensorconnect
Upgrade Helm Chart
Now everything is ready to upgrade the Helm chart.
- Navigate to the Helm > Releases tab.
- Select the united-manufacturing-hub release and click Upgrade.
- In the Helm Upgrade window, make sure that the
Upgrade versionfield contains the version you want to upgrade to. - You can also change the values of the Helm chart, if needed.
- Click Upgrade.
The upgrade process can take a few minutes. The upgrade is complete when the Status field of the release is Deployed.
2.8.5 - Upgrade to v0.9.12
This page describes how to upgrade the United Manufacturing Hub to version 0.9.12. Before upgrading, remember to backup the database, Node-RED flows, and your cluster configuration.
Add Helm repo in UMHLens / OpenLens
Check if the UMH Helm repository is added in UMHLens / OpenLens.
To do so, from the top-left menu, select FIle > Preferences (or press CTRL + ,).
Click on the Kubernetes tab and check if the Helm Chart section contains
the https://repo.umh.app repository.
If it doesn’t, click the Add Custom Helm Repo button and fill in the following values:
- Helm repo name: united-manufacturing-hub
- URL: https://repo.umh.app
Then click Add.
Backup RBAC configuration for MQTT Broker
This step is only needed if you enabled RBAC for the MQTT Broker and changed the default password. If you did not change the default password, you can skip this step.
- Navigate to Config > ConfigMaps.
- Select the united-manufacturing-hub-hivemqce-extension ConfigMap.
- Copy the content of
credentials.xmland save it in a safe place.
Clear Workloads
Some workloads need to be deleted before upgrading. This process does not delete any data, but it will cause downtime. If a workload is missing, it means that it was not enabled in your cluster, therefore you can skip it.
To delete a resource, you can select it using the box on the left of the resource name and click the - button on the bottom right corner.
- Open the Workloads tab.
- From the Deployment section, delete the following deployments:
- united-manufacturing-hub-barcodereader
- united-manufacturing-hub-factoryinsight-deployment
- united-manufacturing-hub-kafkatopostgresql
- united-manufacturing-hub-mqttkafkabridge
- united-manufacturing-hub-iotsensorsmqtt
- united-manufacturing-hub-opcuasimulator-deployment
- From the StatefulSet section, delete the following statefulsets:
- united-manufacturing-hub-mqttbridge
- united-manufacturing-hub-hivemqce
- united-manufacturing-hub-nodered
- united-manufacturing-hub-sensorconnect
Remove MQTT Broker extension PVC
In this version we reduced the size of the MQTT Broker extension PVC. To do so, we need to delete the old PVC and create a new one. This process will set the credentials of the MQTT Broker to the default ones. If you changed the default password, you can restore them after the upgrade.
- Navigate to Storage > Persistent Volume Claims.
- Select the united-manufacturing-hub-hivemqce-claim-extensions PVC and click Delete.
Upgrade Helm Chart
Now everything is ready to upgrade the Helm chart.
Navigate to the Helm > Releases tab.
Select the united-manufacturing-hub release and click Upgrade.
In the Helm Upgrade window, make sure that the
Upgrade versionfield contains the version you want to upgrade to.There are some incompatible changes in this version. To avoid errors, you need to change the following values:
Remove property
console.console.config.kafka.tls.passphrase:console: console: config: kafka: tls: passphrase: "" # <- remove this lineconsole.extraContainers: remove the property and its content.console: extraContainers: {} # <- remove this lineconsole.extraEnv: remove the property and its content.console: extraEnv: "" # <- remove this lineconsole.extraEnvFrom: remove the property and its content.console: extraEnvFrom: "" # <- remove this lineconsole.extraVolumeMounts: remove the|-characters right after the property name. It should look like this:console: extraVolumeMounts: # <- remove the `|-` characters in this line - name: united-manufacturing-hub-kowl-certificates mountPath: /SSL_certs/kafka readOnly: trueconsole.extraVolumes: remove the|-characters right after the property name. It should look like this:console: extraVolumes: # <- remove the `|-` characters in this line - name: united-manufacturing-hub-kowl-certificates secret: secretName: united-manufacturing-hub-kowl-secretsChange the
console.serviceproperty to the following:console: service: type: LoadBalancer port: 8090 targetPort: 8080Change the Redis URI in
factoryinsight.redis:factoryinsight: redis: URI: united-manufacturing-hub-redis-headless:6379Set the following values in the
kafkasection totrue, or add them if they are missing:kafka: externalAccess: autoDiscovery: enabled: true enabled: true rbac: create: trueChange
redis.architectureto standalone:redis: architecture: standaloneredis.sentinel: remove the property and its content.redis: sentinel: {} # <- remove all the content of this sectionRemove the property
redis.master.command:redis: master: command: /run.sh # <- remove this linetimescaledb-single.fullWalPrevention: remove the property and its content.timescaledb-single: fullWalPrevention: # <- remove this line checkFrequency: 30 # <- remove this line enabled: false # <- remove this line thresholds: # <- remove this line readOnlyFreeMB: 64 # <- remove this line readOnlyFreePercent: 5 # <- remove this line readWriteFreeMB: 128 # <- remove this line readWriteFreePercent: 8 # <- remove this linetimescaledb-single.loadBalancer: remove the property and its content.timescaledb-single: loadBalancer: # <- remove this line annotations: # <- remove this line service.beta.kubernetes.io/aws-load-balancer-connection-idle-timeout: "4000" # <- remove this line enabled: true # <- remove this line port: 5432 # <- remove this linetimescaledb-single.replicaLoadBalancer: remove the property and its content.timescaledb-single: replicaLoadBalancer: annotations: # <- remove this line service.beta.kubernetes.io/aws-load-balancer-connection-idle-timeout: "4000" # <- remove this line enabled: false # <- remove this line port: 5432 # <- remove this linetimescaledb-single.secretNames: remove the property and its content.timescaledb-single: secretNames: {} # <- remove this linetimescaledb-single.unsafe: remove the property and its content.timescaledb-single: unsafe: false # <- remove this lineChange the value of the
timescaledb-single.service.primary.typeproperty to LoadBalancer:timescaledb-single: service: primary: type: LoadBalancer
Click Upgrade.
The upgrade process can take a few minutes. The upgrade is complete when the Status field of the release is Deployed.
2.8.6 - Upgrade to v0.9.11
This page describes how to upgrade the United Manufacturing Hub to version 0.9.11. Before upgrading, remember to backup the database, Node-RED flows, and your cluster configuration.
Add Helm repo in UMHLens / OpenLens
Check if the UMH Helm repository is added in UMHLens / OpenLens.
To do so, from the top-left menu, select FIle > Preferences (or press CTRL + ,).
Click on the Kubernetes tab and check if the Helm Chart section contains
the https://repo.umh.app repository.
If it doesn’t, click the Add Custom Helm Repo button and fill in the following values:
- Helm repo name: united-manufacturing-hub
- URL: https://repo.umh.app
Then click Add.
Clear Workloads
Some workloads need to be deleted before upgrading. This process does not delete any data, but it will cause downtime. If a workload is missing, it means that it was not enabled in your cluster, therefore you can skip it.
To delete a resource, you can select it using the box on the left of the resource name and click the - button on the bottom right corner.
- Open the Workloads tab.
- From the Deployment section, delete the following deployments:
- united-manufacturing-hub-barcodereader
- united-manufacturing-hub-factoryinsight-deployment
- united-manufacturing-hub-kafkatopostgresql
- united-manufacturing-hub-mqttkafkabridge
- united-manufacturing-hub-iotsensorsmqtt
- united-manufacturing-hub-opcuasimulator-deployment
- From the StatefulSet section, delete the following statefulsets:
- united-manufacturing-hub-mqttbridge
- united-manufacturing-hub-hivemqce
- united-manufacturing-hub-nodered
- united-manufacturing-hub-sensorconnect
Upgrade Helm Chart
Now everything is ready to upgrade the Helm chart.
- Navigate to the Helm > Releases tab.
- Select the united-manufacturing-hub release and click Upgrade.
- In the Helm Upgrade window, make sure that the
Upgrade versionfield contains the version you want to upgrade to. - You can also change the values of the Helm chart, if needed.
- Click Upgrade.
The upgrade process can take a few minutes. The upgrade is complete when the Status field of the release is Deployed.
2.8.7 - Upgrade to v0.9.10
This page describes how to upgrade the United Manufacturing Hub to version 0.9.10. Before upgrading, remember to backup the database, Node-RED flows, and your cluster configuration.
Add Helm repo in UMHLens / OpenLens
Check if the UMH Helm repository is added in UMHLens / OpenLens.
To do so, from the top-left menu, select FIle > Preferences (or press CTRL + ,).
Click on the Kubernetes tab and check if the Helm Chart section contains
the https://repo.umh.app repository.
If it doesn’t, click the Add Custom Helm Repo button and fill in the following values:
- Helm repo name: united-manufacturing-hub
- URL: https://repo.umh.app
Then click Add.
Grafana plugins
In this release, the Grafana version has been updated from 8.5.9 to 9.3.1. Check the release notes for further information about the changes.
Additionally, the way default plugins are installed has changed. Unfortunatly, it is necesary to manually install all the plugins that were previously installed.
If you didn’t install any plugin other than the default ones, you can skip this section.
Follow these steps to see the list of plugins installed in your cluster:
Open the browser and go to the Grafana dashboard.
Navigate to the Configuration > Plugins tab.
Select the Installed filter.

Write down all the plugins that you manually installed. You can recognize them by not having the
Coretag.
The following ones are installed by default, therefore you can skip them:
- ACE.SVG by Andrew Rodgers
- Button Panel by UMH Systems Gmbh
- Button Panel by CloudSpout LLC
- Discrete by Natel Energy
- Dynamic Text by Marcus Olsson
- FlowCharting by agent
- Pareto Chart by isaozler
- Pie Chart (old) by Grafana Labs
- Timepicker Buttons Panel by williamvenner
- UMH Datasource by UMH Systems Gmbh
- Untimely by factry
- Worldmap Panel by Grafana Labs


Clear Workloads
Some workloads need to be deleted before upgrading. This process does not delete any data, but it will cause downtime. If a workload is missing, it means that it was not enabled in your cluster, therefore you can skip it.
To delete a resource, you can select it using the box on the left of the resource name and click the - button on the bottom right corner.
- Open the Workloads tab.
- From the Deployment section, delete the following deployments:
- united-manufacturing-hub-barcodereader
- united-manufacturing-hub-factoryinsight-deployment
- united-manufacturing-hub-grafana
- united-manufacturing-hub-kafkatopostgresql
- united-manufacturing-hub-mqttkafkabridge
- united-manufacturing-hub-iotsensorsmqtt
- united-manufacturing-hub-opcuasimulator-deployment
- From the StatefulSet section, delete the following statefulsets:
- united-manufacturing-hub-mqttbridge
- united-manufacturing-hub-hivemqce
- united-manufacturing-hub-nodered
- united-manufacturing-hub-sensorconnect
Upgrade Helm Chart
Now everything is ready to upgrade the Helm chart.
Navigate to the Helm > Releases tab.
Select the united-manufacturing-hub release and click Upgrade.
In the Helm Upgrade window, make sure that the
Upgrade versionfield contains the version you want to upgrade to.You can also change the values of the Helm chart, if needed.
In the
grafanasection, find theextraInitContainersfield and change its value to the following:- image: unitedmanufacturinghub/grafana-umh:1.1.2 name: init-plugins imagePullPolicy: IfNotPresent command: ['sh', '-c', 'cp -r /plugins /var/lib/grafana/'] volumeMounts: - name: storage mountPath: /var/lib/grafanaMake these changes in the
kafkasection:Set the value of the
heapOptsfield to-Xmx2048m -Xms2048m.Replace the content of the
resourcessection with the following:limits: cpu: 1000m memory: 4Gi requests: cpu: 100m memory: 2560Mi
Click Upgrade.
The upgrade process can take a few minutes. The upgrade is complete when the Status field of the release is Deployed.
Afterwards, you can reinstall the additional Grafana plugins.
Replace VerneMQ with HiveMQ
In this upgrade we switched from using VerneMQ to HiveMQ as our MQTT Broker (you can read the blog article about it).
While this process is fully backwards compatible, we suggest to update NodeRed flows and any other additional service that uses MQTT, to use the new service broker called united-manufacturing-hub-mqtt. The old united-manufacturing-hub-vernemq is still functional and, despite the name, also points to HiveMQ, but in future upgrades will be removed.
Additionally, for production environments, we recommend to enable RBAC for the MQTT Broker.
Please double-check if all of your services can connect to the new MQTT broker. It might be needed for them to be restarted, so that they can resolve the DNS name and get the new IP. Also, it can happen with tools like chirpstack, that you need to specify the client-id as the automatically generated ID worked with VerneMQ, but is now declined by HiveMQ.
Troubleshooting
Some microservices can’t connect to the new MQTT broker
If you are using the united-manufacturing-hub-mqtt service, but some microservice can’t connect to it, restarting the microservice might solve the issue. To do so, you can delete the Pod of the microservice and let Kubernetes recreate it.
ChirpStack can’t connect to the new MQTT broker
ChirpStack uses a generated client-id to connect to the MQTT broker. This
client-id is not accepted by HiveMQ. To solve this issue, you can set the
client_id field in the integration.mqtt section of the chirpstack configuration
file to a fixed value:
[integration]
...
  [integration.mqtt]
  client_id="chirpstack"
2.8.8 - Upgrade to v0.9.9
This page describes how to upgrade the United Manufacturing Hub to version 0.9.9. Before upgrading, remember to backup the database, Node-RED flows, and your cluster configuration.
Add Helm repo in UMHLens / OpenLens
Check if the UMH Helm repository is added in UMHLens / OpenLens.
To do so, from the top-left menu, select FIle > Preferences (or press CTRL + ,).
Click on the Kubernetes tab and check if the Helm Chart section contains
the https://repo.umh.app repository.
If it doesn’t, click the Add Custom Helm Repo button and fill in the following values:
- Helm repo name: united-manufacturing-hub
- URL: https://repo.umh.app
Then click Add.
Clear Workloads
Some workloads need to be deleted before upgrading. This process does not delete any data, but it will cause downtime. If a workload is missing, it means that it was not enabled in your cluster, therefore you can skip it.
To delete a resource, you can select it using the box on the left of the resource name and click the - button on the bottom right corner.
- Open the Workloads tab.
- From the Deployment section, delete the following deployments:
- united-manufacturing-hub-barcodereader
- united-manufacturing-hub-factoryinsight-deployment
- united-manufacturing-hub-kafkatopostgresql
- united-manufacturing-hub-mqttkafkabridge
- united-manufacturing-hub-iotsensorsmqtt
- united-manufacturing-hub-opcuasimulator-deployment
- From the StatefulSet section, delete the following statefulsets:
- united-manufacturing-hub-mqttbridge
- united-manufacturing-hub-hivemqce
- united-manufacturing-hub-nodered
- united-manufacturing-hub-sensorconnect
Upgrade Helm Chart
Now everything is ready to upgrade the Helm chart.
- Navigate to the Helm > Releases tab.
- Select the united-manufacturing-hub release and click Upgrade.
- In the Helm Upgrade window, make sure that the
Upgrade versionfield contains the version you want to upgrade to. - You can also change the values of the Helm chart, if needed.
In the
grafanasection, find theextraInitContainersfield and change the value of theimagefield tounitedmanufacturinghub/grafana-plugin-extractor:0.1.4. - Click Upgrade.
The upgrade process can take a few minutes. The upgrade is complete when the Status field of the release is Deployed.
2.8.9 - Upgrade to v0.9.8
This page describes how to upgrade the United Manufacturing Hub to version 0.9.8. Before upgrading, remember to backup the database, Node-RED flows, and your cluster configuration.
Add Helm repo in UMHLens / OpenLens
Check if the UMH Helm repository is added in UMHLens / OpenLens.
To do so, from the top-left menu, select FIle > Preferences (or press CTRL + ,).
Click on the Kubernetes tab and check if the Helm Chart section contains
the https://repo.umh.app repository.
If it doesn’t, click the Add Custom Helm Repo button and fill in the following values:
- Helm repo name: united-manufacturing-hub
- URL: https://repo.umh.app
Then click Add.
Clear Workloads
Some workloads need to be deleted before upgrading. This process does not delete any data, but it will cause downtime. If a workload is missing, it means that it was not enabled in your cluster, therefore you can skip it.
To delete a resource, you can select it using the box on the left of the resource name and click the - button on the bottom right corner.
- Open the Workloads tab.
- From the Deployment section, delete the following deployments:
- united-manufacturing-hub-barcodereader
- united-manufacturing-hub-factoryinsight-deployment
- united-manufacturing-hub-kafkatopostgresql
- united-manufacturing-hub-mqttkafkabridge
- united-manufacturing-hub-iotsensorsmqtt
- united-manufacturing-hub-opcuasimulator-deployment
- From the StatefulSet section, delete the following statefulsets:
- united-manufacturing-hub-mqttbridge
- united-manufacturing-hub-hivemqce
- united-manufacturing-hub-nodered
- united-manufacturing-hub-sensorconnect
Upgrade Helm Chart
Now everything is ready to upgrade the Helm chart.
- Navigate to the Helm > Releases tab.
- Select the united-manufacturing-hub release and click Upgrade.
- In the Helm Upgrade window, make sure that the
Upgrade versionfield contains the version you want to upgrade to. - You can also change the values of the Helm chart, if needed.
- Click Upgrade.
The upgrade process can take a few minutes. The upgrade is complete when the Status field of the release is Deployed.
2.8.10 - Upgrade to v0.9.7
This page describes how to upgrade the United Manufacturing Hub to version 0.9.7. Before upgrading, remember to backup the database, Node-RED flows, and your cluster configuration.
Add Helm repo in UMHLens / OpenLens
Check if the UMH Helm repository is added in UMHLens / OpenLens.
To do so, from the top-left menu, select FIle > Preferences (or press CTRL + ,).
Click on the Kubernetes tab and check if the Helm Chart section contains
the https://repo.umh.app repository.
If it doesn’t, click the Add Custom Helm Repo button and fill in the following values:
- Helm repo name: united-manufacturing-hub
- URL: https://repo.umh.app
Then click Add.
Clear Workloads
Some workloads need to be deleted before upgrading. This process does not delete any data, but it will cause downtime. If a workload is missing, it means that it was not enabled in your cluster, therefore you can skip it.
To delete a resource, you can select it using the box on the left of the resource name and click the - button on the bottom right corner.
- Open the Workloads tab.
- From the Deployment section, delete the following deployments:
- united-manufacturing-hub-barcodereader
- united-manufacturing-hub-factoryinsight-deployment
- united-manufacturing-hub-kafkatopostgresql
- united-manufacturing-hub-mqttkafkabridge
- united-manufacturing-hub-iotsensorsmqtt
- united-manufacturing-hub-opcuasimulator-deployment
- From the StatefulSet section, delete the following statefulsets:
- united-manufacturing-hub-mqttbridge
- united-manufacturing-hub-hivemqce
- united-manufacturing-hub-nodered
- united-manufacturing-hub-sensorconnect
Upgrade Helm Chart
Now everything is ready to upgrade the Helm chart.
- Navigate to the Helm > Releases tab.
- Select the united-manufacturing-hub release and click Upgrade.
- In the Helm Upgrade window, make sure that the
Upgrade versionfield contains the version you want to upgrade to. - You can also change the values of the Helm chart, if needed.
Make these changes in the
grafanasection:Replace the content of
datasourceswith the following:datasources.yaml: apiVersion: 1 datasources: - access: proxy editable: false isDefault: true jsonData: apiKey: $FACTORYINSIGHT_PASSWORD apiKeyConfigured: true customerId: $FACTORYINSIGHT_CUSTOMERID serverURL: http://united-manufacturing-hub-factoryinsight-service/ name: umh-datasource orgId: 1 type: umh-datasource url: http://united-manufacturing-hub-factoryinsight-service/ version: 1 - access: proxy editable: false isDefault: false jsonData: apiKey: $FACTORYINSIGHT_PASSWORD apiKeyConfigured: true baseURL: http://united-manufacturing-hub-factoryinsight-service/ customerID: $FACTORYINSIGHT_CUSTOMERID name: umh-v2-datasource orgId: 1 type: umh-v2-datasource url: http://united-manufacturing-hub-factoryinsight-service/ version: 1Replace the content of
envwith the following:GF_PLUGINS_ALLOW_LOADING_UNSIGNED_PLUGINS: umh-datasource,umh-factoryinput-panel,umh-v2-datasourceReplace the content of
extraInitContainerswith the following:- name: init-umh-datasource image: unitedmanufacturinghub/grafana-plugin-extractor:0.1.3 volumeMounts: - name: storage mountPath: /var/lib/grafana imagePullPolicy: IfNotPresent
In the
timescaledb-singlesection, make sure that theimage.tagfield is set to pg13.8-ts2.8.0-p1.
- Click Upgrade.
The upgrade process can take a few minutes. The upgrade is complete when the Status field of the release is Deployed.
Change Factoryinsight API version
The Factoryinsight API version has changed from v1 to v2. To make sure that
you are using the new version, click on any Factoryinsight Pod and check that the
VERSION environment variable is set to 2.
If it’s not, follow these steps:
- Navigate to the Workloads > Deployments tab.
- Select the united-manufacturing-hub-factoryinsight-deployment deployment.
Click the Edit button to open the deployment’s configuration.
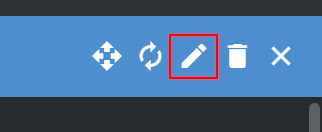
- Find the
spec.template.spec.containers[0].envfield. - Set the
valuefield of theVERSIONvariable to 2.

2.8.11 - Upgrade to v0.9.6
This page describes how to upgrade the United Manufacturing Hub to version 0.9.6. Before upgrading, remember to backup the database, Node-RED flows, and your cluster configuration.
Add Helm repo in UMHLens / OpenLens
Check if the UMH Helm repository is added in UMHLens / OpenLens.
To do so, from the top-left menu, select FIle > Preferences (or press CTRL + ,).
Click on the Kubernetes tab and check if the Helm Chart section contains
the https://repo.umh.app repository.
If it doesn’t, click the Add Custom Helm Repo button and fill in the following values:
- Helm repo name: united-manufacturing-hub
- URL: https://repo.umh.app
Then click Add.
Add new index to the database
In this version, a new index has been added to the processValueTabe table,
allowing to speed up the queries.
Open a shell in the database
sudo $(which kubectl) exec -it $(sudo $(which kubectl) get pods --kubeconfig /etc/rancher/k3s/k3s.yaml -n united-manufacturing-hub -l app.kubernetes.io/component=timescaledb -o jsonpath="{.items[0].metadata.name}") --kubeconfig /etc/rancher/k3s/k3s.yaml -n united-manufacturing-hub -- psql -U postgres
This command will open a psql shell connected to the default postgres database.
Create the index
Execute the following query:
CREATE INDEX ON processvaluetable(valuename, asset_id) WITH (timescaledb.transaction_per_chunk);
REINDEX TABLE processvaluetable;
This command could take a while to complete, especially on larger tables.
Type exit to close the shell.
Clear Workloads
Some workloads need to be deleted before upgrading. This process does not delete any data, but it will cause downtime. If a workload is missing, it means that it was not enabled in your cluster, therefore you can skip it.
To delete a resource, you can select it using the box on the left of the resource name and click the - button on the bottom right corner.
- Open the Workloads tab.
- From the Deployment section, delete the following deployments:
- united-manufacturing-hub-barcodereader
- united-manufacturing-hub-factoryinsight-deployment
- united-manufacturing-hub-kafkatopostgresql
- united-manufacturing-hub-mqttkafkabridge
- united-manufacturing-hub-iotsensorsmqtt
- united-manufacturing-hub-opcuasimulator-deployment
- From the StatefulSet section, delete the following statefulsets:
- united-manufacturing-hub-mqttbridge
- united-manufacturing-hub-hivemqce
- united-manufacturing-hub-nodered
- united-manufacturing-hub-sensorconnect
Upgrade Helm Chart
Now everything is ready to upgrade the Helm chart.
- Navigate to the Helm > Releases tab.
- Select the united-manufacturing-hub release and click Upgrade.
- In the Helm Upgrade window, make sure that the
Upgrade versionfield contains the version you want to upgrade to. - You can also change the values of the Helm chart, if needed.
- Click Upgrade.
The upgrade process can take a few minutes. The upgrade is complete when the Status field of the release is Deployed.
2.8.12 - Upgrade to v0.9.5
This page describes how to upgrade the United Manufacturing Hub to version 0.9.5. Before upgrading, remember to backup the database, Node-RED flows, and your cluster configuration.
Add Helm repo in UMHLens / OpenLens
Check if the UMH Helm repository is added in UMHLens / OpenLens.
To do so, from the top-left menu, select FIle > Preferences (or press CTRL + ,).
Click on the Kubernetes tab and check if the Helm Chart section contains
the https://repo.umh.app repository.
If it doesn’t, click the Add Custom Helm Repo button and fill in the following values:
- Helm repo name: united-manufacturing-hub
- URL: https://repo.umh.app
Then click Add.
Alter ordertable constraint
In this version, one of the constraints of the ordertable table has been
modified.
Make sure to backup the database before exectuing the following steps.
Open a shell in the database
sudo $(which kubectl) exec -it $(sudo $(which kubectl) get pods --kubeconfig /etc/rancher/k3s/k3s.yaml -n united-manufacturing-hub -l app.kubernetes.io/component=timescaledb -o jsonpath="{.items[0].metadata.name}") --kubeconfig /etc/rancher/k3s/k3s.yaml -n united-manufacturing-hub -- psql -U postgres
This command will open a psql shell connected to the default postgres database.
Alter the table
Check for possible conflicts in the
ordertabletable:SELECT order_name, asset_id, count(*) FROM ordertable GROUP BY order_name, asset_id HAVING count(*) > 1;If the result is empty, you can skip the next step.
Delete the duplicates:
DELETE FROM ordertable ox USING (
     SELECT MIN(CTID) as ctid, order_name, asset_id
     FROM ordertable
     GROUP BY order_name, asset_id HAVING count(*) > 1
     ) b
WHERE ox.order_name = b.order_name AND ox.asset_id = b.asset_id
AND ox.CTID <> b.ctid;
If the data cannot be deleted, you have to manually update each duplicate
order_namesto a unique value.Get the name of the constraint:
SELECT conname FROM pg_constraint WHERE conrelid = 'ordertable'::regclass AND contype = 'u';Drop the constraint:
ALTER TABLE ordertable DROP CONSTRAINT ordertable_asset_id_order_id_key;Add the new constraint:
ALTER TABLE ordertable ADD CONSTRAINT ordertable_asset_id_order_name_key UNIQUE (asset_id, order_name);
Now you can close the shell by typing exit and continue with the upgrade process.
Clear Workloads
Some workloads need to be deleted before upgrading. This process does not delete any data, but it will cause downtime. If a workload is missing, it means that it was not enabled in your cluster, therefore you can skip it.
To delete a resource, you can select it using the box on the left of the resource name and click the - button on the bottom right corner.
- Open the Workloads tab.
- From the Deployment section, delete the following deployments:
- united-manufacturing-hub-barcodereader
- united-manufacturing-hub-factoryinsight-deployment
- united-manufacturing-hub-kafkatopostgresql
- united-manufacturing-hub-mqttkafkabridge
- united-manufacturing-hub-iotsensorsmqtt
- united-manufacturing-hub-opcuasimulator-deployment
- From the StatefulSet section, delete the following statefulsets:
- united-manufacturing-hub-mqttbridge
- united-manufacturing-hub-hivemqce
- united-manufacturing-hub-nodered
- united-manufacturing-hub-sensorconnect
Upgrade Helm Chart
Now everything is ready to upgrade the Helm chart.
Navigate to the Helm > Releases tab.
Select the united-manufacturing-hub release and click Upgrade.
In the Helm Upgrade window, make sure that the
Upgrade versionfield contains the version you want to upgrade to.You can also change the values of the Helm chart, if needed.
Enable the startup probe for the Kafka Broker by adding the following into the
kafkasection:startupProbe: enabled: true failureThreshold: 600 periodSeconds: 10 timeoutSeconds: 10
Click Upgrade.
The upgrade process can take a few minutes. The upgrade is complete when the Status field of the release is Deployed.
Changes to the messages
Some messages have been modified in this version. You need to update some payolads in your Node-RED flows.
- modifyState:
start_time_stamphas been renamed totimestamp_msend_time_stamphas been renamed totimestamp_ms_end
- modifyProducedPieces:
start_time_stamphas been renamed totimestamp_msend_time_stamphas been renamed totimestamp_ms_end
deleteShiftByAssetIdAndBeginTimestampanddeleteShiftByIdhave been removed. Use the deleteShift message instead.
2.8.13 - Upgrade to v0.9.4
This page describes how to upgrade the United Manufacturing Hub to version 0.9.4. Before upgrading, remember to backup the database, Node-RED flows, and your cluster configuration.
Add Helm repo in UMHLens / OpenLens
Check if the UMH Helm repository is added in UMHLens / OpenLens.
To do so, from the top-left menu, select FIle > Preferences (or press CTRL + ,).
Click on the Kubernetes tab and check if the Helm Chart section contains
the https://repo.umh.app repository.
If it doesn’t, click the Add Custom Helm Repo button and fill in the following values:
- Helm repo name: united-manufacturing-hub
- URL: https://repo.umh.app
Then click Add.
Clear Workloads
Some workloads need to be deleted before upgrading. This process does not delete any data, but it will cause downtime. If a workload is missing, it means that it was not enabled in your cluster, therefore you can skip it.
To delete a resource, you can select it using the box on the left of the resource name and click the - button on the bottom right corner.
- Open the Workloads tab.
- From the Deployment section, delete the following deployments:
- united-manufacturing-hub-barcodereader
- united-manufacturing-hub-factoryinsight-deployment
- united-manufacturing-hub-kafkatopostgresql
- united-manufacturing-hub-mqttkafkabridge
- united-manufacturing-hub-iotsensorsmqtt
- united-manufacturing-hub-opcuasimulator-deployment
- From the StatefulSet section, delete the following statefulsets:
- united-manufacturing-hub-mqttbridge
- united-manufacturing-hub-hivemqce
- united-manufacturing-hub-nodered
- united-manufacturing-hub-sensorconnect
Upgrade Helm Chart
Now everything is ready to upgrade the Helm chart.
Navigate to the Helm > Releases tab.
Select the united-manufacturing-hub release and click Upgrade.
In the Helm Upgrade window, make sure that the
Upgrade versionfield contains the version you want to upgrade to.You can also change the values of the Helm chart, if needed.
If you have enabled the Kafka Bridge, find the section
_000_commonConfig.kafkaBridge.topicmapand set the value to the following:- bidirectional: false name: HighIntegrity send_direction: to_remote topic: ^ia\.(([^r.](\d|-|\w)*)|(r[b-z](\d|-|\w)*)|(ra[^w]))\.(\d|-|\w|_)+\.(\d|-|\w|_)+\.((addMaintenanceActivity)|(addOrder)|(addParentToChild)|(addProduct)|(addShift)|(count)|(deleteShiftByAssetIdAndBeginTimestamp)|(deleteShiftById)|(endOrder)|(modifyProducedPieces)|(modifyState)|(productTag)|(productTagString)|(recommendation)|(scrapCount)|(startOrder)|(state)|(uniqueProduct)|(scrapUniqueProduct))$ - bidirectional: false name: HighThroughput send_direction: to_remote topic: ^ia\.(([^r.](\d|-|\w)*)|(r[b-z](\d|-|\w)*)|(ra[^w]))\.(\d|-|\w|_)+\.(\d|-|\w|_)+\.(process[V|v]alue).*$For more information, see the Kafka Bridge configuration
If you have enabled Barcodereader, find the
barcodereadersection and set the following values, adding the missing ones and updating the already existing ones:enabled: false image: pullPolicy: IfNotPresent resources: requests: cpu: "2m" memory: "30Mi" limits: cpu: "10m" memory: "60Mi" scanOnly: false # Debug mode, will not send data to kafka
Click Upgrade.
The upgrade process can take a few minutes. The process is complete when the Status field of the release is Deployed.
3 - Administration
In this section, you will find information about how to manage and configure the United Manufacturing Hub cluster, from customizing the cluster to access the different services.
3.1 - Access the Database
There are multiple ways to access the database. If you want to just visualize data, then using Grafana or a database client is the easiest way. If you need to also perform SQL commands, then using a database client or the CLI are the best options.
Generally, using a database client gives you the most flexibility, since you can both visualize the data and manipulate the database. However, it requires you to install a database client on your machine.
Using the CLI gives you more control over the database, but it requires you to have a good understanding of SQL.
Grafana comes with a pre-configured PostgreSQL datasource, so you can use it to visualize the data.
Before you begin
You need to have a UMH cluster. If you do not already have a cluster, you can create one by following the Getting Started guide.
You also need to access the system where the cluster is running, either by logging into it or by using a remote shell.
Get the database credentials
If you are not using the CLI, you need to know the database credentials. You can find them in the timescale-post-init-pw Secret. Run the following command to get the credentials:
sudo $(which kubectl) get secret timescale-post-init-pw -n united-manufacturing-hub -o go-template='{{range $k,$v := .data}}{{if eq $k "1_set_passwords.sh"}}{{if not $v}}{{$v}}{{else}}{{$v | base64decode}}{{end}}{{"\n"}}{{end}}{{end}}' --kubeconfig /etc/rancher/k3s/k3s.yaml
This command will print an SQL script that contains the username and password for the different databases.
Access the database using a database client
There are many database clients that you can use to access the database. Here’s a list of some of the most popular database clients:
| Name | Free or Paid | Platforms |
|---|---|---|
| pgAdmin | Free | Windows, macOS, Linux |
| DataGrip | Paid | Windows, macOS, Linux |
| DBeaver | Both | Windows, macOS, Linux |
For the sake of this tutorial, pgAdmin will be used as an example, but other clients have similar functionality. Refer to the specific client documentation for more information.
Using pgAdmin
You can use pgAdmin to access the database. To do so, you need to install the pgAdmin client on your machine. For more information, see the pgAdmin documentation.
Once you have installed the client, you can add a new server from the main window.
In the General tab, give the server a meaningful name. In the Connection tab, enter the database credentials:
- The Host name/address is the IP address of your instance.
- The Port is 5432.
- The Maintenance database is postgres.
- The Username and Password are the ones you found in the Secret.
Click Save to save the server.


You can now connect to the database by double-clicking the server.
Use the side menu to navigate through the server. The tables are listed under the Schemas > public > Tables section of the factoryinsight database.
Refer to the pgAdmin documentation for more information on how to use the client to perform database operations.
Access the database using the command line interface
You can access the database from the command line using the psql command
directly from the united-manufacturing-hub-timescaledb-0 Pod.
You will not need credentials to access the database from the Pod’s CLI.
The following steps need to be performed from the machine where the cluster is running, either by logging into it or by using a remote shell.
Open a shell in the database Pod
sudo $(which kubectl) exec -it $(sudo $(which kubectl) get pods --kubeconfig /etc/rancher/k3s/k3s.yaml -n united-manufacturing-hub -l app.kubernetes.io/component=timescaledb -o jsonpath="{.items[0].metadata.name}") --kubeconfig /etc/rancher/k3s/k3s.yaml -n united-manufacturing-hub -- psql -U postgres
This command will open a psql shell connected to the default postgres database.
Perform SQL commands
Once you have a shell in the database, you can perform SQL commands.
For example, to create an index on the processValueTable:
CREATE INDEX ON processvaluetable (valuename);When you are done, exit the postgres shell:
exit
What’s next
- See a list of SQL commands
- See how to Delete Assets from the Database
- See how to Reduce the Database Size
- See how to Backup and Restore the Database
- See how to Expose Grafana to the Internet
3.2 - Access Services From Within the Cluster
All the services deployed in the cluster are visible to each other. That makes it easy to connect them together.
Before you begin
You need to have a UMH cluster. If you do not already have a cluster, you can create one by following the Getting Started guide.
You also need to access the system where the cluster is running, either by logging into it or by using a remote shell.
Connect to a service from another service
To connect to a service from another service, you can use the service name as the host name.
To get a list of available services and related ports you can run the following command from the instance:
sudo $(which kubectl) get svc -n united-manufacturing-hub --kubeconfig /etc/rancher/k3s/k3s.yaml
All of them are available from within the cluster. The ones of type LoadBalancer are also available from outside the cluster using the node IP and the port listed in the Ports column.
Use the port on the left side of the colon (:) to connect to the service from
outside the cluster. For example, the database is available on port 5432.
Example
The most common use case is to connect to the MQTT Broker from Node-RED.
To do that, when you create the MQTT node, you can use the service name united-manufacturing-hub-mqtt as the host name and one the ports listed in the Ports column.
The MQTT service name has changed since version 0.9.10. If you are using an older
version, use united-manufacturing-hub-vernemq instead of
united-manufacturing-hub-mqtt.
What’s next
3.3 - Access Services Outside the Cluster
Some of the microservices in the United Manufacturing Hub are exposed outside the cluster with a LoadBalancer service. A LoadBalancer is a service that exposes a set of Pods on the same network as the cluster, but not necessarily to the entire internet. The LoadBalancer service provides a single IP address that can be used to access the Pods.
Before you begin
You need to have a UMH cluster. If you do not already have a cluster, you can create one by following the Getting Started guide.
You also need to access the system where the cluster is running, either by logging into it or by using a remote shell.
Accessing the services
To get a list of available services and related ports you can run the following command from the instance:
sudo $(which kubectl) get svc -n united-manufacturing-hub --kubeconfig /etc/rancher/k3s/k3s.yaml
All of them are available from within the cluster. The ones of type LoadBalancer are also available from outside the cluster using the node IP and the port listed in the Ports column.
Use the port on the left side of the colon (:) to connect to the service from
outside the cluster. For example, the database is available on port 5432.
Services with LoadBalancer by default
The following services are exposed outside the cluster with a LoadBalancer service by default:
- Database at port 5432
- Kafka Console at port 8090
- Grafana at port 8080
- MQTT Broker at port 1883
- OPCUA Simulator at port 46010
- Node-RED at port 1880
To access Node-RED, you need to use the /nodered path, for example
http://192.168.1.100:1880/nodered.
Services with NodePort by default
The Kafka Broker uses the service type NodePort by default.
Follow these steps to access the Kafka Broker outside the cluster:
Access your instance via SSH
Execute this command to check the host port of the Kafka Broker:
sudo $(which kubectl) get svc united-manufacturing-hub-kafka-external -n united-manufacturing-hub --kubeconfig /etc/rancher/k3s/k3s.yamlIn the
PORT(S)column, you should be able to see the port with9094:<host-port>/TCP.To access the Kafka Broker, use
<instance-ip-address>:<host-port>.
Services with ClusterIP
Some of the microservices in the United Manufacturing Hub are exposed via a ClusterIP service. That means that they are only accessible from within the cluster itself. There are two options for enabling access them from outside the cluster:
- Creating a LoadBalancer service: A LoadBalancer is a service that exposes a set of Pods on the same network as the cluster, but not necessarily to the entire internet.
- Port forwarding: You can just forward the port of a service to your local machine.
Port forwarding can be unstable, especially if the connection to the cluster is slow. If you are experiencing issues, try to create a LoadBalancer service instead.
Create a LoadBalancer service
Follow these steps to enable the LoadBalancer service for the corresponding microservice:
Execute the following command to list the services and note the name of the one you want to access.
sudo $(which kubectl) get svc -n united-manufacturing-hub --kubeconfig /etc/rancher/k3s/k3s.yamlStart editing the service configuration by running this command:
sudo $(which kubectl) edit svc <service-name> -n united-manufacturing-hub --kubeconfig /etc/rancher/k3s/k3s.yamlFind the
status.loadBalancersection and update it to the following:status: loadBalancer: ingress: - ip: <external-ip>Replace
<external-ip>with the external IP address of the node.Go to the
spec.typesection and change the value fromClusterIPtoLoadBalancer.After saving, your changes will be applied automatically and the service will be updated. Now, you can access the service at the configured address.
Port forwarding
Execute the following command to list the services and note the name of the one you want to port-forward and the internal port that it use.
sudo $(which kubectl) get svc -n united-manufacturing-hub --kubeconfig /etc/rancher/k3s/k3s.yamlRun the following command to forward the port:
sudo $(which kubectl) port-forward service/<your-service> <local-port>:<remote-port> -n united-manufacturing-hub --kubeconfig /etc/rancher/k3s/k3s.yamlWhere
<local-port>is the port on the host that you want to use, and<remote-port>is the service port that you noted before. Usually, it’s good practice to pick a high number (greater than 30000) for the host port, in order to avoid conflicts.You should be able to see logs like:
Forwarding from 127.0.0.1:31922 -> 9121
Forwarding from [::1]:31922 -> 9121
Handling connection for 31922
You can now access the service using the IP address of the node and the port you choose.
Security considerations
MQTT broker
There are some security considerations to keep in mind when exposing the MQTT broker.
By default, the MQTT broker is configured to allow anonymous connections. This means that anyone can connect to the broker without providing any credentials. This is not recommended for production environments.
To secure the MQTT broker, you can configure it to require authentication. For that, you can either enable RBAC or set up HiveMQ PKI (recommended for production environments).
Troubleshooting
LoadBalancer service stuck in Pending state
If the LoadBalancer service is stuck in the Pending state, it probably means
that the host port is already in use. To fix this, edit the service and change
the section spec.ports.port to a different port number.
What’s next
- See how to Expose Grafana to the Internet
3.4 - Expose Grafana to the Internet
This page describes how to expose Grafana to the Internet so that you can access it from outside the Kubernetes cluster.
Before you begin
You need to have a UMH cluster. If you do not already have a cluster, you can create one by following the Getting Started guide.
You also need to access the system where the cluster is running, either by logging into it or by using a remote shell.
Enable the ingress
Enable the ingress by upgrading the value in the Helm chart.
To do so, run the following command:
sudo $(which helm) upgrade --set grafana.ingress.enabled=true united-manufacturing-hub united-manufacturing-hub/united-manufacturing-hub -n united-manufacturing-hub --reuse-values --version $(sudo $(which helm) get metadata united-manufacturing-hub -n united-manufacturing-hub --kubeconfig /etc/rancher/k3s/k3s.yaml -o json | jq '.version') --kubeconfig /etc/rancher/k3s/k3s.yaml
Remember to add a DNS record for your domain name that points to the external IP address of the Kubernetes host.
What’s next
- See how to Access Factoryinsight Outside the Cluster
3.5 - Install Custom Drivers in NodeRed
NodeRed is running on Alpine Linux as non-root user. This means that you can’t
install packages with apk. This tutorial shows you how to install packages
with proper security measures.
Before you begin
You need to have a UMH cluster. If you do not already have a cluster, you can create one by following the Getting Started guide.
You also need to access the system where the cluster is running, either by logging into it or by using a remote shell.
Change the security context
From the instance’s shell, execute this command:
sudo $(which kubectl) patch statefulset united-manufacturing-hub-nodered -n united-manufacturing-hub -p '{"spec":{"template":{"spec":{"securityContext":{"runAsUser":0,"runAsNonRoot":false,"fsGroup":0}}}}}' --kubeconfig /etc/rancher/k3s/k3s.yaml
Install the packages
Open a shell in the united-manufacturing-hub-nodered-0 pod with:
sudo $(which kubectl) exec -it united-manufacturing-hub-nodered-0 -n united-manufacturing-hub --kubeconfig /etc/rancher/k3s/k3s.yaml -- /bin/shInstall the packages with
apk:apk add <package>For example, to install
unixodbc:apk add unixodbcYou can find the list of available packages here.
Exit the shell by typing
exit.
Revert the security context
For security reasons, you should revert the security context after you install the packages.
From the instance’s shell, execute this command:
sudo $(which kubectl) patch statefulset united-manufacturing-hub-nodered -n united-manufacturing-hub -p '{"spec":{"template":{"spec":{"securityContext":{"runAsUser":1000,"runAsNonRoot":true,"fsGroup":1000}}}}}' --kubeconfig /etc/rancher/k3s/k3s.yaml
What’s next
3.6 - Execute Kafka Shell Scripts
When working with Kafka, you may need to execute shell scripts to perform administrative tasks. This page describes how to execute Kafka shell scripts.
Before you begin
You need to have a UMH cluster. If you do not already have a cluster, you can create one by following the Getting Started guide.
You also need to access the system where the cluster is running, either by logging into it or by using a remote shell.
Open a shell in the Kafka container
From the instance’s shell, execute this command:
sudo $(which kubectl) exec -it united-manufacturing-hub-kafka-0 -n united-manufacturing-hub --kubeconfig /etc/rancher/k3s/k3s.yaml -- /bin/shNavigate to the Kafka bin directory:
cd /opt/bitnami/kafka/binExecute any Kafka shell scripts. For example, to list all topics:
./kafka-topics.sh --list --zookeeper zookeeper:2181Exit the shell by typing
exit.
What’s next
3.7 - Reduce database size
Over time, time-series data can consume a large amount of disk space. To reduce the amount of disk space used by time-series data, there are three options:
- Enable data compression. This reduces the required disk space by applying mathematical compression to the data. This compression is lossless, so the data is not changed in any way. However, it will take more time to compress and decompress the data. For more information, see how TimescaleDB compression works.
- Enable data retention. This deletes old data that is no longer needed, by setting policies that automatically delete data older than a specified time. This can be beneficial for managing the size of the database, as well as adhering to data retention regulations. However, by definition, data loss will occur. For more information, see how TimescaleDB data retention works.
- Downsampling. This is a method of reducing the amount of data stored by aggregating data points over a period of time. For example, you can aggregate data points over a 30-minute period, instead of storing each data point. If exact data is not required, downsampling can be useful to reduce database size. However, data may be less accurate.
Before you begin
You need to have a UMH cluster. If you do not already have a cluster, you can create one by following the Getting Started guide.
You also need to access the system where the cluster is running, either by logging into it or by using a remote shell.
Open the database shell
sudo $(which kubectl) exec -it $(sudo $(which kubectl) get pods --kubeconfig /etc/rancher/k3s/k3s.yaml -n united-manufacturing-hub -l app.kubernetes.io/component=timescaledb -o jsonpath="{.items[0].metadata.name}") --kubeconfig /etc/rancher/k3s/k3s.yaml -n united-manufacturing-hub -- psql -U postgres
This command will open a psql shell connected to the default postgres database.
Connect to the corresponding database:
\c factoryinsight
\c umh_v2
Enable data compression
You can find sample SQL commands to enable data compression here.
The first step is to turn on data compression on the target table, and set the compression options. Refer to the TimescaleDB documentation for a full list of options.
      -- set "asset_id" as the key for the compressed segments and orders the table by "valuename".
      ALTER TABLE processvaluetable SET (timescaledb.compress, timescaledb.compress_segmentby = 'asset_id', timescaledb.compress_orderby = 'valuename');
-- set "asset_id" as the key for the compressed segments and orders the table by "name". ALTER TABLE tag SET (timescaledb.compress, timescaledb.compress_segmentby = 'asset_id', timescaledb.compress_orderby = 'name');Then, you have to create the compression policy. The interval determines the age that the chunks of data need to reach before being compressed. Read the official documentation for more information.
      -- set a compression policy on the "processvaluetable" table, which will compress data older than 7 days.
      SELECT add_compression_policy('processvaluetable', INTERVAL '7 days');
-- set a compression policy on the "tag" table, which will compress data older than 2 weeks. SELECT add_compression_policy('tag', INTERVAL '2 weeks');
Enable data retention
You can find sample SQL commands to enable data retention here.
Sample command for factoryinsight and umh_v2 databases:
Enabling data retention consists in only adding the policy with the desired retention interval. Refer to the official documentation for more detailed information about these queries.
  -- Set a retention policy on the "processvaluetable" table, which will delete data older than 7 days.
  SELECT add_retention_policy('processvaluetable', INTERVAL '7 days');
  -- set a retention policy on the "tag" table, which will delete data older than 3 months.
  SELECT add_retention_policy('tag', INTERVAL '3 months');
What’s next
- Learn how to delete assets from the database explains how to turn on compression.
- Learn how to change the language in factoryinsight.
3.8 - Use Merge Point To Normalize Kafka Topics
Kafka excels at processing a high volume of messages but can encounter difficulties with excessive topics, which may lead to insufficient memory. The optimal Kafka setup involves minimal topics, utilizing the event key for logical data segregation.
On the contrary, MQTT shines when handling a large number of topics with a small number of messages. But when bridging MQTT to Kafka, the number of topics can become overwhelming. Specifically, with the default configuration, Kafka is able to handle around 100-150 topics. This is because there is a limit of 1000 partitions per broker, and each topic requires has 6 partitions by default.
So, if you are experiencing memory issues with Kafka, you may want to consider combining multiple topics into a single topic with different keys. The diagram below illustrates how this principle simplifies topic management.
Value: 1) event2(Topic: umh.v1.acme.anytown.foo.baz
Value: 2) event3(Topic: umh.v1.acme.anytown
Value: 3) event4(umh.v1.acme.anytown.frob
Value: 4) event1 --> bridge event2 --> bridge event3 --> bridge event4 --> bridge bridge{{Topic merge point: 3}} subgraph Topic: umh.v1.acme gmsg1(Key: anytown.foo.bar
Value: 1) gmsg2(Key: anytown.foo.baz
Value: 2) gmsg3(Key: anytown
Value: 3) gmsg4(Key: anytown.frob
Value: 4) end bridge --> gmsg1 bridge --> gmsg2 bridge --> gmsg3 bridge --> gmsg4
Before you begin
You need to have a UMH cluster. If you do not already have a cluster, you can create one by following the Getting Started guide.
You also need to access the system where the cluster is running, either by logging into it or by using a remote shell.
Data Sources
To adjust the topic merge point for data sources, modify mgmtcompanion-config configmap. This can be easily done with the following command:
sudo $(which kubectl) edit configmap mgmtcompanion-config -n mgmtcompanion --kubeconfig /etc/rancher/k3s/k3s.yaml
This command opens the current configuration in the default editor, allowing you
to set the umh_merge_point to your preferred value:
data:
  umh_merge_point: <numeric-value>
Ensure the value is at least 3 and update the lastUpdated field to the current
Unix timestamp to trigger the automatic refresh of existing data sources.
Data Bridge
For data bridges, the merge point is defined individually in the Helm chart values
for each bridge. Update the Helm chart installation with the new topicMergePoint
value for each bridge. See the Helm chart documentation
for more details.
Setting the topicMergePoint to -1 disables the merge feature.
3.9 - Delete Assets from the Database
This is useful if you have created assets by mistake, or to delete the ones that are no longer needed.
This task deletes data from the database. Make sure you have a backup of the database before you proceed.
Before you begin
You need to have a UMH cluster. If you do not already have a cluster, you can create one by following the Getting Started guide.
You also need to access the system where the cluster is running, either by logging into it or by using a remote shell.
Also, make sure to backup the database before you proceed. For more information, see Backing Up and Restoring the Database.
Delete assets from factoryinsight
If you want to delete assets from the umh_v2 database, go to this section.
Open the database shell
sudo $(which kubectl) exec -it $(sudo $(which kubectl) get pods --kubeconfig /etc/rancher/k3s/k3s.yaml -n united-manufacturing-hub -l app.kubernetes.io/component=timescaledb -o jsonpath="{.items[0].metadata.name}") --kubeconfig /etc/rancher/k3s/k3s.yaml -n united-manufacturing-hub -- psql -U postgres
This command will open a psql shell connected to the default postgres database.
Connect to the factoryinsight database:
\c factoryinsight
Choose the assets to delete
You have multiple choices to delete assets, like deleting a single asset, or deleting all assets in a location, or deleting all assets with a specific name.
To do so, you can customize the SQL command using different filters. Specifically, a combination of the following filters:
assetidlocationcustomer
To filter an SQL command, you can use the WHERE clause. For example, using all
of the filters:
WHERE assetid = '<asset-id>' AND location = '<location>' AND customer = '<customer>';
You can use any combination of the filters, even just one of them.
Here are some examples:
Delete all assets with the same name from any location and any customer:
WHERE assetid = '<asset-id>'Delete all assets in a specific location:
WHERE location = '<location>'Delete all assets with the same name in a specific location:
WHERE assetid = '<asset-id>' AND location = '<location>'Delete all assets with the same name in a specific location for a single customer:
WHERE assetid = '<asset-id>' AND location = '<location>' AND customer = '<customer>'
Delete the assets
Once you know the filters you want to use, you can use the following SQL commands to delete assets:
BEGIN;

WITH assets_to_be_deleted AS (SELECT id FROM assettable <filter>)
DELETE FROM shifttable WHERE asset_id IN (SELECT id FROM assets_to_be_deleted);

WITH assets_to_be_deleted AS (SELECT id FROM assettable <filter>)
DELETE FROM counttable WHERE asset_id IN (SELECT id FROM assets_to_be_deleted);

WITH assets_to_be_deleted AS (SELECT id FROM assettable <filter>)
DELETE FROM ordertable WHERE asset_id IN (SELECT id FROM assets_to_be_deleted);

WITH assets_to_be_deleted AS (SELECT id FROM assettable <filter>)
DELETE FROM processvaluestringtable WHERE asset_id IN (SELECT id FROM assets_to_be_deleted);

WITH assets_to_be_deleted AS (SELECT id FROM assettable <filter>)
DELETE FROM processvaluetable WHERE asset_id IN (SELECT id FROM assets_to_be_deleted);

WITH assets_to_be_deleted AS (SELECT id FROM assettable <filter>)
DELETE FROM producttable WHERE asset_id IN (SELECT id FROM assets_to_be_deleted);

WITH assets_to_be_deleted AS (SELECT id FROM assettable <filter>)
DELETE FROM shifttable WHERE asset_id IN (SELECT id FROM assets_to_be_deleted);

WITH assets_to_be_deleted AS (SELECT id FROM assettable <filter>)
DELETE FROM statetable WHERE asset_id IN (SELECT id FROM assets_to_be_deleted);

WITH assets_to_be_deleted AS (SELECT id FROM assettable <filter>)
DELETE FROM assettable WHERE id IN (SELECT id FROM assets_to_be_deleted);

COMMIT;
Optionally, you can add the following code before the last WITH statement if
you used the track&trace feature:
WITH assets_to_be_deleted AS (SELECT id FROM assettable <filter>), uniqueproducts_to_be_deleted AS (SELECT uniqueproductid FROM uniqueproducttable WHERE asset_id IN (SELECT id FROM assets_to_be_deleted))
DELETE FROM producttagtable WHERE product_uid IN (SELECT uniqueproductid FROM uniqueproducts_to_be_deleted);

WITH assets_to_be_deleted AS (SELECT id FROM assettable <filter>), uniqueproducts_to_be_deleted AS (SELECT uniqueproductid FROM uniqueproducttable WHERE asset_id IN (SELECT id FROM assets_to_be_deleted))
DELETE FROM producttagstringtable WHERE product_uid IN (SELECT uniqueproductid FROM uniqueproducts_to_be_deleted);

WITH assets_to_be_deleted AS (SELECT id FROM assettable <filter>), uniqueproducts_to_be_deleted AS (SELECT uniqueproductid FROM uniqueproducttable WHERE asset_id IN (SELECT id FROM assets_to_be_deleted))
DELETE FROM productinheritancetable WHERE parent_uid IN (SELECT uniqueproductid FROM uniqueproducts_to_be_deleted) OR child_uid IN (SELECT uniqueproductid FROM uniqueproducts_to_be_deleted);

WITH assets_to_be_deleted AS (SELECT id FROM assettable <filter>)
DELETE FROM uniqueproducttable WHERE asset_id IN (SELECT id FROM assets_to_be_deleted);
Delete assets from umh_v2
Open the database shell
sudo $(which kubectl) exec -it $(sudo $(which kubectl) get pods --kubeconfig /etc/rancher/k3s/k3s.yaml -n united-manufacturing-hub -l app.kubernetes.io/component=timescaledb -o jsonpath="{.items[0].metadata.name}") --kubeconfig /etc/rancher/k3s/k3s.yaml -n united-manufacturing-hub -- psql -U postgres
This command will open a psql shell connected to the default postgres database.
Connect to the umh_v2 database:
\c umh_v2
Choose the assets to delete
You have multiple choices to delete assets, like deleting a single asset, or deleting all assets in a location, or deleting all assets with a specific name.
To do so, you can customize the SQL command using different filters. Specifically, a combination of the following filters:
enterprisesitearealineworkcellorigin_id
To filter an SQL command, you can use the WHERE clause. For example, you can filter
by enterprise, site, and area:
WHERE enterprise = '<your-enterprise>' AND site = '<your-site>' AND area = '<your-area>';
You can use any combination of the filters, even just one of them.
Delete the assets
Once you know the filters you want to use, you can use the following SQL commands to delete assets:
BEGIN;
WITH assets_to_be_deleted AS (SELECT id FROM asset <filter>)
DELETE FROM tag WHERE asset_id IN (SELECT id FROM assets_to_be_deleted);

WITH assets_to_be_deleted AS (SELECT id FROM asset <filter>)
DELETE FROM tag_string WHERE asset_id IN (SELECT id FROM assets_to_be_deleted);

WITH assets_to_be_deleted AS (SELECT id FROM asset <filter>)
DELETE FROM asset WHERE id IN (SELECT id FROM assets_to_be_deleted);
COMMIT;
What’s next
3.10 - Change the Language in Factoryinsight
You can change the language in Factoryinsight if you want to localize the returned text, like stop codes, to a different language.
Before you begin
You need to have a UMH cluster. If you do not already have a cluster, you can create one by following the Getting Started guide.
You also need to access the system where the cluster is running, either by logging into it or by using a remote shell.
Access the database shell
sudo $(which kubectl) exec -it $(sudo $(which kubectl) get pods --kubeconfig /etc/rancher/k3s/k3s.yaml -n united-manufacturing-hub -l app.kubernetes.io/component=timescaledb -o jsonpath="{.items[0].metadata.name}") --kubeconfig /etc/rancher/k3s/k3s.yaml -n united-manufacturing-hub -- psql -U postgres
This command will open a psql shell connected to the default postgres database.
Connect to the factoryinsight database:
\c factoryinsight
Change the language
Execute the following command to change the language:
INSERT INTO configurationtable (customer, languagecode) VALUES ('factoryinsight', <code>) ON CONFLICT(customer) DO UPDATE SET languagecode=<code>;
where <code> is the language code. For example, to change the language to
German, use 0.
Supported languages
Factoryinsight supports the following languages:
| Language | Code |
|---|---|
| German | 0 |
| English | 1 |
| Turkish | 2 |
What’s next
3.11 - Explore Cached Data
When working with the United Manufacturing Hub, you might want to visualize information about the cached data. This page shows how you can access the cache and explore the data.
Before you begin
You need to have a UMH cluster. If you do not already have a cluster, you can create one by following the Getting Started guide.
You also need to access the system where the cluster is running, either by logging into it or by using a remote shell.
Open a shell in the cache Pod
Get access to the instance’s shell and execute the following commands.
Get the cache password
sudo $(which kubectl) get secret redis-secret -n united-manufacturing-hub -o go-template='{{range $k,$v := .data}}{{printf "%s: " $k}}{{if not $v}}{{$v}}{{else}}{{$v | base64decode}}{{end}}{{"\n"}}{{end}}' --kubeconfig /etc/rancher/k3s/k3s.yamlOpen a shell in the Pod:
sudo $(which kubectl) exec -it united-manufacturing-hub-redis-master-0 -n united-manufacturing-hub --kubeconfig /etc/rancher/k3s/k3s.yaml -- /bin/shIf you have multiple cache Pods, you can select any of them.Enter the Redis shell:
redis-cli -a <cache-password>Now you can execute any command. For example, to get the number of keys in the cache, run:
KEYS *Or, to get the cache size, run:
DBSIZE
For more information about Redis commands, see the Redis documentation.
What’s next
4 - Backup & Recovery
4.1 - Backup and Restore the United Manufacturing Hub
This page describes how to back up the following:
- All Node-RED flows
- All Grafana dashboards
- The Helm values used for installing the united-manufacturing-hub release
- All the contents of the United Manufacturing Hub database (
factoryinsightandumh_v2) - The Management Console Companion’s settings
It does not back up:
- Additional databases other than the United Manufacturing Hub default database
- TimescaleDB continuous aggregates: Follow the official documentation to learn how.
- TimescaleDB policies: Follow the official documentation to learn how.
- Everything else not included in the previous list
This procedure only works on Windows.
Before you begin
Download the backup scripts and extract the content in a folder of your choice.
For this task, you need to have PostgreSQL installed on your machine.
You also need to have enough space on your machine to store the backup. To check the size of the database, ssh into the system and follow the steps below:
sudo $(which kubectl) exec -it $(sudo $(which kubectl) get pods --kubeconfig /etc/rancher/k3s/k3s.yaml -n united-manufacturing-hub -l app.kubernetes.io/component=timescaledb -o jsonpath="{.items[0].metadata.name}") --kubeconfig /etc/rancher/k3s/k3s.yaml -n united-manufacturing-hub -- psql -U postgres
This command will open a psql shell connected to the default postgres database.
Run the following command to get the size of the database:
SELECT pg_size_pretty(pg_database_size('umh_v2')) AS "umh_v2", pg_size_pretty(pg_database_size('factoryinsight')) AS "factoryinsight";
Backup
Generate Grafana API Key
Create a Grafana API Token for an admin user by following these steps:
- Open the Grafana UI in your browser and log in with an admin user.
- Click on the Configuration icon in the left sidebar and select API Keys.
- Give the API key a name and change its role to Admin.
- Optionally set an expiration date.
- Click Add.
- Copy the generated API key and save it for later.
Stop workloads
To prevent data inconsistencies, you need to temporarily stop the MQTT and Kafka Brokers.
Access the instance’s shell and execute the following commands:
sudo $(which kubectl) scale statefulset united-manufacturing-hub-kafka --replicas=0 -n united-manufacturing-hub --kubeconfig /etc/rancher/k3s/k3s.yaml
sudo $(which kubectl) scale statefulset united-manufacturing-hub-hivemqce --replicas=0 -n united-manufacturing-hub --kubeconfig /etc/rancher/k3s/k3s.yaml
Copy kubeconfig file
To run the backup script, you’ll first need to obtain a copy of the Kubernetes configuration file from your instance. This is essential for providing the script with access to the instance.
In the shell of your instance, execute the following command to display the Kubernetes configuration:
sudo cat /etc/rancher/k3s/k3s.yamlMake sure to copy the entire output to your clipboard.
This tutorial is based on the assumption that your kubeconfig file is located at /etc/rancher/k3s/k3s.yaml. Depending on your setup, the actual file location might be different.
Open a text editor, like Notepad, on your local machine and paste the copied content.
In the pasted content, find the server field. It usually defaults to
https://127.0.0.1:6443. Replace this with your instance’s IP addressserver: https://<INSTANCE_IP>:6443Save the file as
k3s.yamlinside thebackupfolder you downloaded earlier.
Backup using the script
The backup script is located inside the folder you downloaded earlier.
Open a terminal and navigate inside the folder.
cd <FOLDER_PATH>Run the script:
.\backup.ps1 -IP <IP_OF_THE_SERVER> -GrafanaToken <GRAFANA_API_KEY> -KubeconfigPath .\k3s.yamlYou can find a list of all available parameters down below.
If
OutputPathis not set, the backup will be stored in the current folder.
This script might take a while to finish, depending on the size of your database and your connection speed.
If the connection is interrupted, there is currently no option to resume the process, therefore you will need to start again.
Here is a list of all available parameters:
| Parameter | Description | Required | Default value |
|---|---|---|---|
GrafanaToken | Grafana API key | Yes | |
IP | IP of the cluster to backup | Yes | |
KubeconfigPath | Path to the kubeconfig file | Yes | |
DatabaseDatabase | Name of the databse to backup | No | factoryinsight |
DatabasePassword | Password of the database user | No | changeme |
DatabasePort | Port of the database | No | 5432 |
DatabaseUser | Database user | No | factoryinsight |
DaysPerJob | Number of days worth of data to backup in each parallel job | No | 31 |
EnableGpgEncryption | Set to true if you want to encrypt the backup | No | false |
EnableGpgSigning | Set to true if you want to sign the backup | No | false |
GpgEncryptionKeyId | ID of the GPG key used for encryption | No | |
GpgSigningKeyId | ID of the GPG key used for signing | No | |
GrafanaPort | External port of the Grafana service | No | 8080 |
OutputPath | Path to the folder where the backup will be stored | No | Current folder |
ParallelJobs | Number of parallel job backups to run | No | 4 |
SkipDiskSpaceCheck | Skip checking available disk space | No | false |
SkipGpgQuestions | Set to true if you want to sign or encrypt the backup | No | false |
Restore
Each component of the United Manufacturing Hub can be restored separately, in order to allow for more flexibility and to reduce the damage in case of a failure.
Copy kubeconfig file
To run the backup script, you’ll first need to obtain a copy of the Kubernetes configuration file from your instance. This is essential for providing the script with access to the instance.
In the shell of your instance, execute the following command to display the Kubernetes configuration:
sudo cat /etc/rancher/k3s/k3s.yamlMake sure to copy the entire output to your clipboard.
This tutorial is based on the assumption that your kubeconfig file is located at /etc/rancher/k3s/k3s.yaml. Depending on your setup, the actual file location might be different.
Open a text editor, like Notepad, on your local machine and paste the copied content.
In the pasted content, find the server field. It usually defaults to
https://127.0.0.1:6443. Replace this with your instance’s IP addressserver: https://<INSTANCE_IP>:6443Save the file as
k3s.yamlinside thebackupfolder you downloaded earlier.
Cluster configuration
To restore the Kubernetes cluster, execute the .\restore-helm.ps1 script with
the following parameters:
.\restore-helm.ps1 -KubeconfigPath .\k3s.yaml -BackupPath <PATH_TO_BACKUP_FOLDER>
Verify that the cluster is up and running by opening UMHLens / OpenLens and checking if the workloads are running.
Grafana dashboards
To restore the Grafana dashboards, you first need to create a Grafana API Key for an admin user in the new cluster by following these steps:
- Open the Grafana UI in your browser and log in with an admin user.
- Click on the Configuration icon in the left sidebar and select API Keys.
- Give the API key a name and change its role to Admin.
- Optionally set an expiration date.
- Click Add.
- Copy the generated API key and save it for later.
Then, on your local machine, execute the .\restore-grafana.ps1 script
with the following parameters:
.\restore-grafana.ps1 -FullUrl http://<IP_OF_THE_SERVER>:8080 -Token <GRAFANA_API_KEY> -BackupPath <PATH_TO_BACKUP_FOLDER>
Restore Node-RED flows
To restore the Node-RED flows, execute the .\restore-nodered.ps1 script with
the following parameters:
.\restore-nodered.ps1 -KubeconfigPath .\k3s.yaml -BackupPath <PATH_TO_BACKUP_FOLDER>
Restore the database
Check the database password by running the following command in your instance’s shell:
sudo $(which kubectl) get secret united-manufacturing-hub-credentials --kubeconfig /etc/rancher/k3s/k3s.yaml -n united-manufacturing-hub -o jsonpath="{.data.PATRONI_SUPERUSER_PASSWORD}" | base64 --decode; echoExecute the
.\restore-timescale.ps1and.\restore-timescale-v2.ps1script with the following parameters to restorefactoryinsightandumh_v2databases:.\restore-timescale.ps1 -Ip <IP_OF_THE_SERVER> -BackupPath <PATH_TO_BACKUP_FOLDER> -PatroniSuperUserPassword <DATABASE_PASSWORD> .\restore-timescale-v2.ps1 -Ip <IP_OF_THE_SERVER> -BackupPath <PATH_TO_BACKUP_FOLDER> -PatroniSuperUserPassword <DATABASE_PASSWORD>
Restore the Management Console Companion
Execute the .\restore-companion.ps1 script with the following parameters to restore the companion:
.\restore-companion.ps1 -KubeconfigPath .\k3s.yaml -BackupPath <FULL_PATH_TO_BACKUP_FOLDER>
Troubleshooting
Unable to connect to the server: x509: certificate signed …
This issue may occur when the device’s IP address changes from DHCP to static
after installation. A quick solution is skipping TLS validation. If you want
to enable insecure-skip-tls-verify option, run the following command on
the instance’s shell before copying kubeconfig on the server:
sudo $(which kubectl) config set-cluster default --insecure-skip-tls-verify=true --kubeconfig /etc/rancher/k3s/k3s.yaml
What’s next
- Take a look at the UMH-Backup repository
- Learn how to manually backup and restore the database
- Read how to import and export Node-RED flows via the UI
4.2 - Backup and Restore Database
Before you begin
For this task, you need to have PostgreSQL installed on your machine. Make sure that its version is compatible with the version installed on the UMH.
Also, enough free space is required on your machine to store the backup. To check the size of the database, ssh into the system and follow the steps below:
sudo $(which kubectl) exec -it $(sudo $(which kubectl) get pods --kubeconfig /etc/rancher/k3s/k3s.yaml -n united-manufacturing-hub -l app.kubernetes.io/component=timescaledb -o jsonpath="{.items[0].metadata.name}") --kubeconfig /etc/rancher/k3s/k3s.yaml -n united-manufacturing-hub -- psql -U postgres
This command will open a psql shell connected to the default postgres database.
Connect to the umh_v2 or factoryinsight database:
\c <database-name>
Run the following command to get the size of the database:
SELECT pg_size_pretty(pg_database_size('<database-name>'));
If you need, check the version of PostgreSQL with this command:
\! psql --version
Backing up the database
Follow these steps to create a backup of the factoryinsight database on your machine:
Open a terminal, and using the
cdcommand, navigate to the folder where you want to store the backup. For example:cd C:\Users\user\backupscd /Users/user/backupscd /home/user/backupsIf the folder does not exist, you can create it using the
mkdircommand or your file manager.Run the following command to backup pre-data, which includes table and schema definitions, as well as information on sequences, owners, and settings:
pg_dump -U factoryinsight -h <remote-host> -p 5432 -Fc -v --section=pre-data --exclude-schema="_timescaledb*" -f dump_pre_data.bak factoryinsightThen, enter your password. The default for factoryinsight is
changeme.<remote-host>is the server’s IP where the database (UMH instance) is running.
The output of the command does not include Timescale-specific schemas.
Run the following command to connect to the factoryinsight database:
psql "postgres://factoryinsight:<password>@<server-IP>:5432/factoryinsight?sslmode=require"The default password is
changeme.Check the table list running
\dtand run the following command for each table to save all data to.csvfiles:\COPY (SELECT * FROM <TABLE_NAME>) TO <TABLE_NAME>.csv CSV
Grafana and umh_v2 database
If you want to backup the Grafana or umh_v2 database, you can follow the same steps
as above, but you need to replace any occurence of factoryinsight with grafana.
In addition, you need to write down the credentials in the grafana-secret Secret, as they are necessary to access the dashboard after restoring the database.
The default username for umh_v2 database is kafkatopostgresqlv2, and the password is
changemetoo.
Restoring the database
For this section, we assume that you are restoring the data to a fresh United Manufacturing Hub installation with an empty database.
Temporarly disable kafkatopostrgesql, kafkatopostgresqlv2, and factoryinsight
Since kafkatopostrgesql, kafkatopostgresqlv2, and factoryinsight microservices
might write actual data into the database while restoring it, they should be
disabled. Connect to your server via SSH and run the following command:
sudo $(which kubectl) scale deployment united-manufacturing-hub-kafkatopostgresql --replicas=0 -n united-manufacturing-hub --kubeconfig /etc/rancher/k3s/k3s.yaml;
sudo $(which kubectl) scale deployment united-manufacturing-hub-kafkatopostgresqlv2 --replicas=0 -n united-manufacturing-hub --kubeconfig /etc/rancher/k3s/k3s.yaml;
sudo $(which kubectl) scale deployment united-manufacturing-hub-factoryinsight-deployment --replicas=0 -n united-manufacturing-hub --kubeconfig /etc/rancher/k3s/k3s.yaml
Restore the database
This section shows an example for restoring factoryinsight. If you want to restore
grafana, you need to replace any occurence of factoryinsight with grafana.
For umh_v2, you should use kafkatopostgresqlv2 for the user name and
changemetoo for the password.
Make sure that your device is connected to server via SSH and run the following command:
sudo $(which kubectl) exec -it $(sudo $(which kubectl) get pods --kubeconfig /etc/rancher/k3s/k3s.yaml -n united-manufacturing-hub -l app.kubernetes.io/component=timescaledb -o jsonpath="{.items[0].metadata.name}") --kubeconfig /etc/rancher/k3s/k3s.yaml -n united-manufacturing-hub -- psql -U postgresThis command will open a
psqlshell connected to the default postgres database.Drop the existing database:
DROP DATABASE factoryinsight;Create a new database:
CREATE DATABASE factoryinsight;
\c factoryinsight
CREATE EXTENSION IF NOT EXISTS timescaledb;
Put the database in maintenance mode:
SELECT timescaledb_pre_restore();Now, open a new terminal and restore schemas except Timescale-specific schemas with the following command:
pg_restore -U factoryinsight -h 10.13.47.205 -p 5432 --no-owner -Fc -v -d factoryinsight <path-to-dump_pre_data.bak>Connect to the database:
psql "postgres://factoryinsight:<password>@<server-IP>:5432/factoryinsight?sslmode=require"Restore hypertables:
- Commands for factoryinsight:
SELECT create_hypertable('productTagTable', 'product_uid', chunk_time_interval => 100000); SELECT create_hypertable('productTagStringTable', 'product_uid', chunk_time_interval => 100000); SELECT create_hypertable('processValueStringTable', 'timestamp'); SELECT create_hypertable('stateTable', 'timestamp'); SELECT create_hypertable('countTable', 'timestamp'); SELECT create_hypertable('processValueTable', 'timestamp'); - Commands for umh_v2
SELECT create_hypertable('tag', 'timestamp'); SELECT create_hypertable('tag_string', 'timestamp'); - Grafana database does not have hypertables by default.
- Commands for factoryinsight:
Run the following SQL commands for each table to restore data into database:
\COPY <table-name> FROM '<table-name>.csv' WITH (FORMAT CSV);Go back to the terminal connected to the server and take the database out of maintenance mode. Make sure that the databsae shell is open:
SELECT timescaledb_post_restore();
Enable kafkatopostgresql, kafkatopostgresqlv2, and factoryinsight
Run the following command to enable kafkatopostgresql, kafkatopostgresqlv2, and factoryinsight:
sudo $(which kubectl) scale deployment united-manufacturing-hub-kafkatopostgresql --replicas=1 -n united-manufacturing-hub --kubeconfig /etc/rancher/k3s/k3s.yaml;
sudo $(which kubectl) scale deployment united-manufacturing-hub-kafkatopostgresqlv2 --replicas=1 -n united-manufacturing-hub --kubeconfig /etc/rancher/k3s/k3s.yaml;
sudo $(which kubectl) scale deployment united-manufacturing-hub-factoryinsight-deployment --replicas=2 -n united-manufacturing-hub --kubeconfig /etc/rancher/k3s/k3s.yaml
What’s next
- See the official TimescaleDB migration guide
- See the official pg_dump documentation
4.3 - Import and Export Node-RED Flows
Export Node-RED Flows
To export Node-RED flows, please follow the steps below:
Access Node-RED by navigating to
http://<CLUSTER-IP>:1880/noderedin your browser. Replace<CLUSTER-IP>with the IP address of your cluster, orlocalhostif you are running the cluster locally.From the top-right menu, select Export.
From the Export dialog, select wich nodes or flows you want to export.
Click Download to download the exported flows, or Copy to clipboard to copy the exported flows to the clipboard.
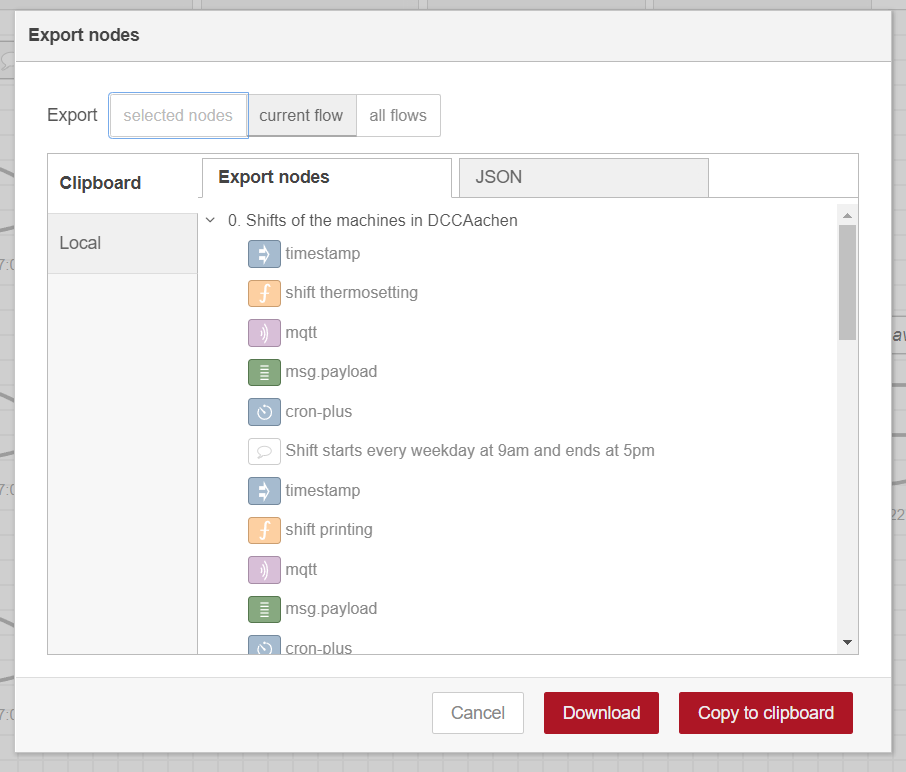

Import Node-RED Flows
To import Node-RED flows, please follow the steps below:
Access Node-RED by navigating to
http://<CLUSTER-IP>:1880/noderedin your browser. Replace<CLUSTER-IP>with the IP address of your cluster, orlocalhostif you are running the cluster locally.From the top-right menu, select Import.
From the Import dialog, select the file containing the exported flows, or paste the exported flows from the clipboard.
Click Import to import the flows.
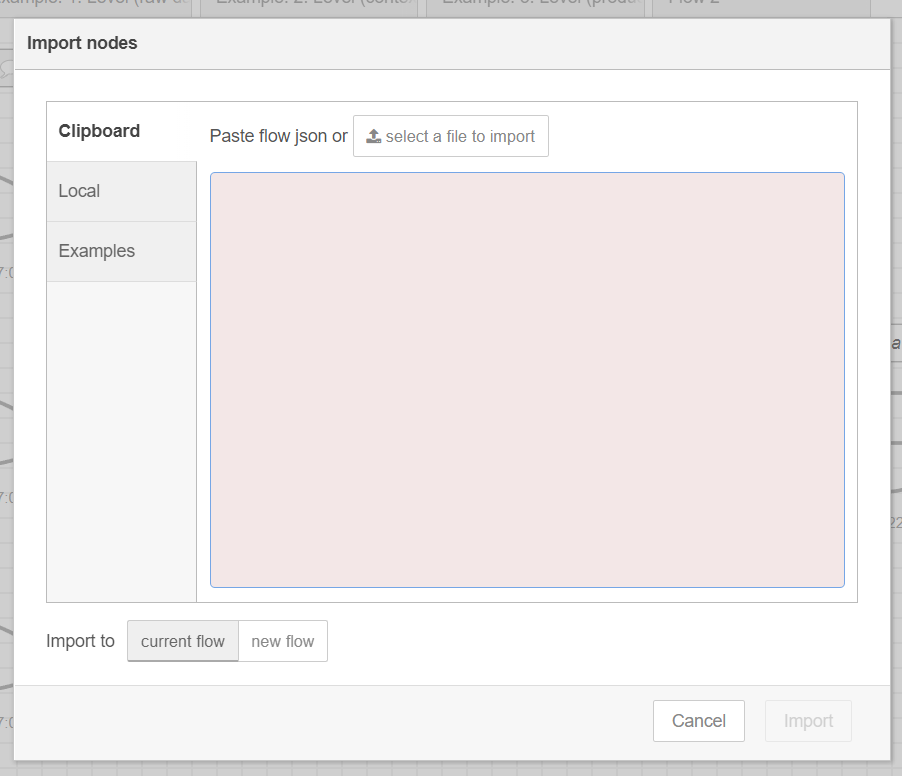

5 - Security
5.1 - Enable RBAC for the MQTT Broker
Enable RBAC
Enable RBAC by upgrading the value in the Helm chart.
To do so, run the following command:
sudo $(which helm) upgrade --set mqtt_broker.rbacEnabled=true united-manufacturing-hub united-manufacturing-hub/united-manufacturing-hub -n united-manufacturing-hub --reuse-values --version $(sudo $(which helm) get metadata united-manufacturing-hub -n united-manufacturing-hub --kubeconfig /etc/rancher/k3s/k3s.yaml -o json | jq '.version') --kubeconfig /etc/rancher/k3s/k3s.yaml
Now all MQTT connections require password authentication with the following defaults:
- Username:
node-red - Password:
INSECURE_INSECURE_INSECURE
Change default credentials
Open a shell inside the Pod:
sudo $(which kubectl) exec -it united-manufacturing-hub-hivemqce-0 -n united-manufacturing-hub --kubeconfig /etc/rancher/k3s/k3s.yaml -- /bin/shNavigate to the installation directory of the RBAC extension.
cd extensions/hivemq-file-rbac-extension/Generate a password hash with this command.
java -jar hivemq-file-rbac-extension-<version>.jar -p <password>- Replace
<version>with the version of the HiveMQ CE extension. If you are not sure which version is installed, you can pressTabafter typingjava -jar hivemq-file-rbac-extension-to autocomplete the version. - Replace
<password>with your desired password. Do not use any whitespaces.
- Replace
Copy the output of the command. It should look similar to this:
$2a$10$Q8ZQ8ZQ8ZQ8ZQ8ZQ8ZQ8ZuExit the shell by typing
exit.Edit the ConfigMap to update the password hash.
sudo $(which kubectl) edit configmap united-manufacturing-hub-hivemqce-extension -n united-manufacturing-hub --kubeconfig /etc/rancher/k3s/k3s.yamlThis command will open the default text editor with the ConfigMap contents. Change the value inbetween the
<password>tags with the password hash generated in step 4.You can use a different password for each different microservice. Just remember that you will need to update the configuration in each one to use the new password.Save the changes.
Recreate the Pod:
sudo $(which kubectl) delete pod united-manufacturing-hub-hivemqce-0 -n united-manufacturing-hub --kubeconfig /etc/rancher/k3s/k3s.yaml
What’s next
5.2 - Firewall Rules
Some enterprise networks operate in a whitelist manner, where all outgoing and incoming communication is blocked by default. However, the installation and maintenance of UMH requires internet access for tasks such as downloading the operating system, Docker containers, monitoring via the Management Console, and loading third-party plugins. As dependencies are hosted on various servers and may change based on vendors’ decisions, we’ve simplified the user experience by consolidating all mandatory services under a single domain. Nevertheless, if you wish to install third-party components like Node-RED or Grafana plugins, you’ll need to whitelist additional domains.
Before you begin
The only prerequisite is having a firewall that allows modification of rules. If you’re unsure about this, consider contacting your network administrator.
Firewall Configuration
Once you’re ready and ensured that you have the necessary permissions to configure the firewall, follow these steps:
Whitelist management.umh.app
This mandatory step requires whitelisting management.umh.app on TCP port 443 (HTTPS traffic). Not doing so will
disrupt UMH functionality; installations, updates, and monitoring won’t work as expected.
Optional: Whitelist domains for common 3rd party plugins
Include these common external domains and ports in your firewall rules to allow installing Node-RED and Grafana plugins:
- registry.npmjs.org (required for installing Node-RED plugins)
- storage.googleapis.com (required for installing Grafana plugins)
- grafana.com (required for displaying Grafana plugins)
- catalogue.nodered.org (required for displaying Node-RED plugins, only relevant for the client that is using Node-RED, not the server where it’s installed on).
Depending on your setup, additional domains may need to be whitelisted.
DNS Configuration (Optional)
By default, we are using your DHCP configured DNS servers. If you are using static ip or want to use a different DNS server, contact us for a custom configuration file.
Bring your own containers
Our system tries to fetch all containers from our own registry (management.umh.app) first.
If this fails, it will try to fetch docker.io from https://registry-1.docker.io, ghcr.io from https://ghcr.io and quay.io from https://quay.io (and any other from management.umh.app)
If you need to use a different registry, edit the /var/lib/rancher/k3s/agent/etc/containerd/config.toml.tmpl to set your own mirror configuration.
Troubleshooting
I’m having connectivity problems. What should I do?
First of all, double-check that your firewall rules are configured as described in this page, especially the step involving our domain. As a quick test, you can use the following command from a different machine within the same network to check if the rules are working:
curl -vvv https://management.umh.app
5.3 - Setup PKI for the MQTT Broker
If you want to use MQTT over TLS (MQTTS) or Secure Web Socket (WSS) you need to setup a Public Key Infrastructure (PKI).
Read the blog article about secure communication in IoT to learn more about encryption and certificates.
Structure overview
The Public Key Infrastructure for HiveMQ consists of two Java Key Stores (JKS):
- Keystore: The Keystore contains the HiveMQ certificate and private keys. This store must be confidential, since anyone with access to it could generate valid client certificates and read or send messages in your MQTT infrastructure.
- Truststore: The Truststore contains all the clients public certificates. HiveMQ uses it to verify the authenticity of the connections.
Before you begin
You need to have the following tools installed:
- OpenSSL. If you are using Windows, you can install it with Chocolatey.
- Java
Create a Keystore
Open a terminal and run the following command:
keytool -genkey -keyalg RSA -alias hivemq -keystore hivemq.jks -storepass <password> -validity <days> -keysize 4096 -dname "CN=united-manufacturing-hub-mqtt" -ext "SAN=IP:127.0.0.1"
Replace the following placeholders:
<password>: The password for the keystore. You can use any password you want.<days>: The number of days the certificate should be valid.
The command runs for a few minutes and generates a file named hivemq.jks in
the current directory, which contains the HiveMQ certificate and private key.
If you want to explore the contents of the keystore, you can use Keystore Explorer.
Generate client certificates
Open a terminal and create a directory for the client certificates:
mkdir pki
Follow these steps for each client you want to generate a certificate for.
Create a new key pair:
openssl req -new -x509 -newkey rsa:4096 -keyout "pki/<servicename>-key.pem" -out "pki/<servicename>-cert.pem" -nodes -days <days> -subj "/CN=<servicename>"Convert the certificate to the correct format:
openssl x509 -outform der -in "pki/<servicename>-cert.pem" -out "pki/<servicename>.crt"Import the certificate into the Truststore:
keytool -import -file "pki/<servicename>.crt" -alias "<servicename>" -keystore hivemq-trust-store.jks -storepass <password>
Replace the following placeholders:
<servicename>with the name of the client. Use the service name from the Network > Services tab in UMHLens / OpenLens.<days>with the number of days the certificate should be valid.<password>with the password for the Truststore. You can use any password you want.
Import the PKI into the United Manufacturing Hub
First you need to encode in base64 the Keystore, the Truststore and all the PEM files. Use the following script to encode everything automatically:
Get-ChildItem .\ -Recurse -Include *.jks,*.pem | ForEach-Object {
    $FileContent = Get-Content $_ -Raw
    $fileContentInBytes = [System.Text.Encoding]::UTF8.GetBytes($FileContent)
    $fileContentEncoded = [System.Convert]::ToBase64String($fileContentInBytes)
    $fileContentEncoded > $_".b64"
    Write-Host $_".b64 File Encoded Successfully!"
}
find ./ -regex '.*\.jks\|.*\.pem' -exec openssl base64 -A -in {} -out {}.b64 \;
You could also do it manually with the following command:
openssl base64 -A -in <filename> -out <filename>.b64
Now you can import the PKI into the United Manufacturing Hub. To do so, create
a file named pki.yaml with the following content:
_000_commonConfig:
  infrastructure:
    mqtt:
      tls:
        keystoreBase64: <content of hivemq.jks.b64>
        keystorePassword: <password>
        truststoreBase64: <content of hivemq-trust-store.jks.b64>
        truststorePassword: <password>
        <servicename>.cert: <content of <servicename>-cert.pem.b64>
        <servicename>.key: <content of <servicename>-key.pem.b64>
Now, send copy it to your instance with the following command:
scp pki.yaml <username>@<ip-address>:/tmp
After that, access the instance with SSH and run the following command:
sudo $(which helm) upgrade -f /tmp/pki.yaml united-manufacturing-hub united-manufacturing-hub/united-manufacturing-hub -n united-manufacturing-hub --reuse-values --version $(sudo $(which helm) get metadata united-manufacturing-hub -n united-manufacturing-hub --kubeconfig /etc/rancher/k3s/k3s.yaml -o json | jq '.version') --kubeconfig /etc/rancher/k3s/k3s.yaml
What’s next
- Learn more about HiveMQ’s TLS configuration in the HiveMQ documentation.