In this section, you will find information about how to manage and configure the United Manufacturing Hub cluster, from customizing the cluster to access the different services.
This is the multi-page printable view of this section. Click here to print.
Administration
This section describes how to manage and configure the United Manufacturing Hub
cluster.
- 1: Access the Database
- 2: Access Services From Within the Cluster
- 3: Access Services Outside the Cluster
- 4: Expose Grafana to the Internet
- 5: Install Custom Drivers in NodeRed
- 6: Execute Kafka Shell Scripts
- 7: Reduce database size
- 8: Use Merge Point To Normalize Kafka Topics
- 9: Delete Assets from the Database
- 10: Change the Language in Factoryinsight
- 11: Explore Cached Data
1 - Access the Database
This page describes how to access the United Manufacturing Hub database to
perform SQL operations using a database client or the CLI.
There are multiple ways to access the database. If you want to just visualize data, then using Grafana or a database client is the easiest way. If you need to also perform SQL commands, then using a database client or the CLI are the best options.
Generally, using a database client gives you the most flexibility, since you can both visualize the data and manipulate the database. However, it requires you to install a database client on your machine.
Using the CLI gives you more control over the database, but it requires you to have a good understanding of SQL.
Grafana comes with a pre-configured PostgreSQL datasource, so you can use it to visualize the data.
Before you begin
You need to have a UMH cluster. If you do not already have a cluster, you can create one by following the Getting Started guide.
You also need to access the system where the cluster is running, either by logging into it or by using a remote shell.
Get the database credentials
If you are not using the CLI, you need to know the database credentials. You can find them in the timescale-post-init-pw Secret. Run the following command to get the credentials:
sudo $(which kubectl) get secret timescale-post-init-pw -n united-manufacturing-hub -o go-template='{{range $k,$v := .data}}{{if eq $k "1_set_passwords.sh"}}{{if not $v}}{{$v}}{{else}}{{$v | base64decode}}{{end}}{{"\n"}}{{end}}{{end}}' --kubeconfig /etc/rancher/k3s/k3s.yaml
This command will print an SQL script that contains the username and password for the different databases.
Access the database using a database client
There are many database clients that you can use to access the database. Here’s a list of some of the most popular database clients:
| Name | Free or Paid | Platforms |
|---|---|---|
| pgAdmin | Free | Windows, macOS, Linux |
| DataGrip | Paid | Windows, macOS, Linux |
| DBeaver | Both | Windows, macOS, Linux |
For the sake of this tutorial, pgAdmin will be used as an example, but other clients have similar functionality. Refer to the specific client documentation for more information.
Using pgAdmin
You can use pgAdmin to access the database. To do so, you need to install the pgAdmin client on your machine. For more information, see the pgAdmin documentation.
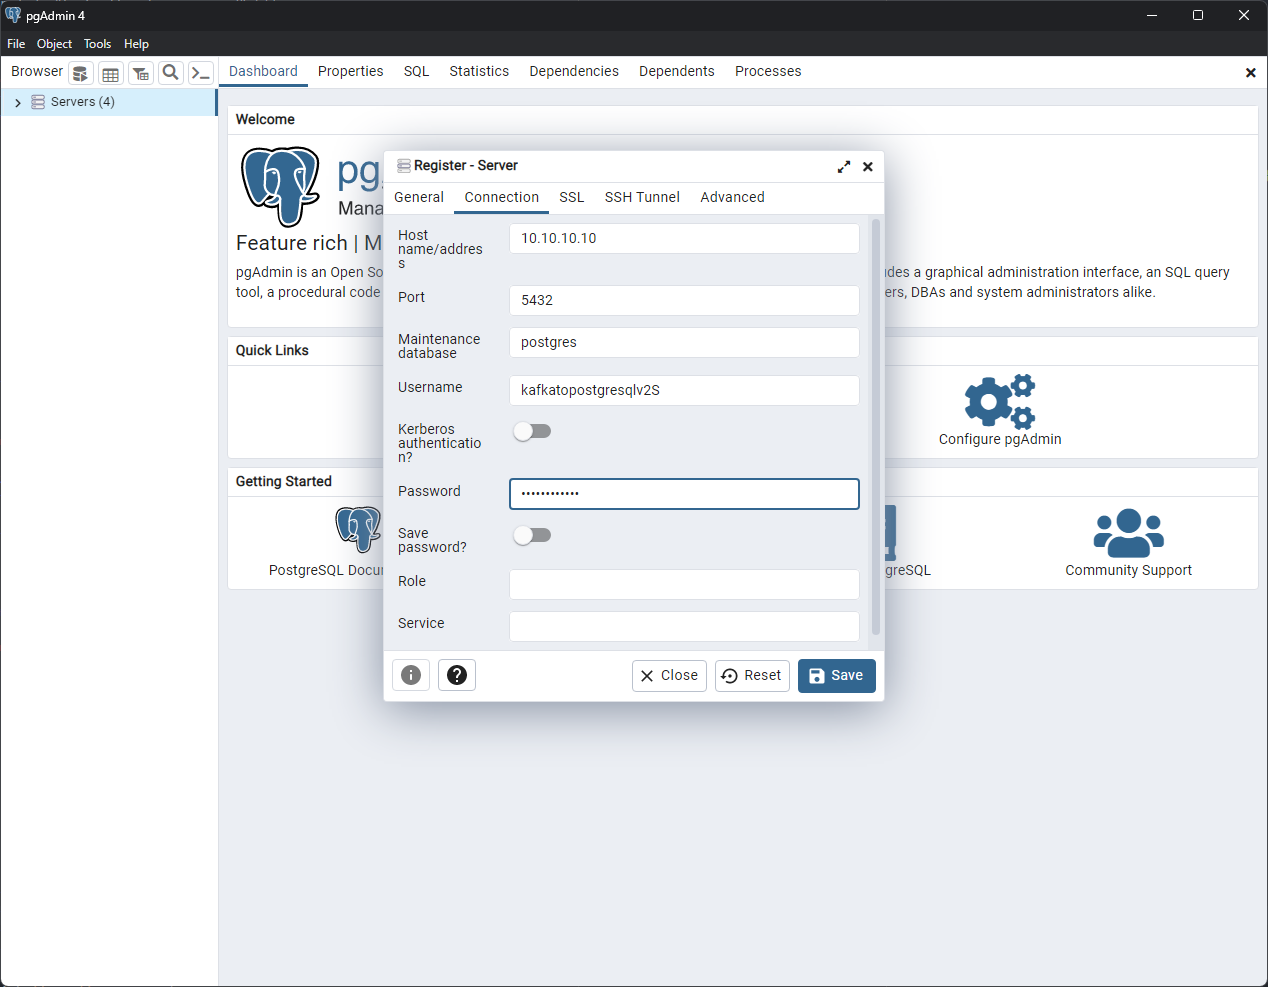
Once you have installed the client, you can add a new server from the main window.
In the General tab, give the server a meaningful name. In the Connection tab, enter the database credentials:
- The Host name/address is the IP address of your instance.
- The Port is 5432.
- The Maintenance database is postgres.
- The Username and Password are the ones you found in the Secret.
Click Save to save the server.


You can now connect to the database by double-clicking the server.
Use the side menu to navigate through the server. The tables are listed under the Schemas > public > Tables section of the factoryinsight database.
Refer to the pgAdmin documentation for more information on how to use the client to perform database operations.
Access the database using the command line interface
You can access the database from the command line using the psql command
directly from the united-manufacturing-hub-timescaledb-0 Pod.
You will not need credentials to access the database from the Pod’s CLI.
The following steps need to be performed from the machine where the cluster is running, either by logging into it or by using a remote shell.
Open a shell in the database Pod
sudo $(which kubectl) exec -it $(sudo $(which kubectl) get pods --kubeconfig /etc/rancher/k3s/k3s.yaml -n united-manufacturing-hub -l app.kubernetes.io/component=timescaledb -o jsonpath="{.items[0].metadata.name}") --kubeconfig /etc/rancher/k3s/k3s.yaml -n united-manufacturing-hub -- psql -U postgres
This command will open a psql shell connected to the default postgres database.
Perform SQL commands
Once you have a shell in the database, you can perform SQL commands.
For example, to create an index on the processValueTable:
CREATE INDEX ON processvaluetable (valuename);When you are done, exit the postgres shell:
exit
What’s next
- See a list of SQL commands
- See how to Delete Assets from the Database
- See how to Reduce the Database Size
- See how to Backup and Restore the Database
- See how to Expose Grafana to the Internet
2 - Access Services From Within the Cluster
This page describes how to access services from within the cluster.
All the services deployed in the cluster are visible to each other. That makes it easy to connect them together.
Before you begin
You need to have a UMH cluster. If you do not already have a cluster, you can create one by following the Getting Started guide.
You also need to access the system where the cluster is running, either by logging into it or by using a remote shell.
Connect to a service from another service
To connect to a service from another service, you can use the service name as the host name.
To get a list of available services and related ports you can run the following command from the instance:
sudo $(which kubectl) get svc -n united-manufacturing-hub --kubeconfig /etc/rancher/k3s/k3s.yaml
All of them are available from within the cluster. The ones of type LoadBalancer are also available from outside the cluster using the node IP and the port listed in the Ports column.
Use the port on the left side of the colon (:) to connect to the service from
outside the cluster. For example, the database is available on port 5432.
Example
The most common use case is to connect to the MQTT Broker from Node-RED.
To do that, when you create the MQTT node, you can use the service name united-manufacturing-hub-mqtt as the host name and one the ports listed in the Ports column.
The MQTT service name has changed since version 0.9.10. If you are using an older
version, use united-manufacturing-hub-vernemq instead of
united-manufacturing-hub-mqtt.
What’s next
3 - Access Services Outside the Cluster
This page describe how to access services from outside the cluster.
Some of the microservices in the United Manufacturing Hub are exposed outside the cluster with a LoadBalancer service. A LoadBalancer is a service that exposes a set of Pods on the same network as the cluster, but not necessarily to the entire internet. The LoadBalancer service provides a single IP address that can be used to access the Pods.
Before you begin
You need to have a UMH cluster. If you do not already have a cluster, you can create one by following the Getting Started guide.
You also need to access the system where the cluster is running, either by logging into it or by using a remote shell.
Accessing the services
To get a list of available services and related ports you can run the following command from the instance:
sudo $(which kubectl) get svc -n united-manufacturing-hub --kubeconfig /etc/rancher/k3s/k3s.yaml
All of them are available from within the cluster. The ones of type LoadBalancer are also available from outside the cluster using the node IP and the port listed in the Ports column.
Use the port on the left side of the colon (:) to connect to the service from
outside the cluster. For example, the database is available on port 5432.
Services with LoadBalancer by default
The following services are exposed outside the cluster with a LoadBalancer service by default:
- Database at port 5432
- Kafka Console at port 8090
- Grafana at port 8080
- MQTT Broker at port 1883
- OPCUA Simulator at port 46010
- Node-RED at port 1880
To access Node-RED, you need to use the /nodered path, for example
http://192.168.1.100:1880/nodered.
Services with NodePort by default
The Kafka Broker uses the service type NodePort by default.
Follow these steps to access the Kafka Broker outside the cluster:
Access your instance via SSH
Execute this command to check the host port of the Kafka Broker:
sudo $(which kubectl) get svc united-manufacturing-hub-kafka-external -n united-manufacturing-hub --kubeconfig /etc/rancher/k3s/k3s.yamlIn the
PORT(S)column, you should be able to see the port with9094:<host-port>/TCP.To access the Kafka Broker, use
<instance-ip-address>:<host-port>.
Services with ClusterIP
Some of the microservices in the United Manufacturing Hub are exposed via a ClusterIP service. That means that they are only accessible from within the cluster itself. There are two options for enabling access them from outside the cluster:
- Creating a LoadBalancer service: A LoadBalancer is a service that exposes a set of Pods on the same network as the cluster, but not necessarily to the entire internet.
- Port forwarding: You can just forward the port of a service to your local machine.
Port forwarding can be unstable, especially if the connection to the cluster is slow. If you are experiencing issues, try to create a LoadBalancer service instead.
Create a LoadBalancer service
Follow these steps to enable the LoadBalancer service for the corresponding microservice:
Execute the following command to list the services and note the name of the one you want to access.
sudo $(which kubectl) get svc -n united-manufacturing-hub --kubeconfig /etc/rancher/k3s/k3s.yamlStart editing the service configuration by running this command:
sudo $(which kubectl) edit svc <service-name> -n united-manufacturing-hub --kubeconfig /etc/rancher/k3s/k3s.yamlFind the
status.loadBalancersection and update it to the following:status: loadBalancer: ingress: - ip: <external-ip>Replace
<external-ip>with the external IP address of the node.Go to the
spec.typesection and change the value fromClusterIPtoLoadBalancer.After saving, your changes will be applied automatically and the service will be updated. Now, you can access the service at the configured address.
Port forwarding
Execute the following command to list the services and note the name of the one you want to port-forward and the internal port that it use.
sudo $(which kubectl) get svc -n united-manufacturing-hub --kubeconfig /etc/rancher/k3s/k3s.yamlRun the following command to forward the port:
sudo $(which kubectl) port-forward service/<your-service> <local-port>:<remote-port> -n united-manufacturing-hub --kubeconfig /etc/rancher/k3s/k3s.yamlWhere
<local-port>is the port on the host that you want to use, and<remote-port>is the service port that you noted before. Usually, it’s good practice to pick a high number (greater than 30000) for the host port, in order to avoid conflicts.You should be able to see logs like:
Forwarding from 127.0.0.1:31922 -> 9121
Forwarding from [::1]:31922 -> 9121
Handling connection for 31922
You can now access the service using the IP address of the node and the port you choose.
Security considerations
MQTT broker
There are some security considerations to keep in mind when exposing the MQTT broker.
By default, the MQTT broker is configured to allow anonymous connections. This means that anyone can connect to the broker without providing any credentials. This is not recommended for production environments.
To secure the MQTT broker, you can configure it to require authentication. For that, you can either enable RBAC or set up HiveMQ PKI (recommended for production environments).
Troubleshooting
LoadBalancer service stuck in Pending state
If the LoadBalancer service is stuck in the Pending state, it probably means
that the host port is already in use. To fix this, edit the service and change
the section spec.ports.port to a different port number.
What’s next
- See how to Expose Grafana to the Internet
4 - Expose Grafana to the Internet
This page describes how to expose Grafana to the Internet.
This page describes how to expose Grafana to the Internet so that you can access it from outside the Kubernetes cluster.
Before you begin
You need to have a UMH cluster. If you do not already have a cluster, you can create one by following the Getting Started guide.
You also need to access the system where the cluster is running, either by logging into it or by using a remote shell.
Enable the ingress
Enable the ingress by upgrading the value in the Helm chart.
To do so, run the following command:
sudo $(which helm) upgrade --set grafana.ingress.enabled=true united-manufacturing-hub united-manufacturing-hub/united-manufacturing-hub -n united-manufacturing-hub --reuse-values --version $(sudo $(which helm) get metadata united-manufacturing-hub -n united-manufacturing-hub --kubeconfig /etc/rancher/k3s/k3s.yaml -o json | jq '.version') --kubeconfig /etc/rancher/k3s/k3s.yaml
Remember to add a DNS record for your domain name that points to the external IP address of the Kubernetes host.
What’s next
- See how to Access Factoryinsight Outside the Cluster
5 - Install Custom Drivers in NodeRed
This page describes how to install custom drivers in NodeRed.
NodeRed is running on Alpine Linux as non-root user. This means that you can’t
install packages with apk. This tutorial shows you how to install packages
with proper security measures.
Before you begin
You need to have a UMH cluster. If you do not already have a cluster, you can create one by following the Getting Started guide.
You also need to access the system where the cluster is running, either by logging into it or by using a remote shell.
Change the security context
From the instance’s shell, execute this command:
sudo $(which kubectl) patch statefulset united-manufacturing-hub-nodered -n united-manufacturing-hub -p '{"spec":{"template":{"spec":{"securityContext":{"runAsUser":0,"runAsNonRoot":false,"fsGroup":0}}}}}' --kubeconfig /etc/rancher/k3s/k3s.yaml
Install the packages
Open a shell in the united-manufacturing-hub-nodered-0 pod with:
sudo $(which kubectl) exec -it united-manufacturing-hub-nodered-0 -n united-manufacturing-hub --kubeconfig /etc/rancher/k3s/k3s.yaml -- /bin/shInstall the packages with
apk:apk add <package>For example, to install
unixodbc:apk add unixodbcYou can find the list of available packages here.
Exit the shell by typing
exit.
Revert the security context
For security reasons, you should revert the security context after you install the packages.
From the instance’s shell, execute this command:
sudo $(which kubectl) patch statefulset united-manufacturing-hub-nodered -n united-manufacturing-hub -p '{"spec":{"template":{"spec":{"securityContext":{"runAsUser":1000,"runAsNonRoot":true,"fsGroup":1000}}}}}' --kubeconfig /etc/rancher/k3s/k3s.yaml
What’s next
6 - Execute Kafka Shell Scripts
This page describes how to execute Kafka shell scripts.
When working with Kafka, you may need to execute shell scripts to perform administrative tasks. This page describes how to execute Kafka shell scripts.
Before you begin
You need to have a UMH cluster. If you do not already have a cluster, you can create one by following the Getting Started guide.
You also need to access the system where the cluster is running, either by logging into it or by using a remote shell.
Open a shell in the Kafka container
From the instance’s shell, execute this command:
sudo $(which kubectl) exec -it united-manufacturing-hub-kafka-0 -n united-manufacturing-hub --kubeconfig /etc/rancher/k3s/k3s.yaml -- /bin/shNavigate to the Kafka bin directory:
cd /opt/bitnami/kafka/binExecute any Kafka shell scripts. For example, to list all topics:
./kafka-topics.sh --list --zookeeper zookeeper:2181Exit the shell by typing
exit.
What’s next
7 - Reduce database size
This page describes how to reduce the size of the United Manufacturing Hub database.
Over time, time-series data can consume a large amount of disk space. To reduce the amount of disk space used by time-series data, there are three options:
- Enable data compression. This reduces the required disk space by applying mathematical compression to the data. This compression is lossless, so the data is not changed in any way. However, it will take more time to compress and decompress the data. For more information, see how TimescaleDB compression works.
- Enable data retention. This deletes old data that is no longer needed, by setting policies that automatically delete data older than a specified time. This can be beneficial for managing the size of the database, as well as adhering to data retention regulations. However, by definition, data loss will occur. For more information, see how TimescaleDB data retention works.
- Downsampling. This is a method of reducing the amount of data stored by aggregating data points over a period of time. For example, you can aggregate data points over a 30-minute period, instead of storing each data point. If exact data is not required, downsampling can be useful to reduce database size. However, data may be less accurate.
Before you begin
You need to have a UMH cluster. If you do not already have a cluster, you can create one by following the Getting Started guide.
You also need to access the system where the cluster is running, either by logging into it or by using a remote shell.
Open the database shell
sudo $(which kubectl) exec -it $(sudo $(which kubectl) get pods --kubeconfig /etc/rancher/k3s/k3s.yaml -n united-manufacturing-hub -l app.kubernetes.io/component=timescaledb -o jsonpath="{.items[0].metadata.name}") --kubeconfig /etc/rancher/k3s/k3s.yaml -n united-manufacturing-hub -- psql -U postgres
This command will open a psql shell connected to the default postgres database.
Connect to the corresponding database:
\c factoryinsight
\c umh_v2
Enable data compression
You can find sample SQL commands to enable data compression here.
The first step is to turn on data compression on the target table, and set the compression options. Refer to the TimescaleDB documentation for a full list of options.
      -- set "asset_id" as the key for the compressed segments and orders the table by "valuename".
      ALTER TABLE processvaluetable SET (timescaledb.compress, timescaledb.compress_segmentby = 'asset_id', timescaledb.compress_orderby = 'valuename');
-- set "asset_id" as the key for the compressed segments and orders the table by "name". ALTER TABLE tag SET (timescaledb.compress, timescaledb.compress_segmentby = 'asset_id', timescaledb.compress_orderby = 'name');Then, you have to create the compression policy. The interval determines the age that the chunks of data need to reach before being compressed. Read the official documentation for more information.
      -- set a compression policy on the "processvaluetable" table, which will compress data older than 7 days.
      SELECT add_compression_policy('processvaluetable', INTERVAL '7 days');
-- set a compression policy on the "tag" table, which will compress data older than 2 weeks. SELECT add_compression_policy('tag', INTERVAL '2 weeks');
Enable data retention
You can find sample SQL commands to enable data retention here.
Sample command for factoryinsight and umh_v2 databases:
Enabling data retention consists in only adding the policy with the desired retention interval. Refer to the official documentation for more detailed information about these queries.
  -- Set a retention policy on the "processvaluetable" table, which will delete data older than 7 days.
  SELECT add_retention_policy('processvaluetable', INTERVAL '7 days');
  -- set a retention policy on the "tag" table, which will delete data older than 3 months.
  SELECT add_retention_policy('tag', INTERVAL '3 months');
What’s next
- Learn how to delete assets from the database explains how to turn on compression.
- Learn how to change the language in factoryinsight.
8 - Use Merge Point To Normalize Kafka Topics
This page describes how to reduce the amount of Kafka Topics in order to
lower the overhead by using the merge point feature.
Kafka excels at processing a high volume of messages but can encounter difficulties with excessive topics, which may lead to insufficient memory. The optimal Kafka setup involves minimal topics, utilizing the event key for logical data segregation.
On the contrary, MQTT shines when handling a large number of topics with a small number of messages. But when bridging MQTT to Kafka, the number of topics can become overwhelming. Specifically, with the default configuration, Kafka is able to handle around 100-150 topics. This is because there is a limit of 1000 partitions per broker, and each topic requires has 6 partitions by default.
So, if you are experiencing memory issues with Kafka, you may want to consider combining multiple topics into a single topic with different keys. The diagram below illustrates how this principle simplifies topic management.
graph LR
event1(Topic: umh.v1.acme.anytown.foo.bar
Value: 1) event2(Topic: umh.v1.acme.anytown.foo.baz
Value: 2) event3(Topic: umh.v1.acme.anytown
Value: 3) event4(umh.v1.acme.anytown.frob
Value: 4) event1 --> bridge event2 --> bridge event3 --> bridge event4 --> bridge bridge{{Topic merge point: 3}} subgraph Topic: umh.v1.acme gmsg1(Key: anytown.foo.bar
Value: 1) gmsg2(Key: anytown.foo.baz
Value: 2) gmsg3(Key: anytown
Value: 3) gmsg4(Key: anytown.frob
Value: 4) end bridge --> gmsg1 bridge --> gmsg2 bridge --> gmsg3 bridge --> gmsg4
Before you begin
This tutorial is for advanced users. Contact us if you need assistance.
You need to have a UMH cluster. If you do not already have a cluster, you can create one by following the Getting Started guide.
You also need to access the system where the cluster is running, either by logging into it or by using a remote shell.
There are two configurations for the topic merge point: one in the Companion
configuration for Benthos data sources and another in the Helm chart for data bridges.
Data Sources
To adjust the topic merge point for data sources, modify mgmtcompanion-config configmap. This can be easily done with the following command:
sudo $(which kubectl) edit configmap mgmtcompanion-config -n mgmtcompanion --kubeconfig /etc/rancher/k3s/k3s.yaml
This command opens the current configuration in the default editor, allowing you
to set the umh_merge_point to your preferred value:
data:
  umh_merge_point: <numeric-value>
Ensure the value is at least 3 and update the lastUpdated field to the current
Unix timestamp to trigger the automatic refresh of existing data sources.
Data Bridge
For data bridges, the merge point is defined individually in the Helm chart values
for each bridge. Update the Helm chart installation with the new topicMergePoint
value for each bridge. See the Helm chart documentation
for more details.
Setting the topicMergePoint to -1 disables the merge feature.
9 - Delete Assets from the Database
This task shows you how to delete assets from the database.
This is useful if you have created assets by mistake, or to delete the ones that are no longer needed.
This task deletes data from the database. Make sure you have a backup of the database before you proceed.
Before you begin
You need to have a UMH cluster. If you do not already have a cluster, you can create one by following the Getting Started guide.
You also need to access the system where the cluster is running, either by logging into it or by using a remote shell.
Also, make sure to backup the database before you proceed. For more information, see Backing Up and Restoring the Database.
Delete assets from factoryinsight
If you want to delete assets from the umh_v2 database, go to this section.
Open the database shell
sudo $(which kubectl) exec -it $(sudo $(which kubectl) get pods --kubeconfig /etc/rancher/k3s/k3s.yaml -n united-manufacturing-hub -l app.kubernetes.io/component=timescaledb -o jsonpath="{.items[0].metadata.name}") --kubeconfig /etc/rancher/k3s/k3s.yaml -n united-manufacturing-hub -- psql -U postgres
This command will open a psql shell connected to the default postgres database.
Connect to the factoryinsight database:
\c factoryinsight
Choose the assets to delete
You have multiple choices to delete assets, like deleting a single asset, or deleting all assets in a location, or deleting all assets with a specific name.
To do so, you can customize the SQL command using different filters. Specifically, a combination of the following filters:
assetidlocationcustomer
To filter an SQL command, you can use the WHERE clause. For example, using all
of the filters:
WHERE assetid = '<asset-id>' AND location = '<location>' AND customer = '<customer>';
You can use any combination of the filters, even just one of them.
Here are some examples:
Delete all assets with the same name from any location and any customer:
WHERE assetid = '<asset-id>'Delete all assets in a specific location:
WHERE location = '<location>'Delete all assets with the same name in a specific location:
WHERE assetid = '<asset-id>' AND location = '<location>'Delete all assets with the same name in a specific location for a single customer:
WHERE assetid = '<asset-id>' AND location = '<location>' AND customer = '<customer>'
Delete the assets
Once you know the filters you want to use, you can use the following SQL commands to delete assets:
BEGIN;

WITH assets_to_be_deleted AS (SELECT id FROM assettable <filter>)
DELETE FROM shifttable WHERE asset_id IN (SELECT id FROM assets_to_be_deleted);

WITH assets_to_be_deleted AS (SELECT id FROM assettable <filter>)
DELETE FROM counttable WHERE asset_id IN (SELECT id FROM assets_to_be_deleted);

WITH assets_to_be_deleted AS (SELECT id FROM assettable <filter>)
DELETE FROM ordertable WHERE asset_id IN (SELECT id FROM assets_to_be_deleted);

WITH assets_to_be_deleted AS (SELECT id FROM assettable <filter>)
DELETE FROM processvaluestringtable WHERE asset_id IN (SELECT id FROM assets_to_be_deleted);

WITH assets_to_be_deleted AS (SELECT id FROM assettable <filter>)
DELETE FROM processvaluetable WHERE asset_id IN (SELECT id FROM assets_to_be_deleted);

WITH assets_to_be_deleted AS (SELECT id FROM assettable <filter>)
DELETE FROM producttable WHERE asset_id IN (SELECT id FROM assets_to_be_deleted);

WITH assets_to_be_deleted AS (SELECT id FROM assettable <filter>)
DELETE FROM shifttable WHERE asset_id IN (SELECT id FROM assets_to_be_deleted);

WITH assets_to_be_deleted AS (SELECT id FROM assettable <filter>)
DELETE FROM statetable WHERE asset_id IN (SELECT id FROM assets_to_be_deleted);

WITH assets_to_be_deleted AS (SELECT id FROM assettable <filter>)
DELETE FROM assettable WHERE id IN (SELECT id FROM assets_to_be_deleted);

COMMIT;
Optionally, you can add the following code before the last WITH statement if
you used the track&trace feature:
WITH assets_to_be_deleted AS (SELECT id FROM assettable <filter>), uniqueproducts_to_be_deleted AS (SELECT uniqueproductid FROM uniqueproducttable WHERE asset_id IN (SELECT id FROM assets_to_be_deleted))
DELETE FROM producttagtable WHERE product_uid IN (SELECT uniqueproductid FROM uniqueproducts_to_be_deleted);

WITH assets_to_be_deleted AS (SELECT id FROM assettable <filter>), uniqueproducts_to_be_deleted AS (SELECT uniqueproductid FROM uniqueproducttable WHERE asset_id IN (SELECT id FROM assets_to_be_deleted))
DELETE FROM producttagstringtable WHERE product_uid IN (SELECT uniqueproductid FROM uniqueproducts_to_be_deleted);

WITH assets_to_be_deleted AS (SELECT id FROM assettable <filter>), uniqueproducts_to_be_deleted AS (SELECT uniqueproductid FROM uniqueproducttable WHERE asset_id IN (SELECT id FROM assets_to_be_deleted))
DELETE FROM productinheritancetable WHERE parent_uid IN (SELECT uniqueproductid FROM uniqueproducts_to_be_deleted) OR child_uid IN (SELECT uniqueproductid FROM uniqueproducts_to_be_deleted);

WITH assets_to_be_deleted AS (SELECT id FROM assettable <filter>)
DELETE FROM uniqueproducttable WHERE asset_id IN (SELECT id FROM assets_to_be_deleted);
Delete assets from umh_v2
Open the database shell
sudo $(which kubectl) exec -it $(sudo $(which kubectl) get pods --kubeconfig /etc/rancher/k3s/k3s.yaml -n united-manufacturing-hub -l app.kubernetes.io/component=timescaledb -o jsonpath="{.items[0].metadata.name}") --kubeconfig /etc/rancher/k3s/k3s.yaml -n united-manufacturing-hub -- psql -U postgres
This command will open a psql shell connected to the default postgres database.
Connect to the umh_v2 database:
\c umh_v2
Choose the assets to delete
You have multiple choices to delete assets, like deleting a single asset, or deleting all assets in a location, or deleting all assets with a specific name.
To do so, you can customize the SQL command using different filters. Specifically, a combination of the following filters:
enterprisesitearealineworkcellorigin_id
To filter an SQL command, you can use the WHERE clause. For example, you can filter
by enterprise, site, and area:
WHERE enterprise = '<your-enterprise>' AND site = '<your-site>' AND area = '<your-area>';
You can use any combination of the filters, even just one of them.
Delete the assets
Once you know the filters you want to use, you can use the following SQL commands to delete assets:
BEGIN;
WITH assets_to_be_deleted AS (SELECT id FROM asset <filter>)
DELETE FROM tag WHERE asset_id IN (SELECT id FROM assets_to_be_deleted);

WITH assets_to_be_deleted AS (SELECT id FROM asset <filter>)
DELETE FROM tag_string WHERE asset_id IN (SELECT id FROM assets_to_be_deleted);

WITH assets_to_be_deleted AS (SELECT id FROM asset <filter>)
DELETE FROM asset WHERE id IN (SELECT id FROM assets_to_be_deleted);
COMMIT;
What’s next
10 - Change the Language in Factoryinsight
This page describes how to change the language in Factoryinsight, in order to
display the returned text in a different language.
You can change the language in Factoryinsight if you want to localize the returned text, like stop codes, to a different language.
Before you begin
You need to have a UMH cluster. If you do not already have a cluster, you can create one by following the Getting Started guide.
You also need to access the system where the cluster is running, either by logging into it or by using a remote shell.
Access the database shell
sudo $(which kubectl) exec -it $(sudo $(which kubectl) get pods --kubeconfig /etc/rancher/k3s/k3s.yaml -n united-manufacturing-hub -l app.kubernetes.io/component=timescaledb -o jsonpath="{.items[0].metadata.name}") --kubeconfig /etc/rancher/k3s/k3s.yaml -n united-manufacturing-hub -- psql -U postgres
This command will open a psql shell connected to the default postgres database.
Connect to the factoryinsight database:
\c factoryinsight
Change the language
Execute the following command to change the language:
INSERT INTO configurationtable (customer, languagecode) VALUES ('factoryinsight', <code>) ON CONFLICT(customer) DO UPDATE SET languagecode=<code>;
where <code> is the language code. For example, to change the language to
German, use 0.
Supported languages
Factoryinsight supports the following languages:
| Language | Code |
|---|---|
| German | 0 |
| English | 1 |
| Turkish | 2 |
What’s next
11 - Explore Cached Data
This page shows how to explore cached data in the United Manufacturing Hub.
When working with the United Manufacturing Hub, you might want to visualize information about the cached data. This page shows how you can access the cache and explore the data.
Before you begin
You need to have a UMH cluster. If you do not already have a cluster, you can create one by following the Getting Started guide.
You also need to access the system where the cluster is running, either by logging into it or by using a remote shell.
Open a shell in the cache Pod
Get access to the instance’s shell and execute the following commands.
Get the cache password
sudo $(which kubectl) get secret redis-secret -n united-manufacturing-hub -o go-template='{{range $k,$v := .data}}{{printf "%s: " $k}}{{if not $v}}{{$v}}{{else}}{{$v | base64decode}}{{end}}{{"\n"}}{{end}}' --kubeconfig /etc/rancher/k3s/k3s.yamlOpen a shell in the Pod:
sudo $(which kubectl) exec -it united-manufacturing-hub-redis-master-0 -n united-manufacturing-hub --kubeconfig /etc/rancher/k3s/k3s.yaml -- /bin/shIf you have multiple cache Pods, you can select any of them.Enter the Redis shell:
redis-cli -a <cache-password>Now you can execute any command. For example, to get the number of keys in the cache, run:
KEYS *Or, to get the cache size, run:
DBSIZE
For more information about Redis commands, see the Redis documentation.