This is the multi-page printable view of this section. Click here to print.
Backup & Recovery
1 - Backup and Restore the United Manufacturing Hub
This page describes how to back up the following:
- All Node-RED flows
- All Grafana dashboards
- The Helm values used for installing the united-manufacturing-hub release
- All the contents of the United Manufacturing Hub database (
factoryinsightandumh_v2) - The Management Console Companion’s settings
It does not back up:
- Additional databases other than the United Manufacturing Hub default database
- TimescaleDB continuous aggregates: Follow the official documentation to learn how.
- TimescaleDB policies: Follow the official documentation to learn how.
- Everything else not included in the previous list
This procedure only works on Windows.
Before you begin
Download the backup scripts and extract the content in a folder of your choice.
For this task, you need to have PostgreSQL installed on your machine.
You also need to have enough space on your machine to store the backup. To check the size of the database, ssh into the system and follow the steps below:
sudo $(which kubectl) exec -it $(sudo $(which kubectl) get pods --kubeconfig /etc/rancher/k3s/k3s.yaml -n united-manufacturing-hub -l app.kubernetes.io/component=timescaledb -o jsonpath="{.items[0].metadata.name}") --kubeconfig /etc/rancher/k3s/k3s.yaml -n united-manufacturing-hub -- psql -U postgres
This command will open a psql shell connected to the default postgres database.
Run the following command to get the size of the database:
SELECT pg_size_pretty(pg_database_size('umh_v2')) AS "umh_v2", pg_size_pretty(pg_database_size('factoryinsight')) AS "factoryinsight";
Backup
Generate Grafana API Key
Create a Grafana API Token for an admin user by following these steps:
- Open the Grafana UI in your browser and log in with an admin user.
- Click on the Configuration icon in the left sidebar and select API Keys.
- Give the API key a name and change its role to Admin.
- Optionally set an expiration date.
- Click Add.
- Copy the generated API key and save it for later.
Stop workloads
To prevent data inconsistencies, you need to temporarily stop the MQTT and Kafka Brokers.
Access the instance’s shell and execute the following commands:
sudo $(which kubectl) scale statefulset united-manufacturing-hub-kafka --replicas=0 -n united-manufacturing-hub --kubeconfig /etc/rancher/k3s/k3s.yaml
sudo $(which kubectl) scale statefulset united-manufacturing-hub-hivemqce --replicas=0 -n united-manufacturing-hub --kubeconfig /etc/rancher/k3s/k3s.yaml
Copy kubeconfig file
To run the backup script, you’ll first need to obtain a copy of the Kubernetes configuration file from your instance. This is essential for providing the script with access to the instance.
In the shell of your instance, execute the following command to display the Kubernetes configuration:
sudo cat /etc/rancher/k3s/k3s.yamlMake sure to copy the entire output to your clipboard.
This tutorial is based on the assumption that your kubeconfig file is located at /etc/rancher/k3s/k3s.yaml. Depending on your setup, the actual file location might be different.
Open a text editor, like Notepad, on your local machine and paste the copied content.
In the pasted content, find the server field. It usually defaults to
https://127.0.0.1:6443. Replace this with your instance’s IP addressserver: https://<INSTANCE_IP>:6443Save the file as
k3s.yamlinside thebackupfolder you downloaded earlier.
Backup using the script
The backup script is located inside the folder you downloaded earlier.
Open a terminal and navigate inside the folder.
cd <FOLDER_PATH>Run the script:
.\backup.ps1 -IP <IP_OF_THE_SERVER> -GrafanaToken <GRAFANA_API_KEY> -KubeconfigPath .\k3s.yamlYou can find a list of all available parameters down below.
If
OutputPathis not set, the backup will be stored in the current folder.
This script might take a while to finish, depending on the size of your database and your connection speed.
If the connection is interrupted, there is currently no option to resume the process, therefore you will need to start again.
Here is a list of all available parameters:
| Parameter | Description | Required | Default value |
|---|---|---|---|
GrafanaToken | Grafana API key | Yes | |
IP | IP of the cluster to backup | Yes | |
KubeconfigPath | Path to the kubeconfig file | Yes | |
DatabaseDatabase | Name of the databse to backup | No | factoryinsight |
DatabasePassword | Password of the database user | No | changeme |
DatabasePort | Port of the database | No | 5432 |
DatabaseUser | Database user | No | factoryinsight |
DaysPerJob | Number of days worth of data to backup in each parallel job | No | 31 |
EnableGpgEncryption | Set to true if you want to encrypt the backup | No | false |
EnableGpgSigning | Set to true if you want to sign the backup | No | false |
GpgEncryptionKeyId | ID of the GPG key used for encryption | No | |
GpgSigningKeyId | ID of the GPG key used for signing | No | |
GrafanaPort | External port of the Grafana service | No | 8080 |
OutputPath | Path to the folder where the backup will be stored | No | Current folder |
ParallelJobs | Number of parallel job backups to run | No | 4 |
SkipDiskSpaceCheck | Skip checking available disk space | No | false |
SkipGpgQuestions | Set to true if you want to sign or encrypt the backup | No | false |
Restore
Each component of the United Manufacturing Hub can be restored separately, in order to allow for more flexibility and to reduce the damage in case of a failure.
Copy kubeconfig file
To run the backup script, you’ll first need to obtain a copy of the Kubernetes configuration file from your instance. This is essential for providing the script with access to the instance.
In the shell of your instance, execute the following command to display the Kubernetes configuration:
sudo cat /etc/rancher/k3s/k3s.yamlMake sure to copy the entire output to your clipboard.
This tutorial is based on the assumption that your kubeconfig file is located at /etc/rancher/k3s/k3s.yaml. Depending on your setup, the actual file location might be different.
Open a text editor, like Notepad, on your local machine and paste the copied content.
In the pasted content, find the server field. It usually defaults to
https://127.0.0.1:6443. Replace this with your instance’s IP addressserver: https://<INSTANCE_IP>:6443Save the file as
k3s.yamlinside thebackupfolder you downloaded earlier.
Cluster configuration
To restore the Kubernetes cluster, execute the .\restore-helm.ps1 script with
the following parameters:
.\restore-helm.ps1 -KubeconfigPath .\k3s.yaml -BackupPath <PATH_TO_BACKUP_FOLDER>
Verify that the cluster is up and running by opening UMHLens / OpenLens and checking if the workloads are running.
Grafana dashboards
To restore the Grafana dashboards, you first need to create a Grafana API Key for an admin user in the new cluster by following these steps:
- Open the Grafana UI in your browser and log in with an admin user.
- Click on the Configuration icon in the left sidebar and select API Keys.
- Give the API key a name and change its role to Admin.
- Optionally set an expiration date.
- Click Add.
- Copy the generated API key and save it for later.
Then, on your local machine, execute the .\restore-grafana.ps1 script
with the following parameters:
.\restore-grafana.ps1 -FullUrl http://<IP_OF_THE_SERVER>:8080 -Token <GRAFANA_API_KEY> -BackupPath <PATH_TO_BACKUP_FOLDER>
Restore Node-RED flows
To restore the Node-RED flows, execute the .\restore-nodered.ps1 script with
the following parameters:
.\restore-nodered.ps1 -KubeconfigPath .\k3s.yaml -BackupPath <PATH_TO_BACKUP_FOLDER>
Restore the database
Check the database password by running the following command in your instance’s shell:
sudo $(which kubectl) get secret united-manufacturing-hub-credentials --kubeconfig /etc/rancher/k3s/k3s.yaml -n united-manufacturing-hub -o jsonpath="{.data.PATRONI_SUPERUSER_PASSWORD}" | base64 --decode; echoExecute the
.\restore-timescale.ps1and.\restore-timescale-v2.ps1script with the following parameters to restorefactoryinsightandumh_v2databases:.\restore-timescale.ps1 -Ip <IP_OF_THE_SERVER> -BackupPath <PATH_TO_BACKUP_FOLDER> -PatroniSuperUserPassword <DATABASE_PASSWORD> .\restore-timescale-v2.ps1 -Ip <IP_OF_THE_SERVER> -BackupPath <PATH_TO_BACKUP_FOLDER> -PatroniSuperUserPassword <DATABASE_PASSWORD>
Restore the Management Console Companion
Execute the .\restore-companion.ps1 script with the following parameters to restore the companion:
.\restore-companion.ps1 -KubeconfigPath .\k3s.yaml -BackupPath <FULL_PATH_TO_BACKUP_FOLDER>
Troubleshooting
Unable to connect to the server: x509: certificate signed …
This issue may occur when the device’s IP address changes from DHCP to static
after installation. A quick solution is skipping TLS validation. If you want
to enable insecure-skip-tls-verify option, run the following command on
the instance’s shell before copying kubeconfig on the server:
sudo $(which kubectl) config set-cluster default --insecure-skip-tls-verify=true --kubeconfig /etc/rancher/k3s/k3s.yaml
What’s next
- Take a look at the UMH-Backup repository
- Learn how to manually backup and restore the database
- Read how to import and export Node-RED flows via the UI
2 - Backup and Restore Database
Before you begin
For this task, you need to have PostgreSQL installed on your machine. Make sure that its version is compatible with the version installed on the UMH.
Also, enough free space is required on your machine to store the backup. To check the size of the database, ssh into the system and follow the steps below:
sudo $(which kubectl) exec -it $(sudo $(which kubectl) get pods --kubeconfig /etc/rancher/k3s/k3s.yaml -n united-manufacturing-hub -l app.kubernetes.io/component=timescaledb -o jsonpath="{.items[0].metadata.name}") --kubeconfig /etc/rancher/k3s/k3s.yaml -n united-manufacturing-hub -- psql -U postgres
This command will open a psql shell connected to the default postgres database.
Connect to the umh_v2 or factoryinsight database:
\c <database-name>
Run the following command to get the size of the database:
SELECT pg_size_pretty(pg_database_size('<database-name>'));
If you need, check the version of PostgreSQL with this command:
\! psql --version
Backing up the database
Follow these steps to create a backup of the factoryinsight database on your machine:
Open a terminal, and using the
cdcommand, navigate to the folder where you want to store the backup. For example:cd C:\Users\user\backupscd /Users/user/backupscd /home/user/backupsIf the folder does not exist, you can create it using the
mkdircommand or your file manager.Run the following command to backup pre-data, which includes table and schema definitions, as well as information on sequences, owners, and settings:
pg_dump -U factoryinsight -h <remote-host> -p 5432 -Fc -v --section=pre-data --exclude-schema="_timescaledb*" -f dump_pre_data.bak factoryinsightThen, enter your password. The default for factoryinsight is
changeme.<remote-host>is the server’s IP where the database (UMH instance) is running.
The output of the command does not include Timescale-specific schemas.
Run the following command to connect to the factoryinsight database:
psql "postgres://factoryinsight:<password>@<server-IP>:5432/factoryinsight?sslmode=require"The default password is
changeme.Check the table list running
\dtand run the following command for each table to save all data to.csvfiles:\COPY (SELECT * FROM <TABLE_NAME>) TO <TABLE_NAME>.csv CSV
Grafana and umh_v2 database
If you want to backup the Grafana or umh_v2 database, you can follow the same steps
as above, but you need to replace any occurence of factoryinsight with grafana.
In addition, you need to write down the credentials in the grafana-secret Secret, as they are necessary to access the dashboard after restoring the database.
The default username for umh_v2 database is kafkatopostgresqlv2, and the password is
changemetoo.
Restoring the database
For this section, we assume that you are restoring the data to a fresh United Manufacturing Hub installation with an empty database.
Temporarly disable kafkatopostrgesql, kafkatopostgresqlv2, and factoryinsight
Since kafkatopostrgesql, kafkatopostgresqlv2, and factoryinsight microservices
might write actual data into the database while restoring it, they should be
disabled. Connect to your server via SSH and run the following command:
sudo $(which kubectl) scale deployment united-manufacturing-hub-kafkatopostgresql --replicas=0 -n united-manufacturing-hub --kubeconfig /etc/rancher/k3s/k3s.yaml;
sudo $(which kubectl) scale deployment united-manufacturing-hub-kafkatopostgresqlv2 --replicas=0 -n united-manufacturing-hub --kubeconfig /etc/rancher/k3s/k3s.yaml;
sudo $(which kubectl) scale deployment united-manufacturing-hub-factoryinsight-deployment --replicas=0 -n united-manufacturing-hub --kubeconfig /etc/rancher/k3s/k3s.yaml
Restore the database
This section shows an example for restoring factoryinsight. If you want to restore
grafana, you need to replace any occurence of factoryinsight with grafana.
For umh_v2, you should use kafkatopostgresqlv2 for the user name and
changemetoo for the password.
Make sure that your device is connected to server via SSH and run the following command:
sudo $(which kubectl) exec -it $(sudo $(which kubectl) get pods --kubeconfig /etc/rancher/k3s/k3s.yaml -n united-manufacturing-hub -l app.kubernetes.io/component=timescaledb -o jsonpath="{.items[0].metadata.name}") --kubeconfig /etc/rancher/k3s/k3s.yaml -n united-manufacturing-hub -- psql -U postgresThis command will open a
psqlshell connected to the default postgres database.Drop the existing database:
DROP DATABASE factoryinsight;Create a new database:
CREATE DATABASE factoryinsight;
\c factoryinsight
CREATE EXTENSION IF NOT EXISTS timescaledb;
Put the database in maintenance mode:
SELECT timescaledb_pre_restore();Now, open a new terminal and restore schemas except Timescale-specific schemas with the following command:
pg_restore -U factoryinsight -h 10.13.47.205 -p 5432 --no-owner -Fc -v -d factoryinsight <path-to-dump_pre_data.bak>Connect to the database:
psql "postgres://factoryinsight:<password>@<server-IP>:5432/factoryinsight?sslmode=require"Restore hypertables:
- Commands for factoryinsight:
SELECT create_hypertable('productTagTable', 'product_uid', chunk_time_interval => 100000); SELECT create_hypertable('productTagStringTable', 'product_uid', chunk_time_interval => 100000); SELECT create_hypertable('processValueStringTable', 'timestamp'); SELECT create_hypertable('stateTable', 'timestamp'); SELECT create_hypertable('countTable', 'timestamp'); SELECT create_hypertable('processValueTable', 'timestamp'); - Commands for umh_v2
SELECT create_hypertable('tag', 'timestamp'); SELECT create_hypertable('tag_string', 'timestamp'); - Grafana database does not have hypertables by default.
- Commands for factoryinsight:
Run the following SQL commands for each table to restore data into database:
\COPY <table-name> FROM '<table-name>.csv' WITH (FORMAT CSV);Go back to the terminal connected to the server and take the database out of maintenance mode. Make sure that the databsae shell is open:
SELECT timescaledb_post_restore();
Enable kafkatopostgresql, kafkatopostgresqlv2, and factoryinsight
Run the following command to enable kafkatopostgresql, kafkatopostgresqlv2, and factoryinsight:
sudo $(which kubectl) scale deployment united-manufacturing-hub-kafkatopostgresql --replicas=1 -n united-manufacturing-hub --kubeconfig /etc/rancher/k3s/k3s.yaml;
sudo $(which kubectl) scale deployment united-manufacturing-hub-kafkatopostgresqlv2 --replicas=1 -n united-manufacturing-hub --kubeconfig /etc/rancher/k3s/k3s.yaml;
sudo $(which kubectl) scale deployment united-manufacturing-hub-factoryinsight-deployment --replicas=2 -n united-manufacturing-hub --kubeconfig /etc/rancher/k3s/k3s.yaml
What’s next
- See the official TimescaleDB migration guide
- See the official pg_dump documentation
3 - Import and Export Node-RED Flows
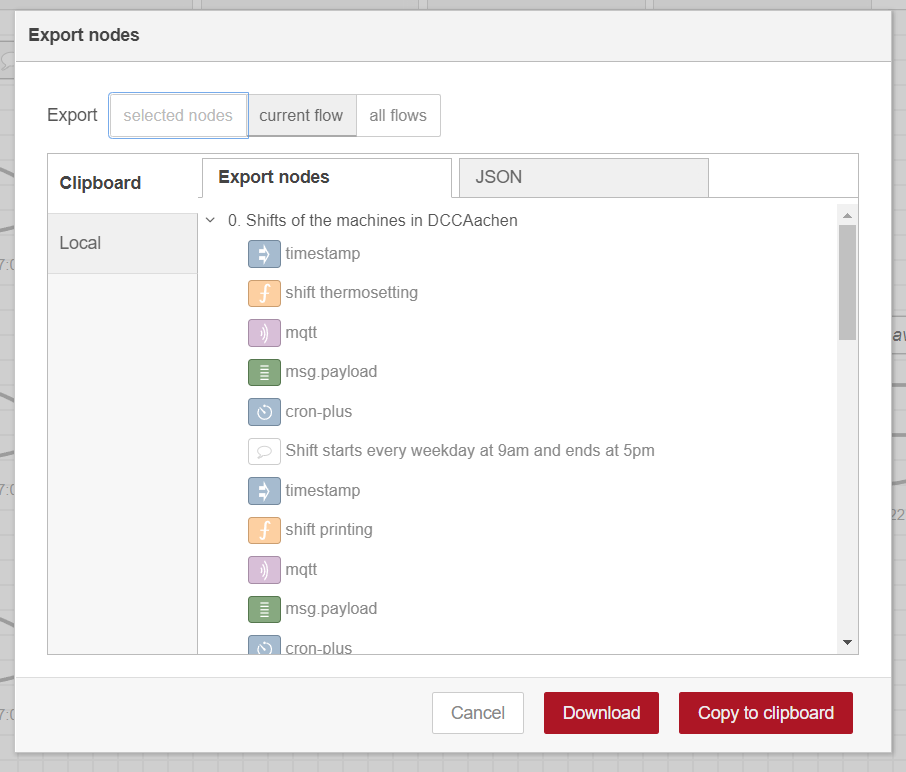
Export Node-RED Flows
To export Node-RED flows, please follow the steps below:
Access Node-RED by navigating to
http://<CLUSTER-IP>:1880/noderedin your browser. Replace<CLUSTER-IP>with the IP address of your cluster, orlocalhostif you are running the cluster locally.From the top-right menu, select Export.
From the Export dialog, select wich nodes or flows you want to export.
Click Download to download the exported flows, or Copy to clipboard to copy the exported flows to the clipboard.

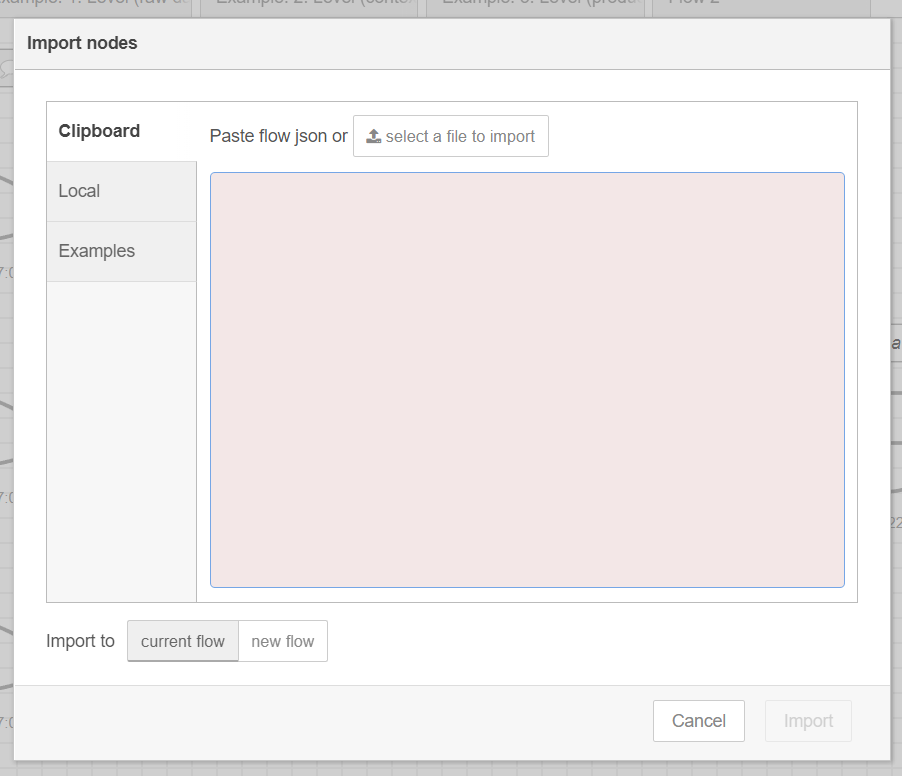
Import Node-RED Flows
To import Node-RED flows, please follow the steps below:
Access Node-RED by navigating to
http://<CLUSTER-IP>:1880/noderedin your browser. Replace<CLUSTER-IP>with the IP address of your cluster, orlocalhostif you are running the cluster locally.From the top-right menu, select Import.
From the Import dialog, select the file containing the exported flows, or paste the exported flows from the clipboard.
Click Import to import the flows.